Queries
The Business Object – Queries
Queries are written to retrieve data from the database or do database operations (insert, update, delete) using rules. In the platform, use queries to manipulate data in the data flows. In query processing, it takes various steps for fetching the data from the database. By using the business entity, Query you can access, retrieve and manipulate data.
You can create Queries at different levels (organization level and data flow level) to achieve your requirement. This document explains how to work with queries at the data flow level.
Note
Queries are utilized in data flows and hence it is mandatory to map a Data Model for the creation of a query, and the Data Model is created and designed from the data source.
Organization and Local Level Queries
The organization-level queries or the data flow level queries have the same configurations and properties except that organization-level queries apply to the whole organization and local queries created within a data flow module apply to that data flow only.
- Go to Main Menu > App Studio > Queries for managing the organization-level Queries.
- Go to Main Menu > App Studio > Applications > open [Application_Name] > Data Flow > open [Data_Flow_Name] > Queries for managing the local-level Queries.
Note
In this user manual, the procedures and functionalities of the entity Queries is explained considering the local scope or data flow level.
Viewing Organization-Level Queries
-
Go to Main Menu > App Studio > Queries.
The page displays all the Queries that can be used at the organization level.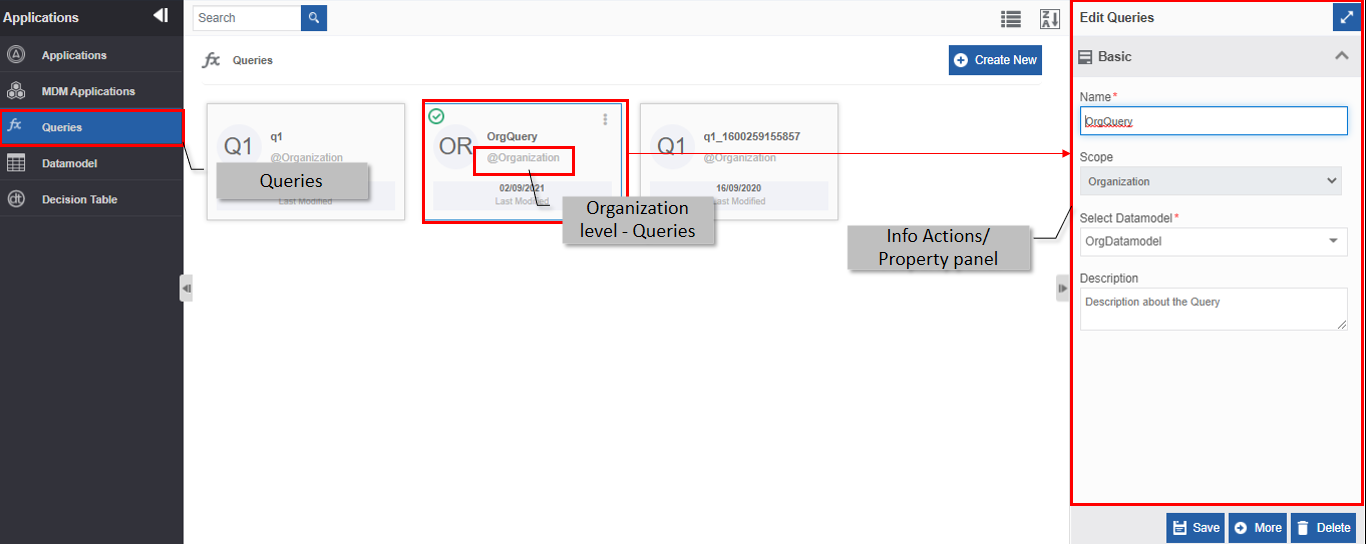
Viewing Local Queries
Local entities are those entities associated with any of the flow modules. The queries associated with each data flow will appear within that data flow.
Query is appliable for data flows.
- Go to Main Menu > App Studio > Applications > open [Application_Name] > Data Flow > open [Data_Flow_Name].
-
Select Queries on the left side panel to view the local Queries for the data flow module.
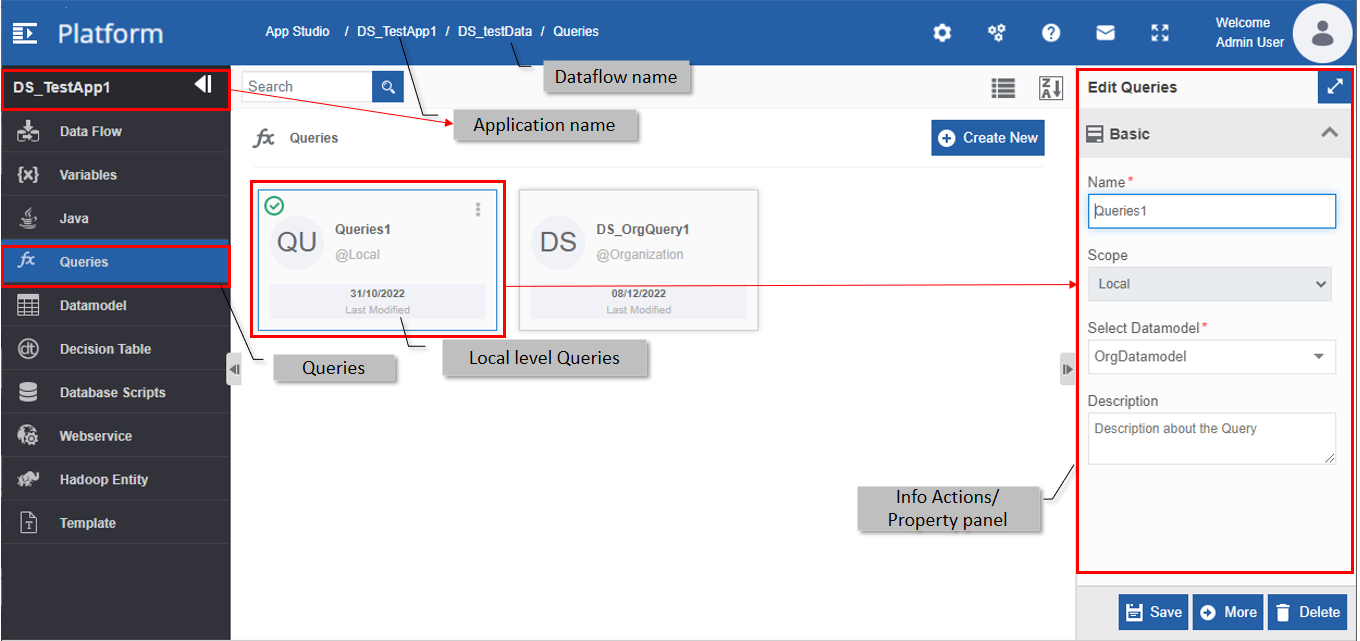
Creating New Query
You can create a query with a specified set of rules/conditions as per the requirement.
Prerequisites:
Datamodel –
App Studio > Datamodel (Organization level)
or
App Studio > Applications > Data Flow > Datamodel (Data Flow level)
To create a new query:
-
Go to Main Menu > App Studio > Applications > open [Application_Name] > Data Flow > open [Data_Flow_Name] > Queries
or
Go to Main Menu > App Studio > Queries
The list of Queries appears.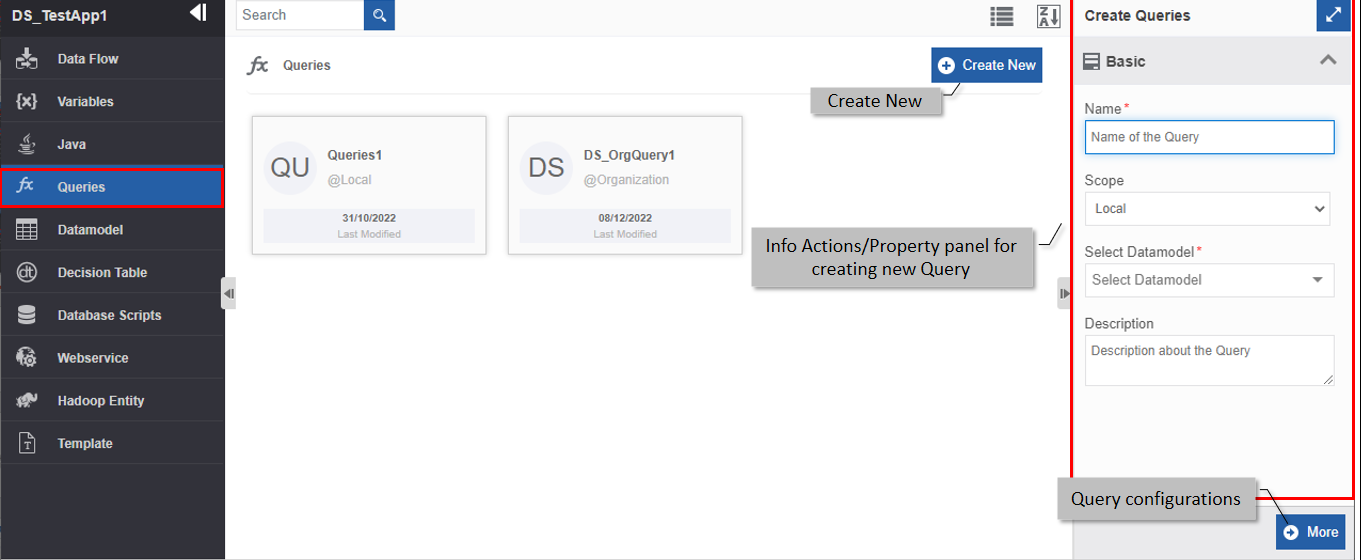
-
Click Create New. The Info Actions panel appears as Create Queries.
-
Enter the Basic details in the Create Query panel as explained below.
Field Description Name* Enter the name for the query.
Character limit: 50.
Data type: Alphanumeric, underscore and single space. Whitespace is not allowed.Scope* Select the required scope – Local or Organization .
- If you create the query within data flow module, you can select Local or Organization scope.
- If you create the query at the organization level, you can select only Organization scope.
You cannot edit the scope of an entity.Select Datamodel* Select the Datamodel that you have configured for the query. Description Enter a description for the Queries. -
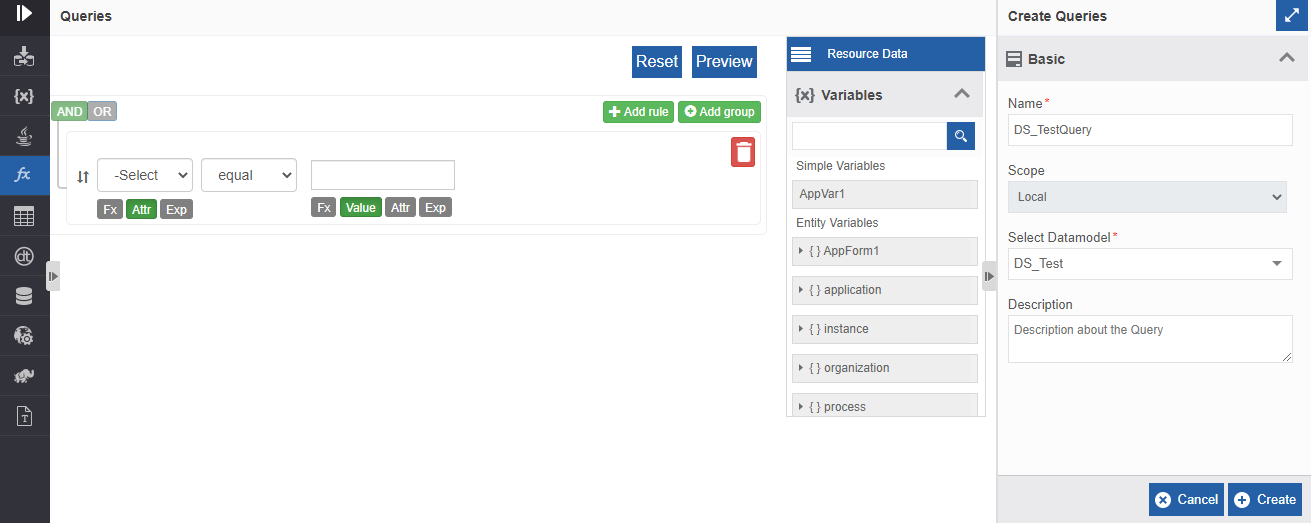
Click More. Query builder appears.
-
Define the query using the query builder. Refer to Query Builder.
- Click Create.
Query Builder
-
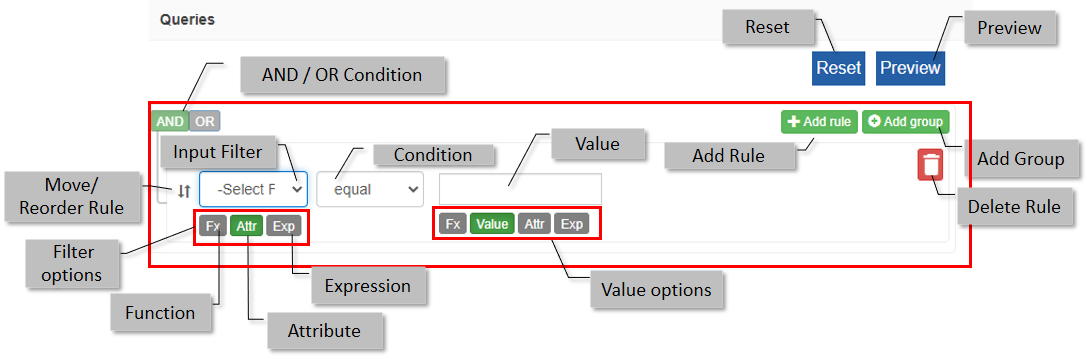
Provide Input Filter. The Select Filter (for Attr) displays the fields or columns that are captured from the selected Datamodel.
You can provide the input filter using the Attributes, Functions, and Expression features available in the query builder.- To create a Query rule using Attributes, refer to Creating Queries Using Attributes and Functions.
- To create a Query rule using Expressions, refer to Creating Queries Using Expressions.
- You can drag the variables from the Resource Data to the fields as needed.
-
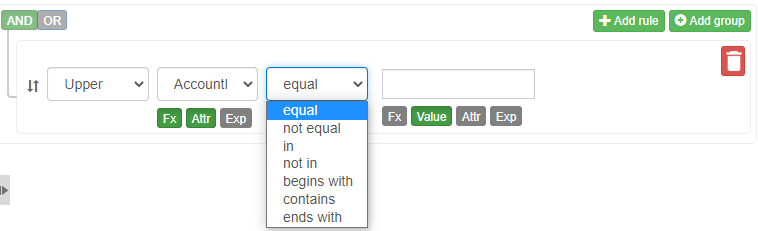
Click and select a condition. Conditions are listed based on the input filter provided.
-
Click any value option (Value, Attr, Attr-Fx, or Exp) and enter the value for the selected LHS input.
- For a detailed explanation of how to create a Query rule using Attributes and Functions, refer to Creating Queries Using Attributes and Functions.
- For a detailed explanation of how to create a Query rule using Expressions, refer to Creating Queries Using Expressions.
-
Click Add Rule to add multiple rules. When you add multiple groups, there will be only one AND or OR operator associated with those rules.
-
Click Add Group to group multiple rules. For each group you add, you can define an operator for that group.
- To group multiple rules using AND condition or OR condition, refer to Grouping Multiple Rules.
-
Click and drag ⮃ symbol on the left of the rule to move the rule to the desired order.
- Click the delete icon on the right side of the rule to remove a rule.
- Click Reset on the top-right of the query builder to reset the rules. Reset features clear all the rules that you defined and display a fresh view for creating a new rule.
-
Click Preview on the top-right of the query builder to preview the rule structure created.
Click Close or close mark to close the Rules Preview.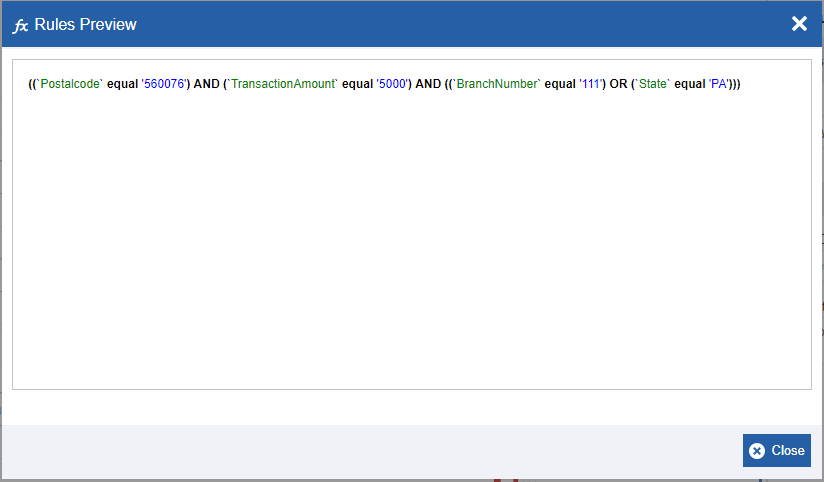
-
Click Create. If the details provided are correct and valid, a query with the provided details is created else an error message appears with the details.
Note
If you do not provide information in the Rule editor, it will throw you an error while creating/saving (that is when you click Create or Save) the details and display a warning icon.
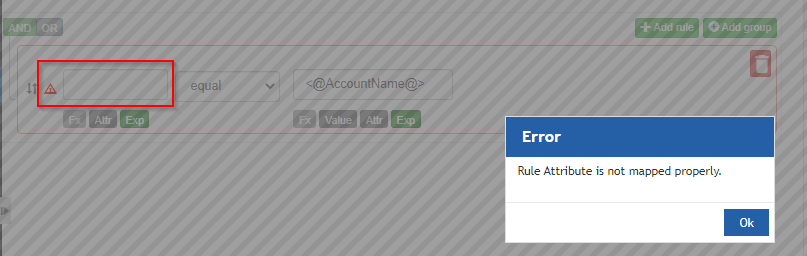
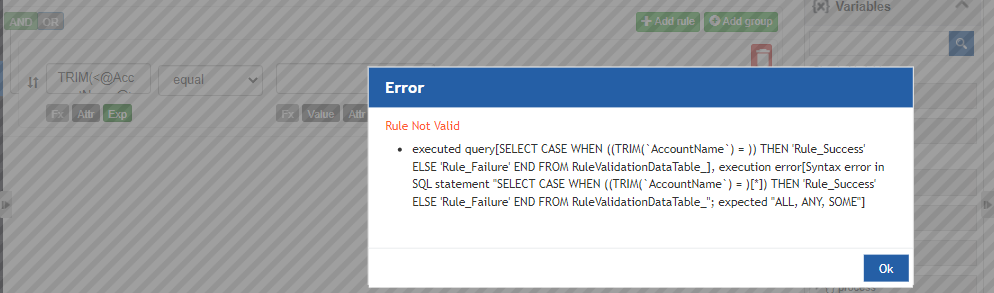
If the rule that you created is invalid, “Rule Not Valid” error is thrown.
Creating Queries Using Attributes and Functions
Attributes and functions allow you to create queries for the attributes in the Data Model. The list of attributes that populate in the relevant fields is dependent on the Data Model that you choose. The Attributes and Functions apply to both the LHS and RHS section of the rule template.
- Go to Main Menu > App Studio > Applications > open [Application_Name] > Data Flow > open [Data_Flow_Name] > Queries and provide the required details in the Basic section.
- Click More to display the Queries configuration and rule details.
-
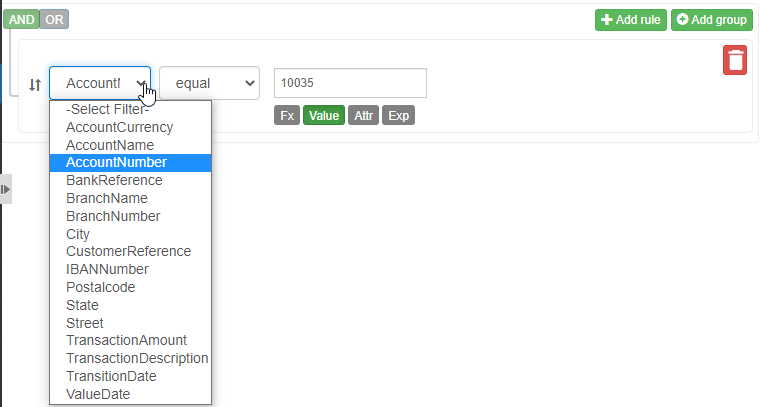
In the Rules Builder section, click Attr (Attr is selected by default for the LHS and RHS sections). The Select Filter displays the fields or columns that are captured from the selected Data Model.
-
If you need to apply a function for the selected attribute, click Fx and select the function from the drop-down.
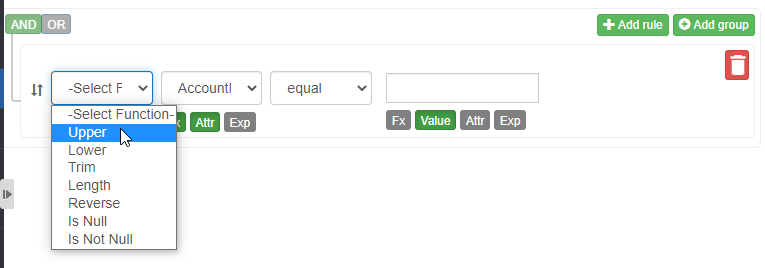
- Fx is enabled only if you click Attr; as the function is applied for the attributes.
- Upper – Returns the uppercase value of the attribute.
- Lower – Returns the lowercase value of the attribute.
- Trim – Trims out the space characters at the beginning and end of the attribute value.
- Reverse – Returns the reverse order of the attribute value.
- Is Null – Returns 1 if the attribute value is null.
- Is Not Null – Returns 1 if the attribute value is not null.
-
Click any of the Value options in the RHS. You can provide details in the RHS value options using the Attr or Attr-Fx as explained above.
Creating Queries Using Expressions
You can define queries using the features and functions available in the Expression Builder. Expression builder is used to define complex business rules by providing expressions as the input to the queries.
- Go to Main Menu > App Studio > Applications > open [Application_Name] > Data Flow > open [Data_Flow_Name] > Queries and provide the required details in the Basic section.
- Click More to display the Queries configuration and rule details.
-
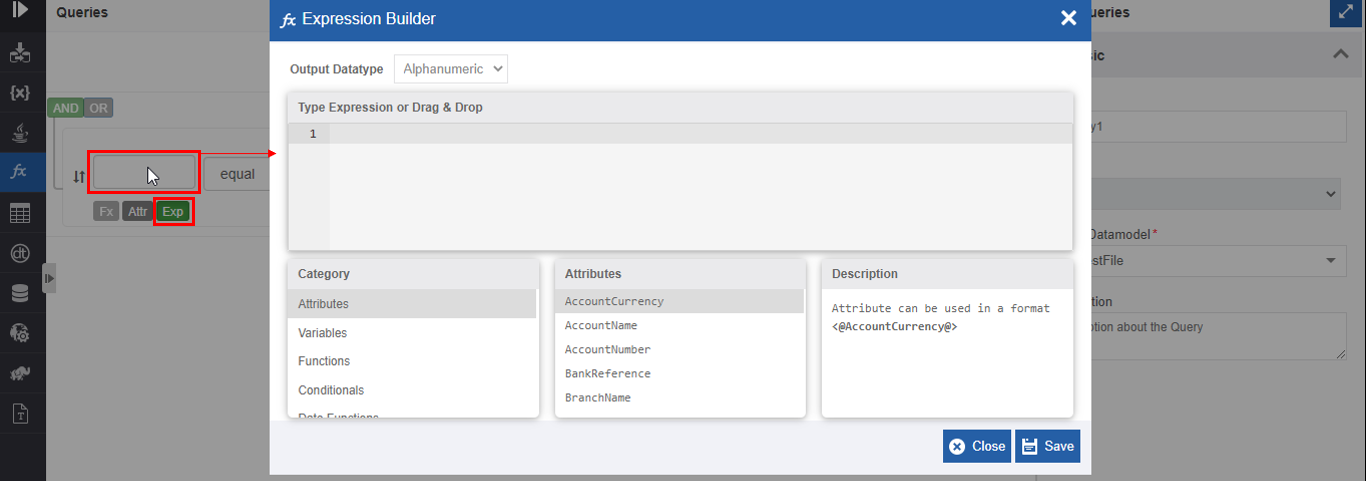
In the Rules builder section - either for LHS input or RHS input of a condition, click Exp and then click the input text box. The Expression Builder pop-up appears. (You can frame rules for Exp in the LHS input or RHS input option in the same way).
-
In the Output Datatype drop-down, select the data type of the output value for the expression to be defined.
Note
Output Datatype is applicable only for the input field in the LHS. For the RHS value Exp, Output Datatype is not applicable.
-
In the “Type Expression or Drag & Drop” section, create the required expression. You can drag & drop the attributes, Functions, etc by choosing a Category first and then selecting the input as needed for framing rules or you can type directly on the section.
In the Category, select the category from which you need to take the input. The adjacent section displays the details of the corresponding selected category.
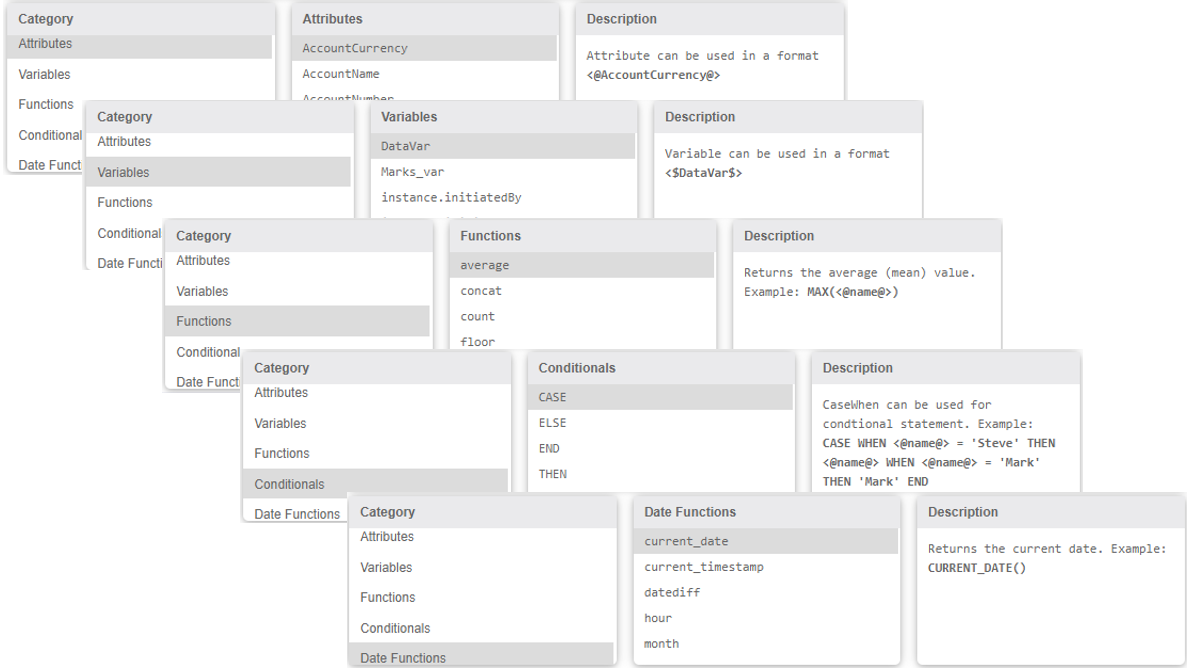
Select an item from the adjacent section and the Description section will display the description of the selected item.
Refer to Expression Builder Categories for a detailed explanation of how to build/define expressions using the Functions, Conditionals, and Date Functions.
-
Click Save to load the expression in the Expression builder for the selected input.
Expression Builder Categories
Attributes
The Attribute category displays the list of attributes of the Data Model that is mapped.
Format: \<@AttributeName@>
Attributes are used in the format \<@AttributeName@> in the Expression builder for creating the expressions.
Variables
The Variable category displays the list of variables in the data flow which are combinations of user-defined and system variables in the data flow.
Format: \<\$VariableName\$>
Variables are used in a format \<\$VariableName\$> in the Expression builder for creating the expressions.
Functions
The Functions category displays the list of functions that can be used within the expression builder to achieve desired results. Functions need to be used along with variables and/or data model attributes.
The Functions listed in the Expression builder are explained below.
| Function | Description | Syntax/Example |
|---|---|---|
| average | Returns the average (mean) value of the rows as the result. | Syntax : AVG(Input) Example : AVG(<@AmountCol@>) |
| concat | Combines strings and returns the concatenated value. | Syntax : CONCAT(Input1,Input2) Example : CONCAT(<@name@>, <$var_name$>) |
| count | Returns the count of the number of records for the selected input attribute of the data model. | Syntax: COUNT (Input) Example : COUNT(<@name@>) |
| floor | Returns the largest integer value that is less than or equal to the argument. | Syntax : FLOOR(Input) Example : FLOOR(-0.1) |
| instr | Returns the location of a search string occurrence in the string input. | Syntax : INSTR(String,SearchString) Example: INSTR('DemoSQL', 'SQL') Result: 5 |
| length | Returns the number of characters in the string. | Syntax : LENGTH(Input) Example : LENGTH(<@name@>) |
| lower | Returns the string with all characters changed to lowercase. | Syntax: LOWER (Input) Example : LOWER(<@name@>) |
| ltrim | Removes all leading spaces from a string | Syntax: LTRIM(Input , characterToTrimString) Example : LTRIM(<@name@>, ‘_’) |
| maximum | Returns the highest numerical or decimal value for the input attribute of a data model. | Syntax : MAX(Input) Example : MAX(<@name@>) |
| minimum | Returns the lowest value. If no rows are selected, the result is NULL. Applicable only to select statements. |
Syntax : MIN(Input) Example : MIN(<@name@>) |
| mod | Mod stands for the Modulus expression. The Modulus is the remainder of the Euclidean division of one number by another. | Syntax: MOD (dividendNumeric , divisorNumeric) Example: MOD(2, 1.8) Result: 0.2 |
| regexp_replace | Replaces each substring that matches a regular expression. | Syntax : REGEXP_REPLACE(InputString, RegexString, ReplacementString) Example: REGEXP_REPLACE(<@Attr@>, ’+’ , ’ ‘) |
| replace | Replaces all occurrences of a search string in a text with another string. | Syntax: REPLACE(str, search, replace) Example: REPLACE(<@Attr@>, “fly”, ”paper”) |
| round | Rounds to a number of fractional digits. | Syntax: ROUND(input, frac)) Example: ROUND(2.5, 0); 3.0 |
| rtrim | Removes the right trailing spaces from the string. | Syntax: RTRIM(trimStr, str) Example : RTRIM(<@name@>, ‘ ‘) |
| substring | Returns the substring of string (str) that starts at position (pos) of specific length (len). | Syntax: SUBSTRING(str, pos, len]) Example : SUBSTRING(<@name@>, 2, 4) |
| sum | Returns the sum of values in an attribute of datamodel in a numerical or decimal format based on input. | Syntax: SUM(<@name@>) |
| trim | Removes all trailing spaces from a string. | Syntax : TRIM(BOTH trimStr FROM INPUT) Example : TRIM(BOTH ‘_‘ FROM <@Attr@>) |
| upper | Converts a string to uppercase. | Syntax: UPPER(<@name@>) |
Conditionals
The Conditionals category contains the list of conditionals that can be used within the expression builder to achieve desired results.
The Conditionals supported in the Expression builder are explained below.
| Conditionals | Description | Syntax/Example |
|---|---|---|
| CASE | “Case” can be used for conditional statements. Output is based on the conditions provided in the “When” syntax. | CASE WHEN <@name@> = 'Steve' THEN <@name@> WHEN <@name@> = 'Mark' THEN 'Mark' END |
| ELSE | “Else” is used for providing a default action. | WHEN <@name@> = 'Mark' THEN 'Mark' ELSE <@name@> |
| END | End is used as terminate/finish the Case/When statement. | END |
| THEN | Then is used for providing an action on certain conditions. | WHEN <@name@> = 'Steve' THEN CONCAT(<@name@>,'_Success') |
| WHEN | When is used for providing a condition. | WHEN <@name@> = 'Steve' THEN |
Date Functions
The Date Functions category contains the list of date functions that can be used within the expression builder to achieve desired results.
The Date Functions supported in the Expression builder are explained below.
| Date Functions | Description | Syntax/Example |
|---|---|---|
| current_date | Returns the current date. | CURRENT_DATE() |
| current_timestamp | Returns the current timestamp with time zone. | CURRENT_TIMESTAMP() |
| datediff | Returns the number of days difference between the two dates provided. | DATEDIFF(CURRENT_DATE(), <@date_attribute@>) |
| hour | Returns the hour component of the string/timestamp. | HOUR('2009-07-30 12:58:59') = 12 |
| month | Returns the month component of the date/timestamp. | MONTH('2016-07-30') = 7 |
| quarter | Returns the quarter of the year for date, in the range 1 to 4. | QUARTER('2016-08-31') = 3 |
| second | Returns the second component of the string/timestamp. | SECOND('2009-07-30 12:58:59') = 59 |
| year | Returns the year component of the date/timestamp. | YEAR('2009-07-30 12:58:59') = 2009 |
Grouping Multiple Rules
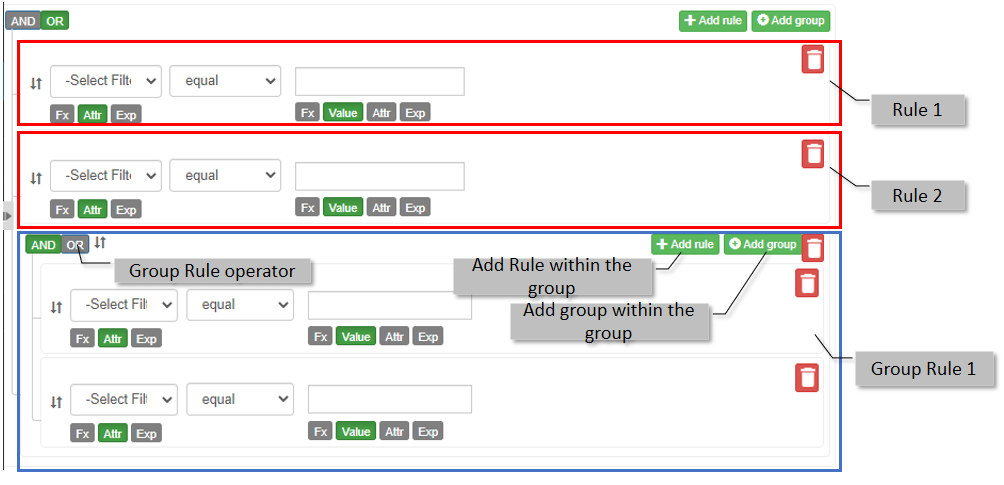
You can add multiple rules in a query and group those rules using AND or OR operator. In this case, there will be multiple rules and a single AND or OR operator for the rules.
If you want to design a complex query with multiple rules and multiple operators, you need to group the rules. You can club the rules with AND operator in a group and in the same way club the rules with OR operator in another group and these two groups can be defined with any of the operators.
You can create nested rule groups using Add Group feature to achieve specific results.
The preview feature allows you to view the script format of the rules created.
- Go to Main Menu > App Studio > Applications > open [Application_Name] > Data Flow > open [Data_Flow_Name] > Queries and provide the required details in the Basic section.
- Click More to display the Queries configuration and rule details.
- Click Add Rule to add multiple rules.
-
Click Add Group for grouping group. A group gets added with the AND/OR operator.
-
Click Add Rule within a group to add rules within that group.
- Click Add Group within a group to add nested groups.
Note
Only one operator can be assigned to one group. That is, a group can have multiple rules with “AND” operator and another group can have multiple rules with “OR” operator. You cannot create a group with both AND and OR operators together.
Viewing and Editing Queries
Make sure to unlock the application before editing if you want to edit the details of the query object that is not created by you.
- Go to Main Menu > App Studio > Applications > open [Application_Name] > Data Flow > open [Data_Flow_Name] > Queries
or
Go to Main Menu > App Studio > Queries
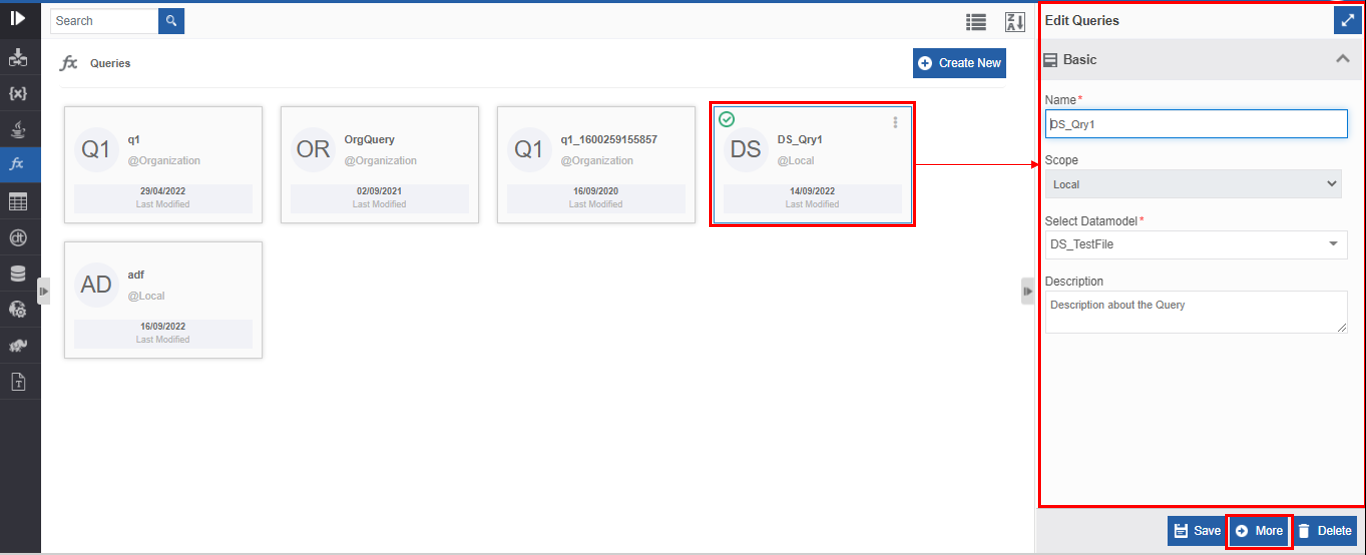
The list of Queries appears. -
Click the Query card to view the details of the selected query. The details of the query appear in the Info Actions panel (Edit Queries).
-
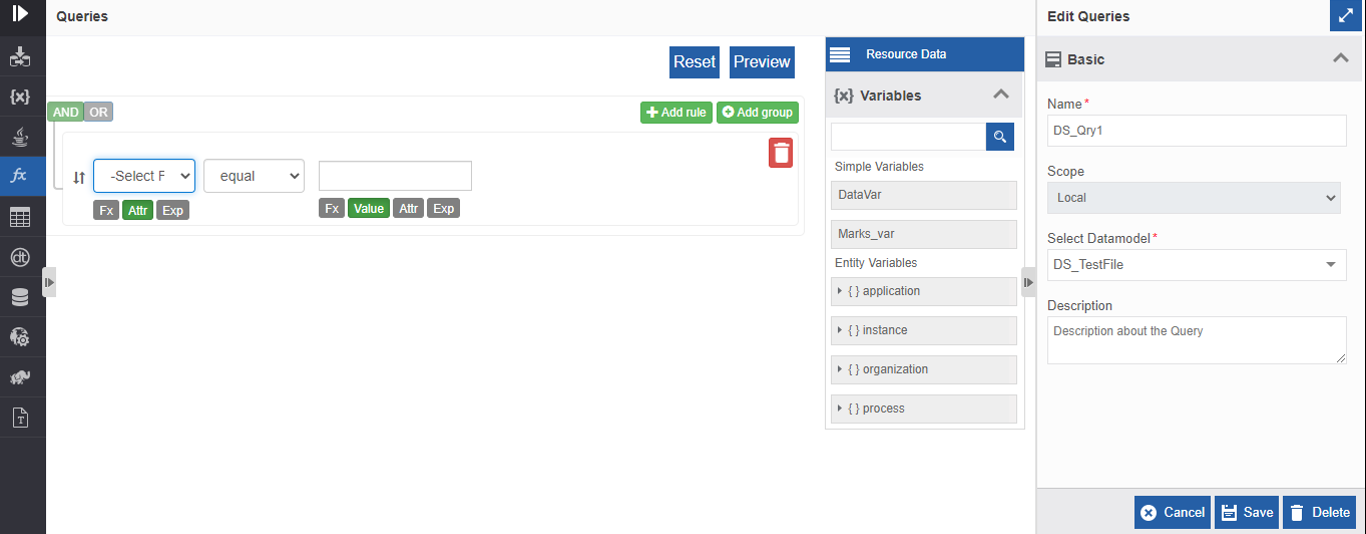
Click More for viewing query builder and configuration details.
-
Edit the query details as needed.
- Click Save.
Viewing Query Associations
- Go to Main Menu > App Studio > Applications > open [Application_Name] > Data Flow > open [Data_Flow_Name] > Queries
or
Go to Main Menu > App Studio > Queries
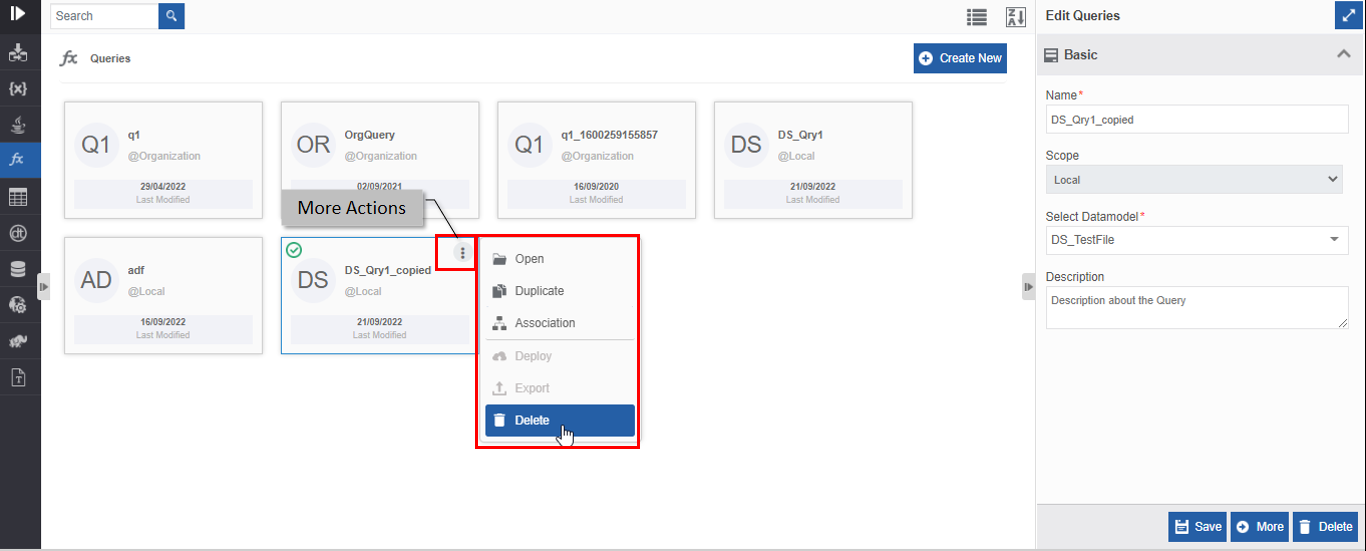
The query list appears. - Hover over any query card. Three dots appear on the upper right side of the card.
-
Click the three dots. More Actions appear.
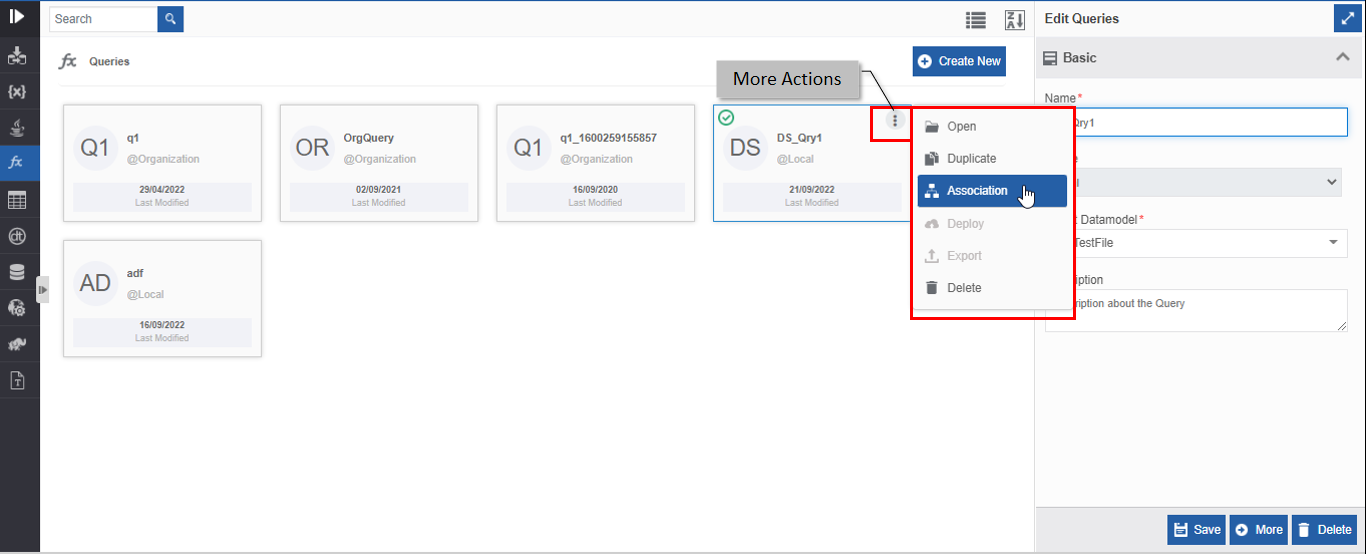
-
Click Associations. The association of the query with the application, data flow, and activities appear in a pop-up.
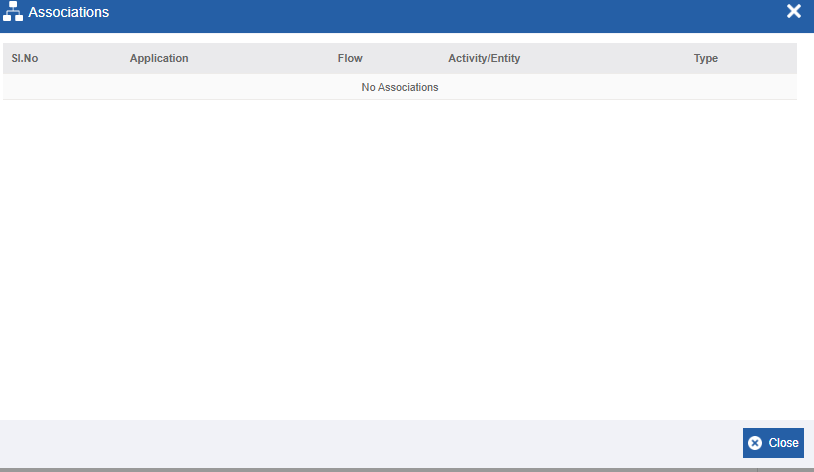
- Application – The application in which the query is utilized.
- Flow - The flow in which the query is utilized.
- Activity/Entity - The activity name in which the query is utilized.
- Type - The type of entity or activity.
Duplicating Queries
Make sure to unlock the application before duplicating an entity that is not created by you. When you duplicate a query, the associations are not duplicated.
- Go to Main Menu > App Studio > Applications > open [Application_Name] > Data Flow > open [Data_Flow_Name] > Queries
or
Go to Main Menu > App Studio > Queries
The list of Queries appears. - Hover over the query card that you want to duplicate. Three dots appear on the upper right side of the card.
-
Click the three dots. More Actions appear.
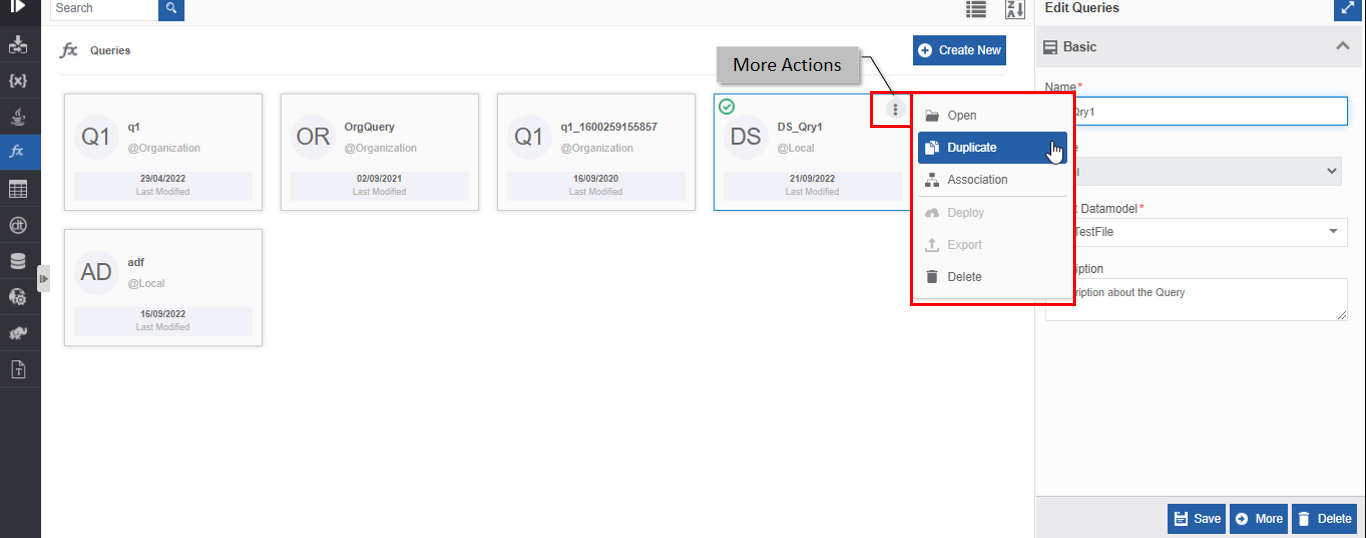
-
Click Duplicate. A confirmation pop-up appears.
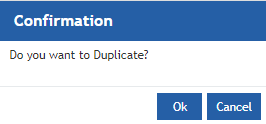
-
Click Ok for duplicating the query (or you can click Cancel to cancel the duplicate action). A Success message appears on the successful duplication of the query.
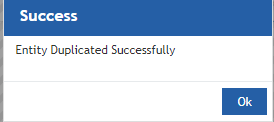
-
Click Ok. A duplicate copy of the query appears on the Queries page with the same name suffixed with “_copied”.
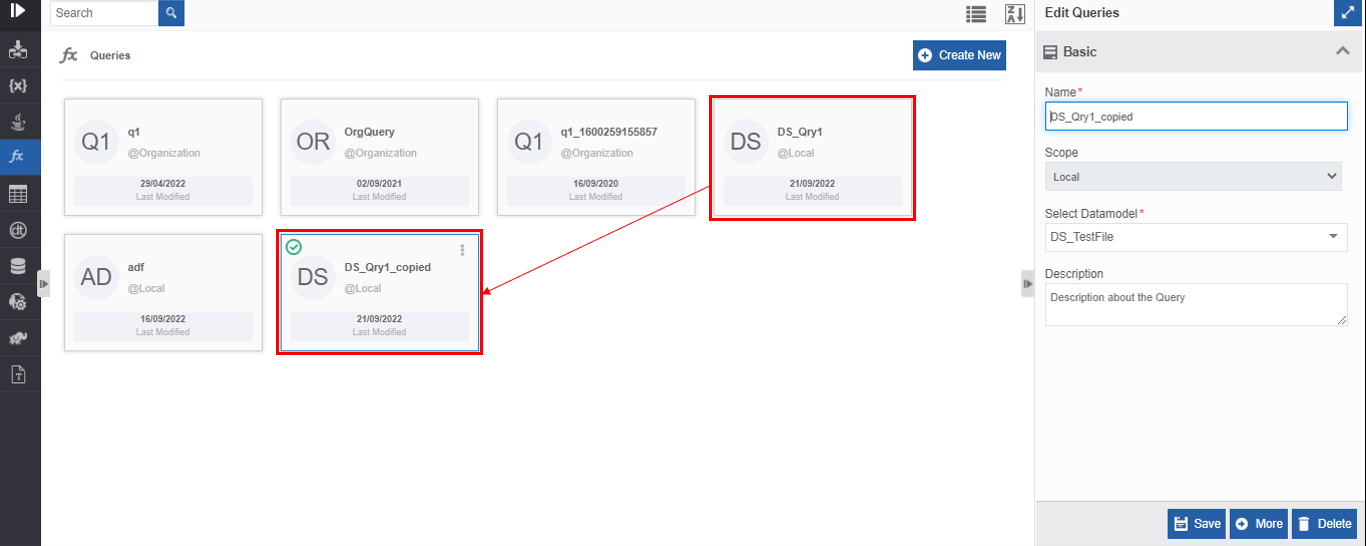
Deleting Queries
Make sure to unlock the application before deleting an entity that is not created by you. Also, you cannot delete the entity if it is associated with any activity or entity.
- Go to Main Menu > App Studio > Applications > open [Application_Name] > Data Flow > open [Data_Flow_Name] > Queries
or
Go to Main Menu > App Studio > Queries
The list of Queries appears. -
Click the query name card that is to be deleted. The lower-right of the page displays Delete.
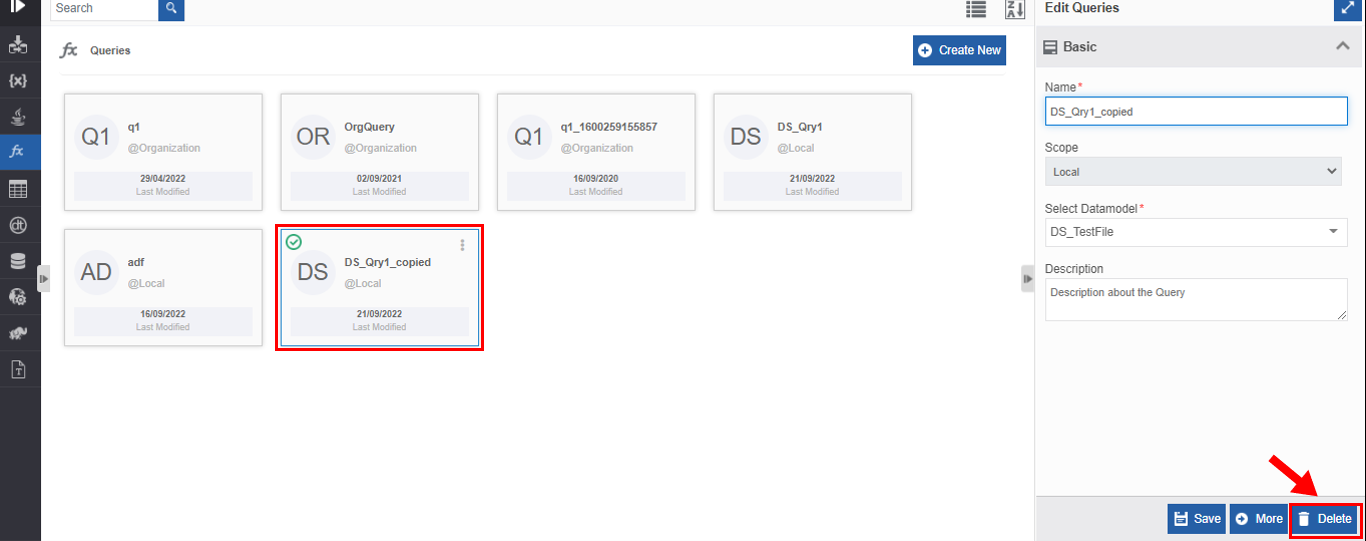
-
Click Delete. A Confirmation pop-up for delete appears.
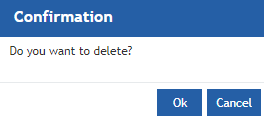
-
Click Ok for deleting the query.
Or
Click Cancel to cancel the action.
Alternatively, you can follow the below steps to delete the query:
- Go to Main Menu > App Studio > Applications > open [Application_Name] > Data Flow > open [Data_Flow_Name] > Queries.
- Hover over the query card. Three dots appear on the upper right side of the card.
- Click the three dots. More Actions appear.
-
Click Delete and follow step 6 in the above procedure.
Utilizing Queries
Accessing Queries through Activity
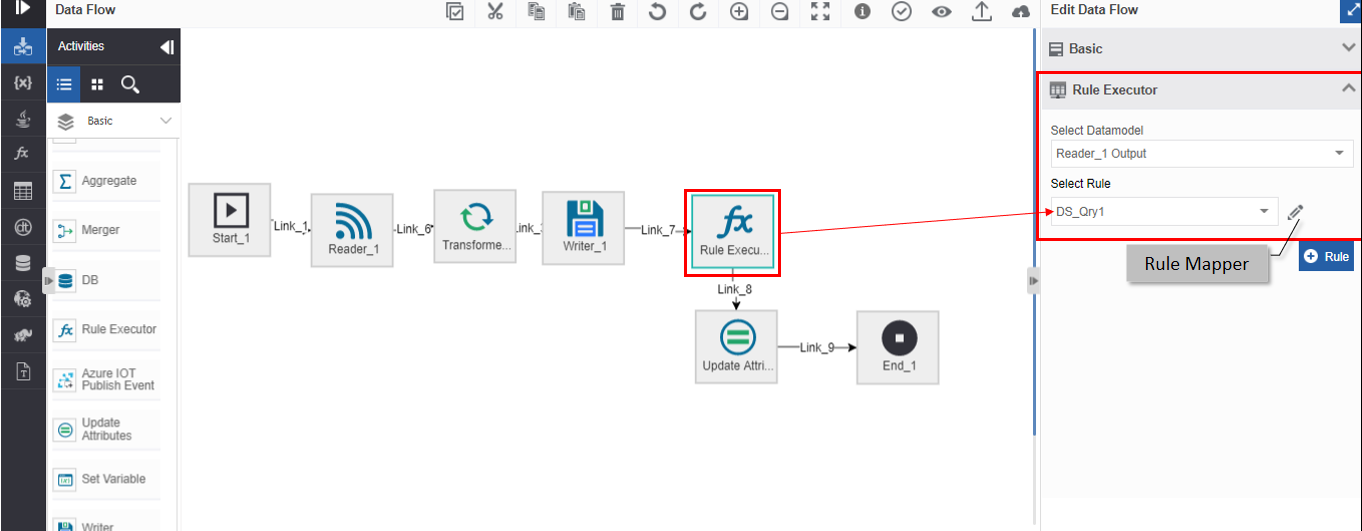
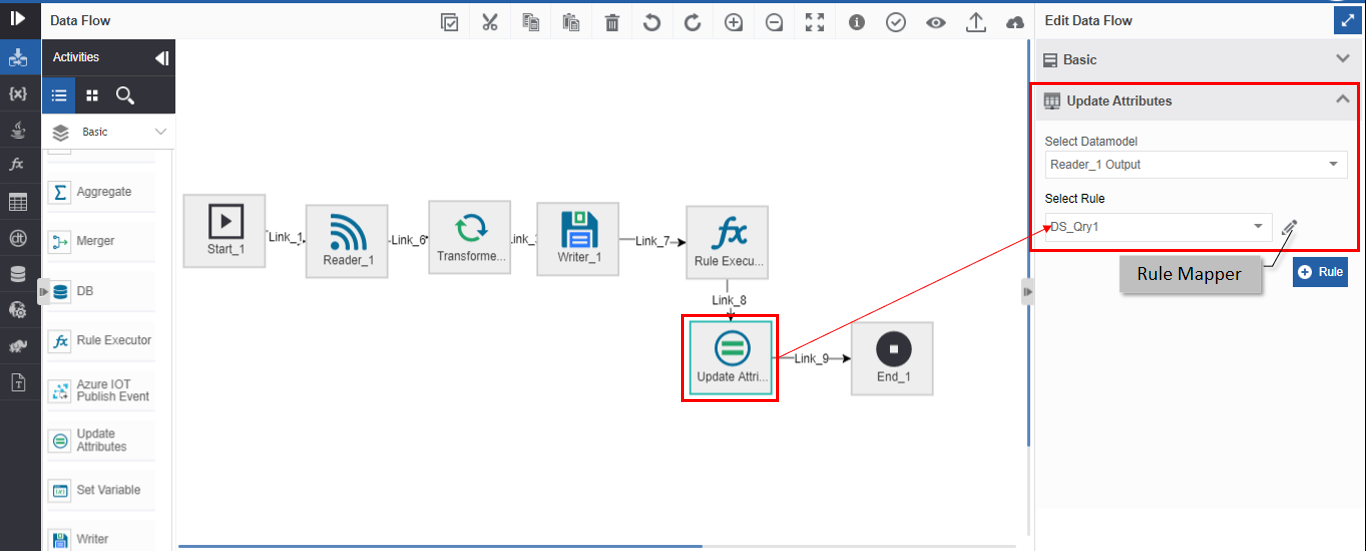
You can map Queries to the activity Rule Executor and Update Attributes in the data flows.
- Go to Main Menu > App Studio > Applications > open [Application_Name] > Data Flow and create a data flow (with Rule Executor and/or Update Attribute mapped with Queries) as per your requirement.
-
Click Rule Executor / Update Attributes accordion. Query mapping details appear.
-
Click the Select Rule box for viewing the list of all Queries.
- Select the required Query.
-
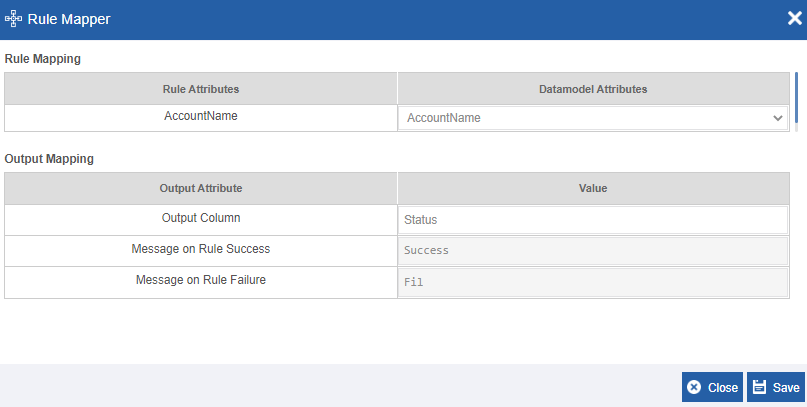
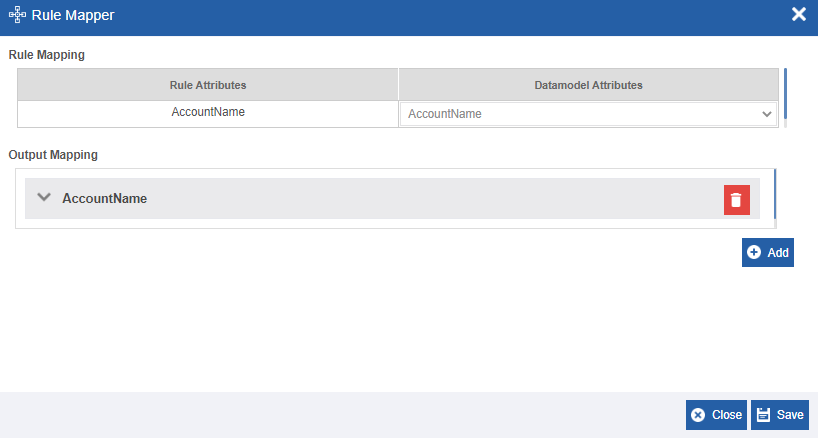
Click the pencil icon (Rule Mapper) adjacent to the selected Query for configuring the rule mapping.
-
Configure the details as required.
- Click Save.
- Deploy the data flow. It is mandatory to deploy the data flow to view the corresponding Queries in the activity configuration.
Accessing Queries in Rule Editor Widget
You can view the Rule Editor on a platform page by configuring the Rule Editor widget.
It is mandatory to deploy the data flow for viewing the query details in the Rule Editor.
In the Rule Editor, you can modify the details of rule details and the changes are reflected in the latest version of the data flow without further deployment. The modifications that are done in the Rule Editor do not reflect in the Queries entity at the designer level (that is, in the App Studio > Data Flows > Queries).
- Go to Main Menu > App Studio > Applications > open [Application_Name] > Data Flow and create a data flow (with Rule Executor and/or Update Attribute mapped with Queries) as per your requirement.
- Deploy the data flow. It is mandatory to deploy the data flow to view the corresponding Queries in the Rule Editor.
-
Create a page on the platform.
(On the title bar, click the Administration icon, and then in the left side menu click Public Pages > “+” (Add Page) > Widget Page (Basic Templates) > Enter the name of the page in Add Page > Add).
-
Navigate to the page that you created in the platform (click the page name on the Main Menu).
- On the title bar, click the Administration icon (
 ) and then click the “+” icon. Add Widgets and Contents section appears on the right side.
 - In the Add Widgets and Contents panel, click the Widgets tab and then navigate to PLATFORM > Rule Editor.
-
Click and drag the Rule Editor to the page or click the “+” icon on the right side of the Rule Editor. The Rule Editor widget is added to the page.
Note
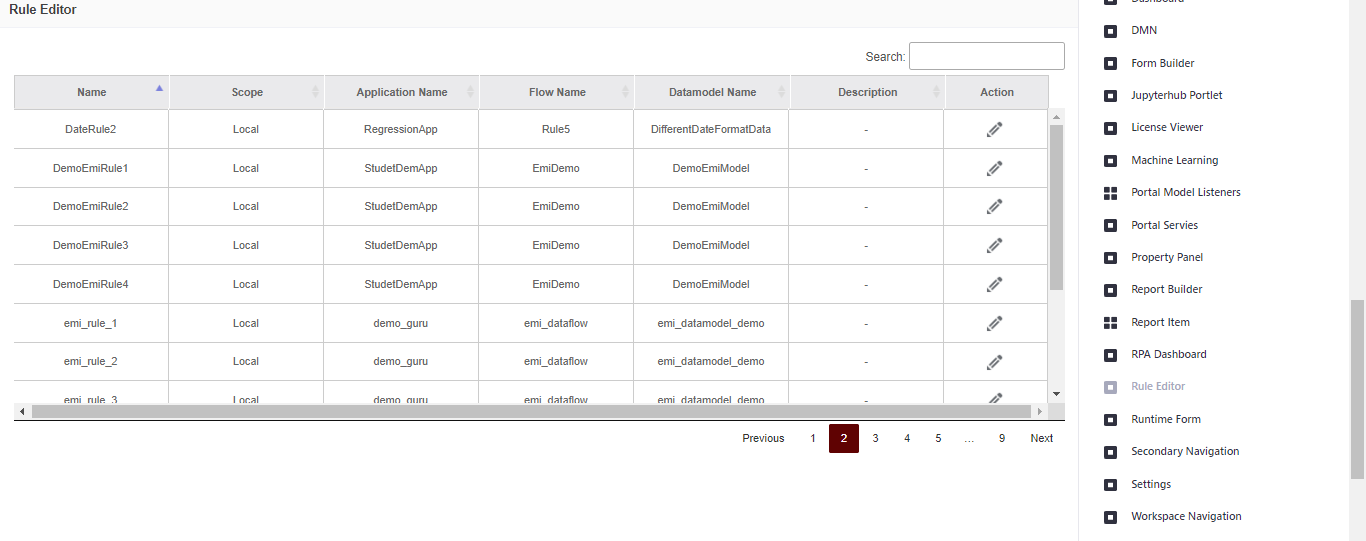
The Rule Editor widget displays all the Queries in the deployed data flows created by all the users of the organization irrespective of the user permissions.
-
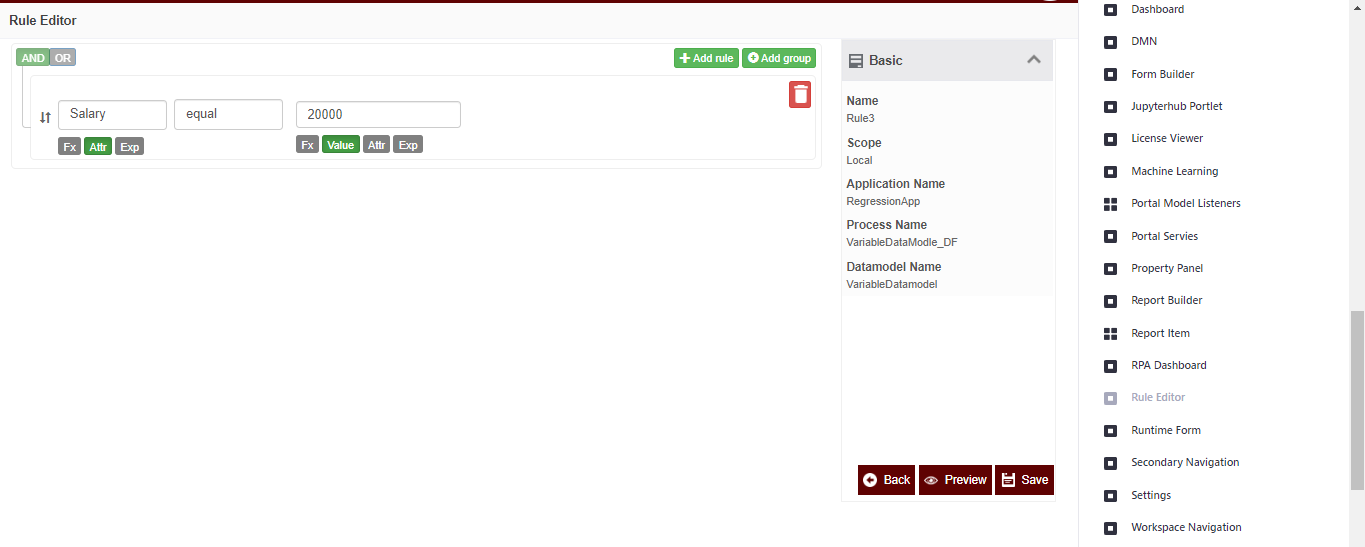
In the Actions click the pencil icon corresponding to a Query name. Rule Editor page opens.
-
Modify the details as needed. The configurations for creating/editing rules are the same as on the Queries page for creating the rules.
- Click Preview to preview the rules created.
-
Click Save to update the modifications done or click Back to navigate back to the previous section without updating any details.
Info
The modification done through the Rule Editor widget page WILL NOT reflect at the designer level.
Rule Editor List Grid Features
- The Rule Editor Widget displays all the Queries in the deployed data flows in the grid format.
- Click the sort arrow in the column header of the Rule List grid to sort that particular column in ascending or descending order.
- The Search box allows you to search for a query based on the search text entered.
- Enter the search text and the entered search text is matched against all the column details. The results are filtered if the entered text is matched with any of the column details.
- In the Actions column, click the Pencil icon to view the Rule configuration of the selected query.
- The pagination at the bottom of the Rule Editor List grid allows you to navigate through the list of queries.
- You can view 12 records (queries) at a time on the page.
- Click the page number to navigate to that page.
- Click Next to go to the Next page.
- Click Previous to navigate to the previous page.
Viewing and Editing the Rule Editor Widget Configuration
You can view and edit the Rule Editor configuration details.
- Navigate to the page in the platform in which the custom task list widget is added. The custom task list appears as applicable.
-
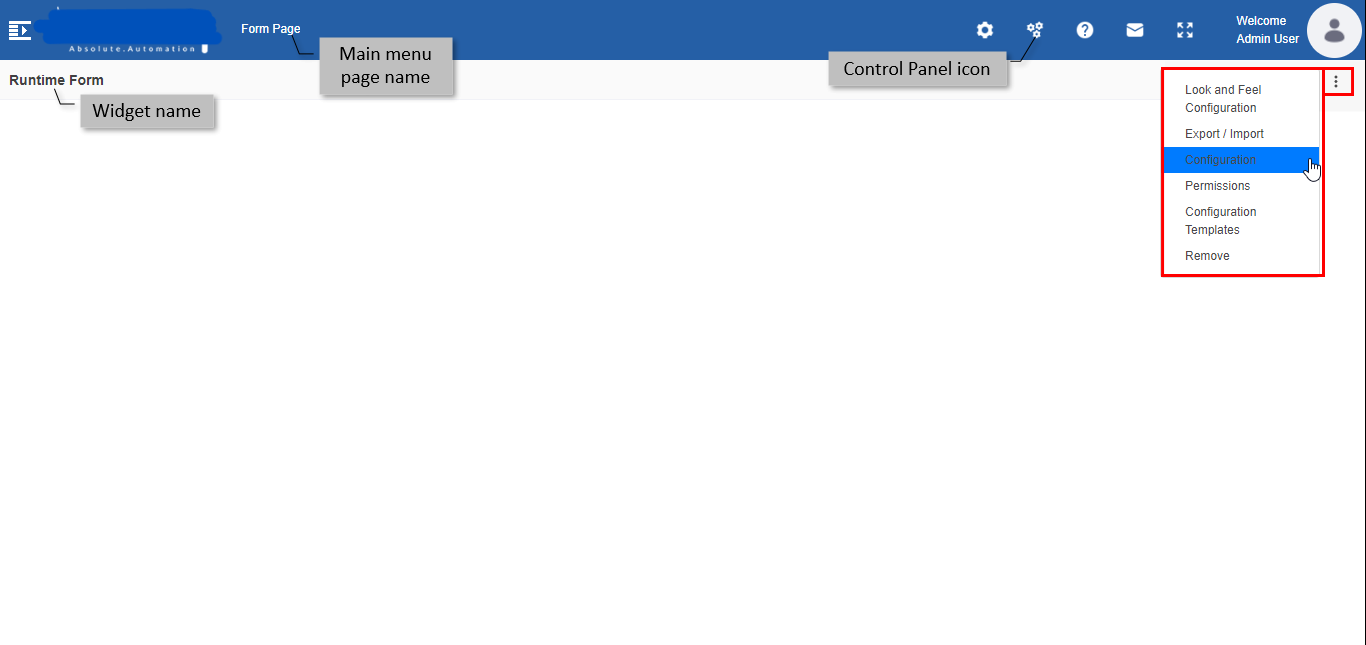
In the title bar, click the Control Panel icon and then hover over the widget on the page. Three dots appear on the right side of the page with configuration options.
-
Click the three dots. Using the Options available, you can change the Look and Feel, Configuration and set Permissions for the Rule Editor widget. These details are generic as for any other widget configuration.
- Modify the details click Save.