Organization Management
You can manage the Organizations and the organization components in the Management > Organization Management module.
The components of Organization Management are:
-
Organization
-
User
-
Role
-
Permission👑
-
API Token
Organizations, Users, and Roles are the primary requirements for working in the Platform. That is, you need to create the above-mentioned entities before starting to work with the applications and flows in the Platform.
The organization administrator is responsible and authorized to create the requirements in the Platform.
Viewing Organization Management and Components
-
Click the Burger Menu on the left of the logo on the upper-left of the Platform.
-
Click Management. The list of all management sections is displayed.
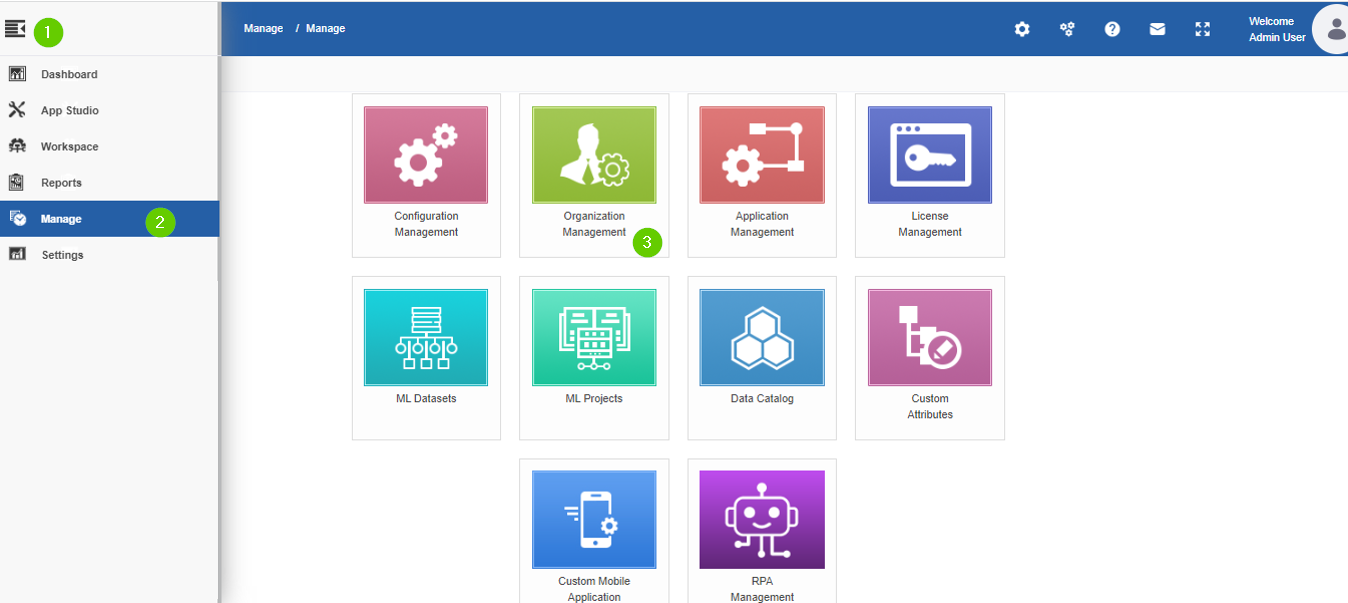
Figure 1.: Steps for viewing Organization Management section. - Click Organization Management.
The Organization submodule is selected by default and the organization page appears with the default organization (Platform) and any other organizations that are created using the logged in credentials.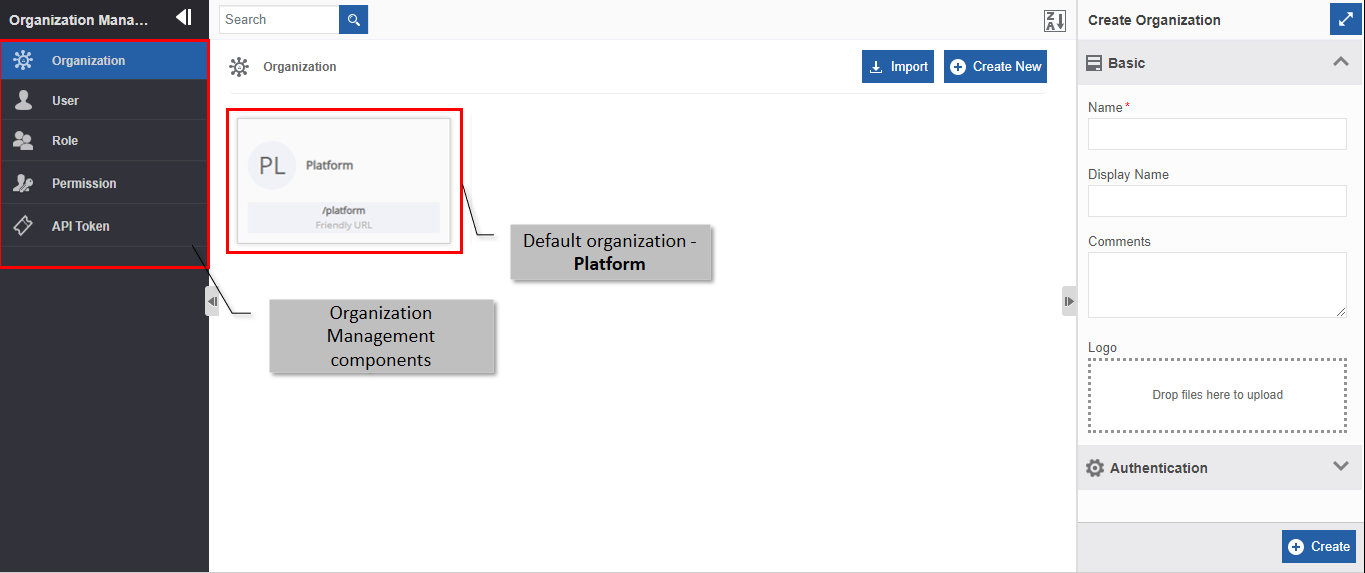
Figure 2.: The organization page and components. - Click the expand arrow in the left side panel for viewing the components in the Organization Management module.
Organizations
Organizations are created and managed in the Management > Organization Management module When you purchase Platform, there is a default organization in the list of organizations. The user credentials for organization administrator are provided with all the privileges for managing the Platform.
Viewing and Editing Organization Details
The organization administrator can view the default organization and the organizations that are created using the logged-in credentials. The organization administrator can edit and manage the organizations.
- Login to the Platform using organization administrator credentials.
- Click Burger menu, navigate to Management > Organization Management > Organization. The default organization and the new organizations created using the logged-in credentials are displayed in the organization list.
- Click the organization card for viewing the details of the selected
organization. The details of the organization appear in the Info
Actions panel (Edit Organization).
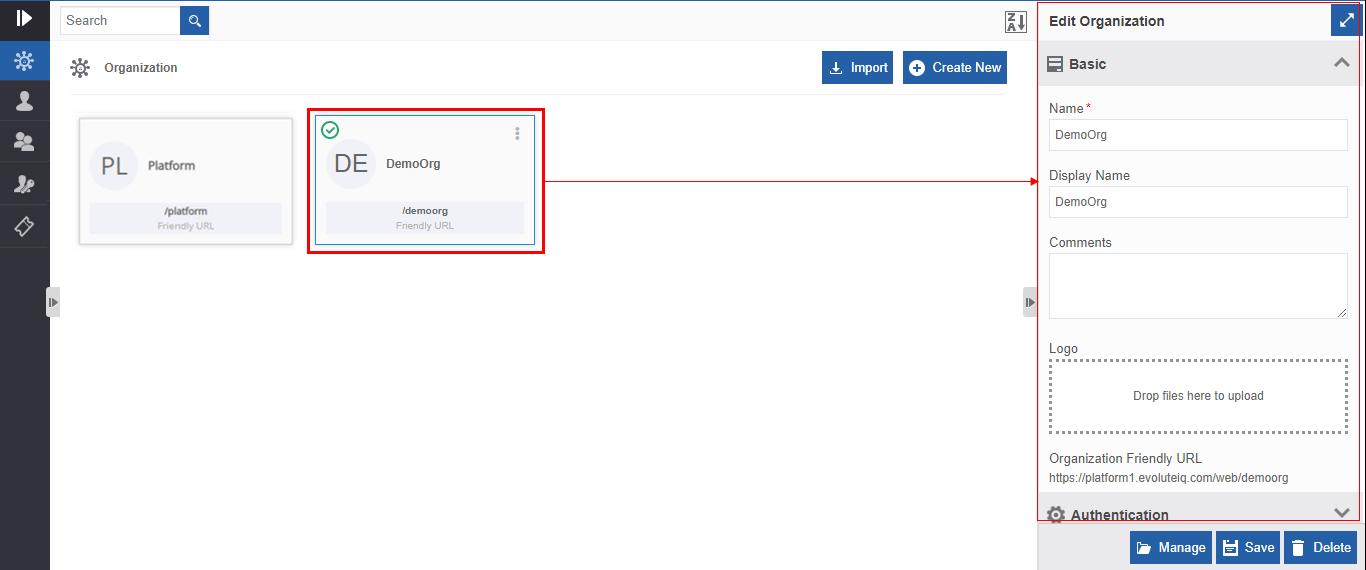
Figure 3.: Editing organization details - Edit the organization details as needed. Refer to Creating New Organization for the explanation of the organization attributes displayed in the Edit Organization.
- Click Save.
Creating New Organization
By default, an organization name is listed on the Organization page. As an organization administrator, you can create new organization(s) and configure the details as per the business requirement.
-
Click Burger menu, click Management > Organization Management. Organization management page appears with the default organization.
-
Click Organization from the left side list (Organization is selected and displayed by default).
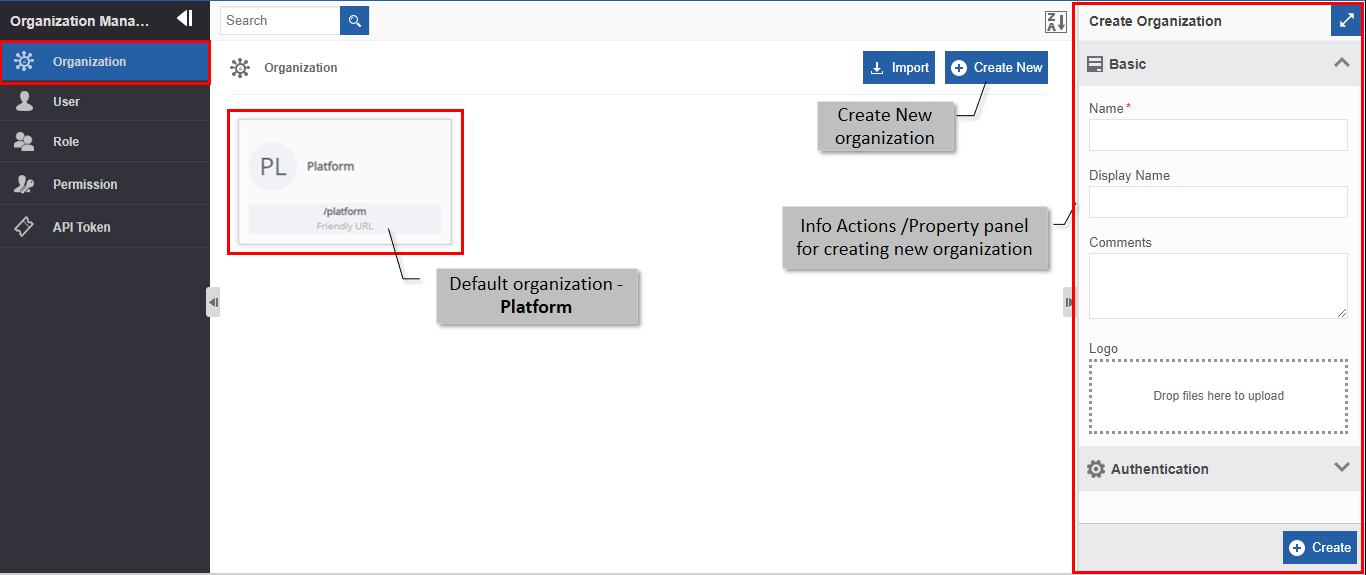
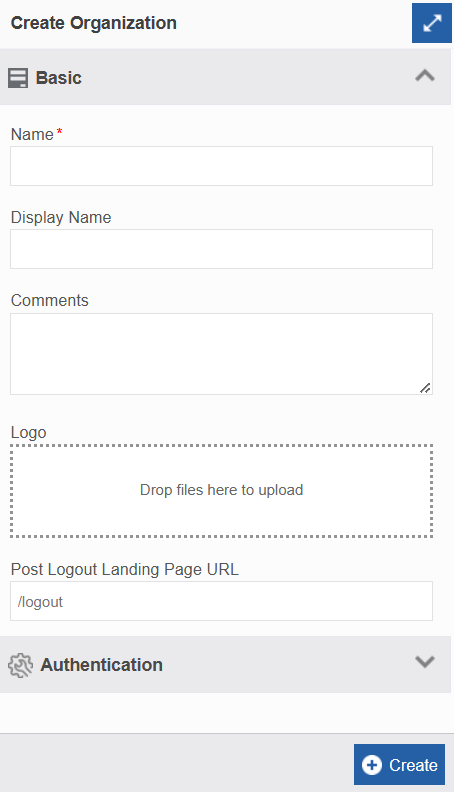
Figure 4.: Creating a new organization - Click Create New.
-
Enter the Basic details in the Create Organization panel as explained below.
Field Description Name* Enter the name of the organization.
Character limit: 50
Data type: Alphanumeric and symbols.Comments Provide description or comments if any.
Data type: Alphanumeric and symbols.Logo Upload the logo of the organization. - Click inside the dotted area below the Logo. The explorer window opens.
- Select the required icon file from any folder.
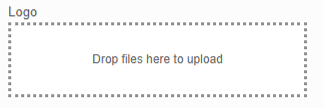
Or
Drag a logo file from the location/folder into the marked area.
Logo file formats supported are PNG, JPEG, and JPG.
After uploading the icon, Download and Remove are displayed along with the
logo name (file name of the uploaded logo).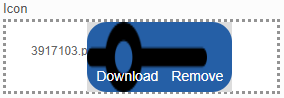
- Click Download to download the logo.
- Click Remove to remove the logo.
- To update a new logo, remove the current logo and repeat the steps mentioned
above.
Post Logout Landing
Page URLEnter /Logout (logout page name).
Logout is the default logout page name in the platform. However, as per your requirement, you can create your own custom design page with your own name preferences.For the existing organizations, if there is no logout page in the burger menu, you can create the Logout page using the APIs available and configure the logout page widget.
For Normal Users:At runtime, you will be redirected to Logout page if the user tries to log out of the platform or if the session expires automatically.
For SAML Users:This allows the SAML user to choose to navigate to another page without actually logging out of the platform. When you create a new organization, Logout page is automatically created and you can just give “/Logout” as the page name. It is important to configure the landing page in the logout portlet page. This is applicable to SAML users with SSO login. Not Providing logout page name – For Normal or SAML users: If you do not provide any logout page name, you will be logged out of the platform. -
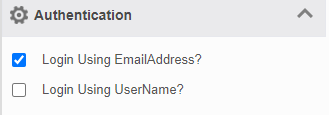
Click Authentication accordion and select/check an authentication method.
-
Check the Login Using Email Address? checkbox if you want the users of the organization to log in using the email address.
Else uncheck the Login Using Email Address? checkbox. -
Check the Login Using Username? checkbox, if you want to allow the users of the organization to log in using the username.
Else uncheck the Login Using Username? checkbox.
The username is the screen name in the user details.
(Navigate to Management > Organization Management > User and click the user card for viewing user details in the Edit User. Refer to Viewing and Editing User Details.)
-
-
Click Create. An organization is created with the administrator who created the organization as the default user (organization administrator) for that organization.
After creating the Organization, navigate to Management > Organization > click the newly created organization name card. An Organization Friendly URL appears at the end of Basic section in Edit Organization. The new organization automatically takes the path of the current organization in the server on which the Platform is running.
The Organization Friendly URL can be shared with the other users of the Organization for accessing the organization utilities.
- When a user accesses the organization through the Organization Friendly URL, “/login” is amended to the URL and the Login page of the Platform appears for the user.
- When you log on to the new organization using the Organization Friendly URL, the new organization is displayed as the default organization in the Organization list.
- When the organization administrator who created the new organization accesses the URL when logged into another organization, it automatically displays the dashboard page of the new organization as the administrator is a common user for both organizations.
Managing Organizations (Within the Parent Organization)
The user can manage the new organizations (created by the logged in user) through the Manage feature without logging into the newly created organization. This feature can be utilized only by the organization administrator who created the new organization. By default, the organization administrator who created the organization is a user of the newly created organization.
- Click Burger menu and navigate to Management > Organization Management > Organization.
- Click Organization name. The Manage button appears on the
bottom-right of the screen.
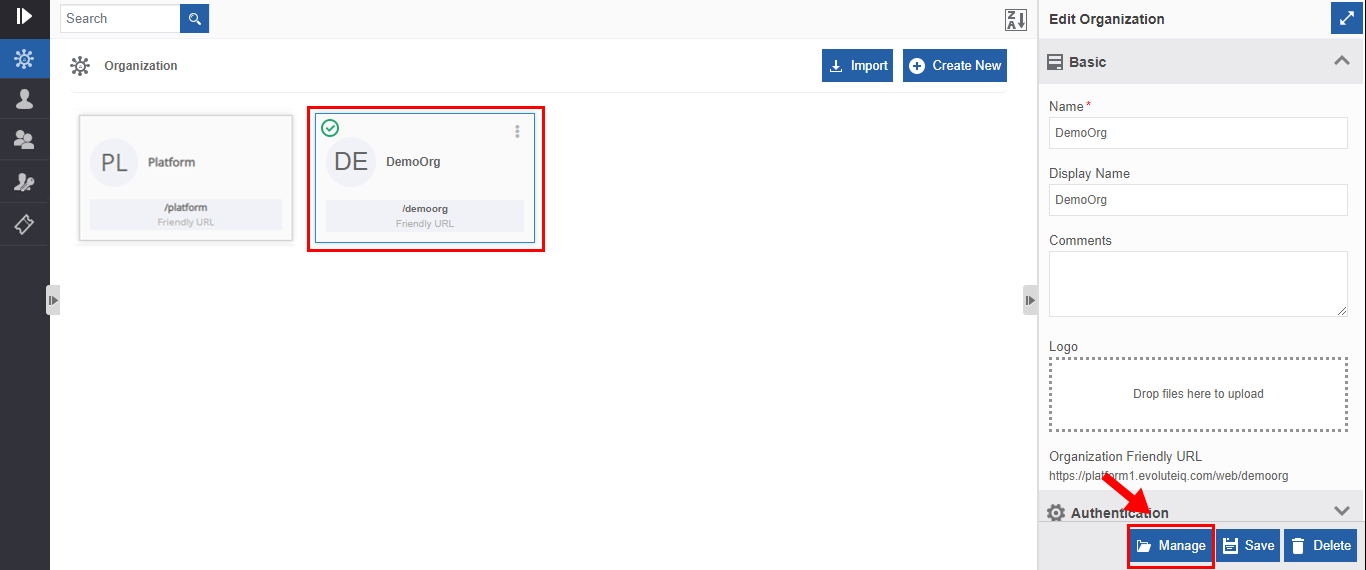
Figure 5.: Managing organizations -
Click Management.
As an organization administrator, when you click the Manage button for the first time after creating a new organization, you will be redirected to the Licenser Viewer page where you need to upload the license for the organization.
Or
When you click the Manage button after uploading the license for the new organization, you are redirected to the Manage page of the new organization created. You can view the new organization URL in the browser.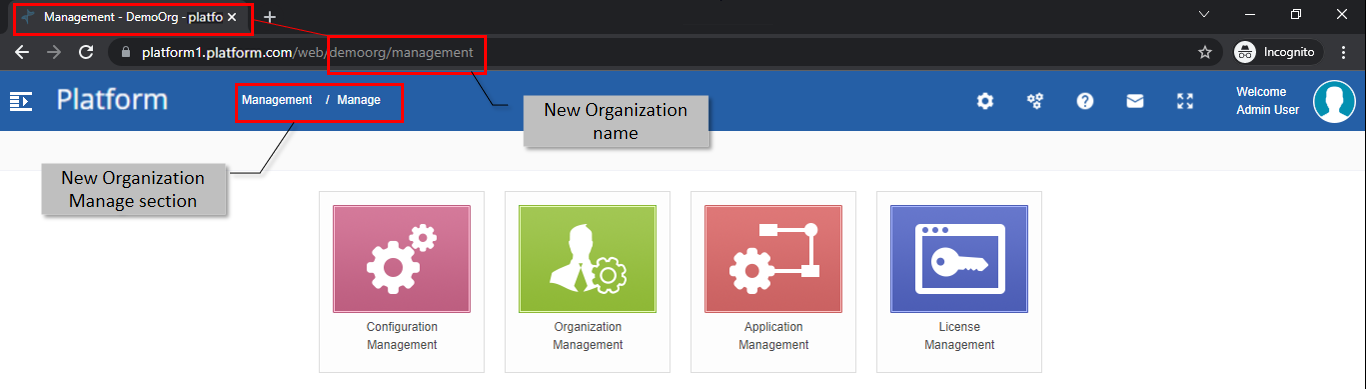
Figure 6.: Manage page of the newly created organizationAs you are the organization administrator for the current organization, you become the common user for the current and newly created organization. Hence, you are redirected to the new Organization Management page (automatically logs into the new organization).
-
Click any Management section (Configuration Management, Organization Management, Application Management, License Management, Data Catalog, or Custom Attributes) on the Manage page of the new organization for configuring and managing entities for the new organization.
Sorting Organizations
-
Click Burger menu, navigate to Management > Organization Management.
-
Click Organization (Organization is selected and displayed by default). The organization management page displays the default organization and the organizations created by the logged in administrator. Organization name cards are displayed in ascending order by default and the sort icon is descending (Z→A).
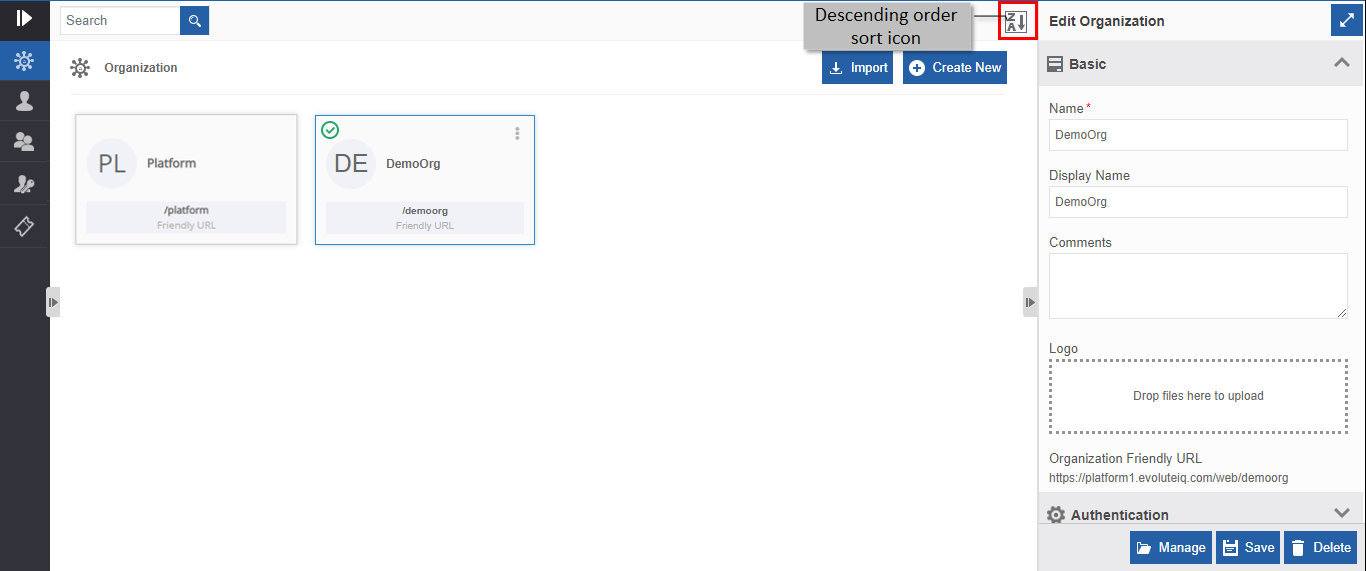
Figure 7.: Ascending order display with descending order sort icon - Click the Descending order sort icon (Z→A). The organizations get sorted in descending order (A→Z) of the names. The Sort icon is now changed to ascending order (A→Z).
- Click the Ascending order sort icon (A→Z) for sorting in the ascending order (A→Z). The sort icon changes to descending order (Z→A).
Exporting Organization
The Organization can be exported as an organization file (with .org extension) to the local system.
- Click Burger menu, navigate to Management > Organization Management.
- Click Organization.
- Hover over the organization card, three dots (More Actions) appear.
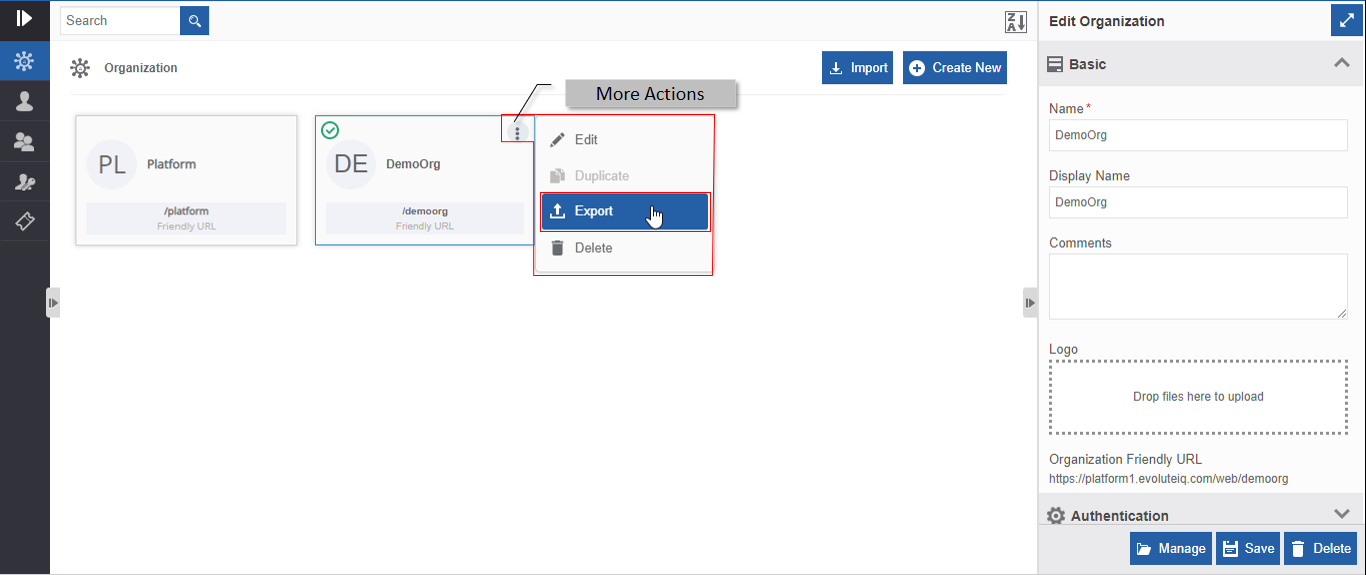
Figure 8.: Export Organization - Click More Actions and then click Export. Export
Organization pop-up displays with the list of features and
applications. You can select or deselect the features or
applications by checking or unchecking the checkboxes.
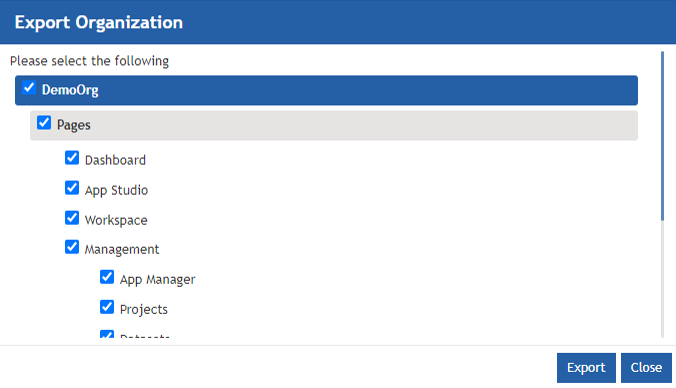
Figure 9.: Export Organization pop-up with the checklist - Click the background greyed entities/flows for viewing the lower-level hierarchy of features. Click Applications for viewing the flows.
- Check/uncheck the components as needed.
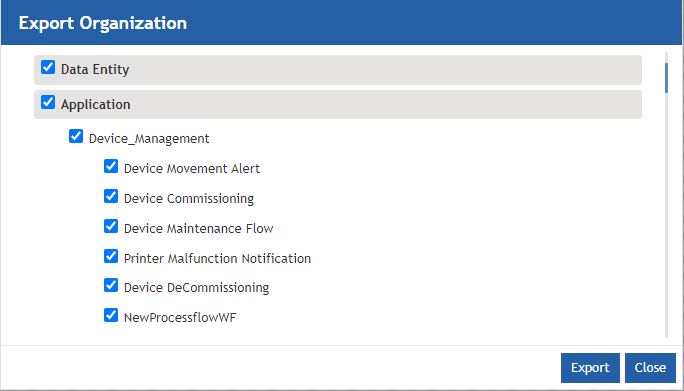
- Click Export. The organization exports (downloads) to the local system. The organization file exported includes only the checked/selected entities and flows. The exported file format is with “.org” extension.
Importing Organization
An organization file with organization details can be imported into the Platform. Organization file should be of “.org” extension.
To import an organization, follow the below steps.
- Click Burger menu, navigate to Management > Organization Management.
- Click Organization. Organizations are displayed.
- Click Import. The Import Flow pop-up appears.
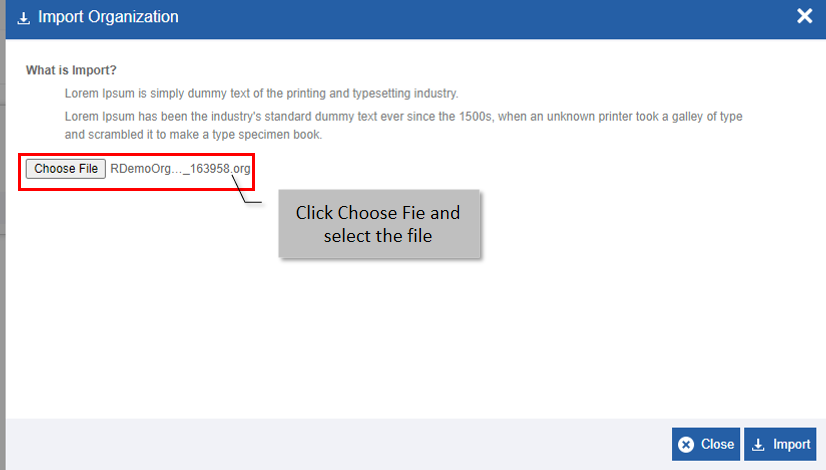
Figure 10.: Choosing import file - Click Choose File and select an organization file (with extension .org).
- Click Import. A success message is displayed if the import is successful.
Deleting Organization
Deletion of the organization is done after confirmation from the business leads as it is created to achieve business goals. All the details within the organization are removed when the organization is deleted.
You cannot retrieve the deleted organization unless you have imported it.
- Click Burger menu, navigate to Management > Organization Management.
- Click Organization. The list of all organizations created by the logged-in organization administrator is displayed.
- Click the Organization name card of the organization to be deleted.
The lower-right of the page displays the Delete button.
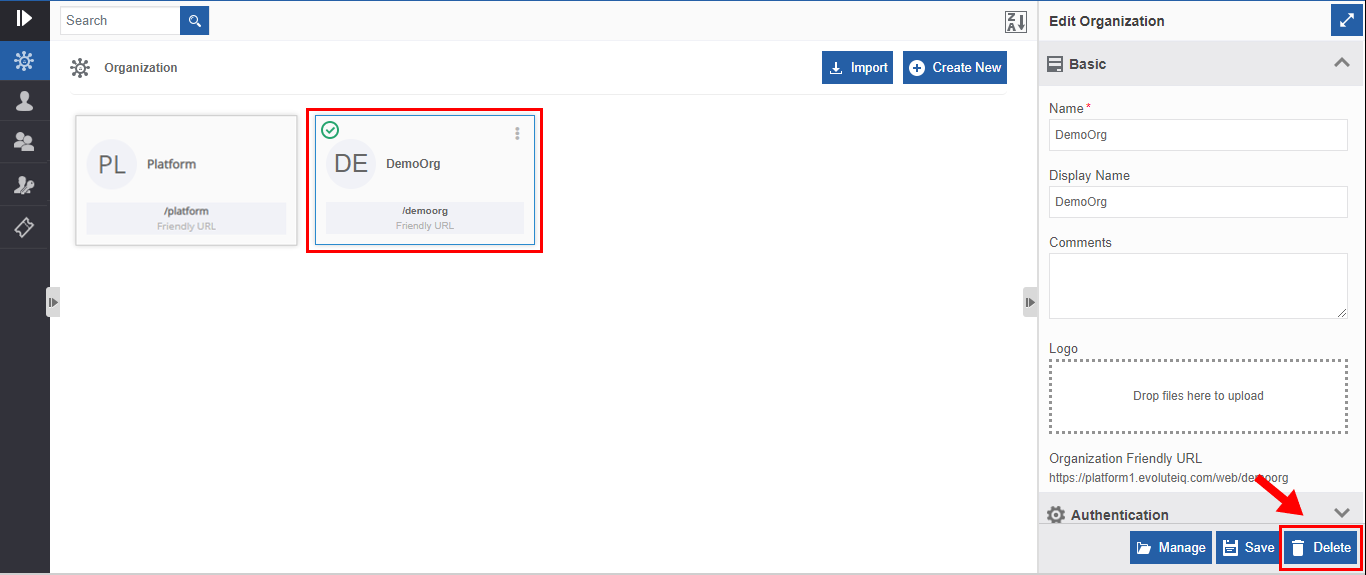
Figure 11.: Deleting organization - Click Delete. A Confirmation pop-up for delete appears.
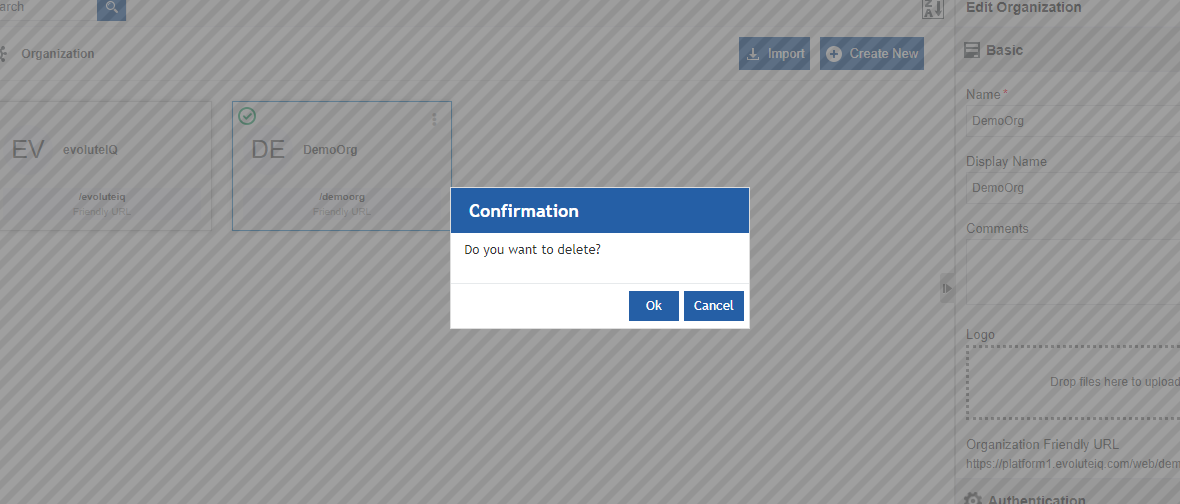
Figure 12.: Organization Delete confirmation - Click Ok for deleting the organization.
Or
Click Cancel to cancel the action.
Alternatively, follow the steps below to delete the organization:
- Click Burger menu, navigate to Management > Organization Management > Organization.
- Hover over the organization card. Three dots appear on the upper right side of the card.
- Click the three dots. More Actions appear.
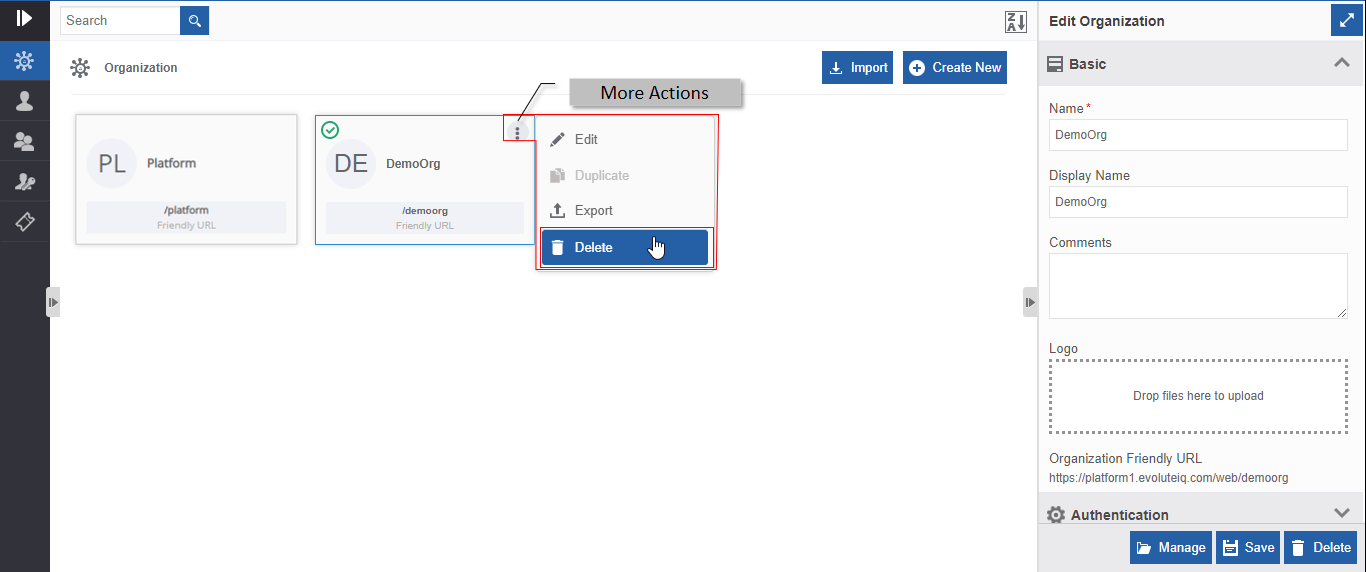
Figure 13.: Delete action in More Actions - Click Delete. Confirmation pop-up appears.
- Click Ok for deleting the organization or click Cancel to discard action.
Users
Introduction to Users
Users are the people who use the Platform. Each employee in the business organization is having a unique identification ID and user name in the organization. The Platform administrator (organization administrator) creates users for the Platform using the unique email address of the employee.
Viewing and Editing User Details
- Go to Main Menu > Management > Organization Management.
- Click User. The list of all users within the organization is displayed.
- Click a User card. The details of the user are displayed in the
Edit User.
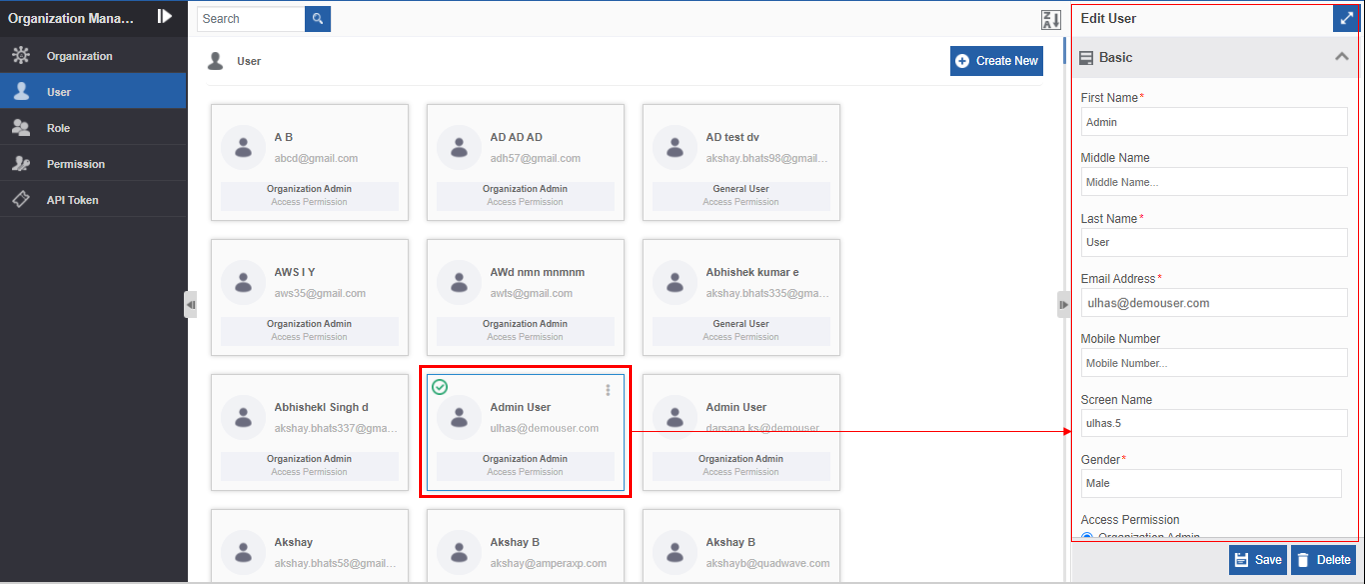
Figure 14.: Editing user details -
Edit or modify the details of the user. Refer to Creating New User section for a detailed explanation of Basic properties (fields and description).
Note that if you edit the Screen Name field, it should be unique and it cannot be blank.
If you try to save the user details by entering an already existing screen name or by leaving it blank, a validation error appears. -
Click Advance accordion.
-
Enter the password for the user in the password textbox.
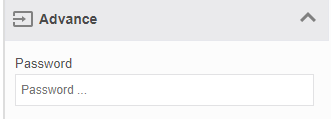
If the password is set in Edit User > Advance section, this feature (entering password in Edit User > Advance > Password field) overrides the Reset Password Required feature in the Create User section.
7. Click Save.
That is, if you check the Reset Password Required in Create User and enter the password in Edit User > Advance section, the system will not prompt the user for resetting the password during the first-time login.
Creating New User
It is mandatory to map role(s) for the user and hence, you need to create the required roles for the organization before creating the users. For creating a new user in Platform, the person/employee should have a valid email id.
- Go to Main Menu > Management > Organization Management.
- Click User.
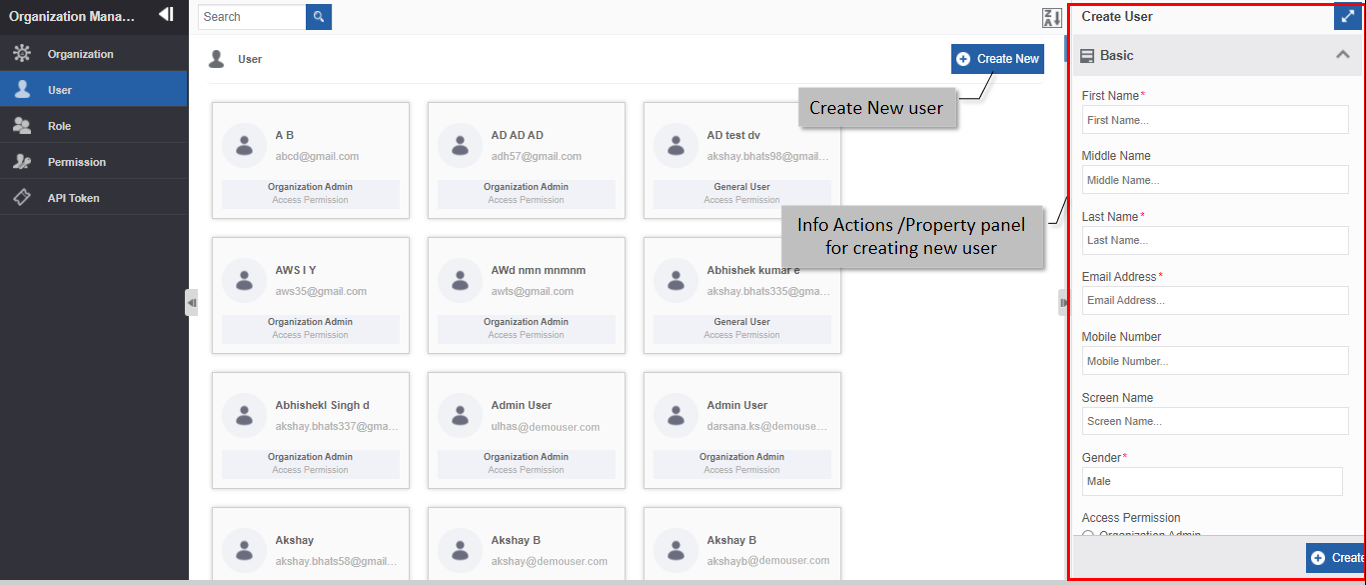
Figure 15.: Creating new user - Click Create New.
-
Enter the details in the Create User panel.
Field Description First Name* Enter the first name of the user.
Character limit: 50
Data type: Alphanumeric and symbols.Middle Name Enter the middle name of the user.
Character limit: 50
Data type: Alphanumeric and symbols.Last Name* Enter the last name of the user.
Character limit: 50
Data type: Alphanumeric and symbols.Email Address* Enter the email id of the user.
The user should have a valid email id and it should be unique.
Character limit: 50
Data type: Alphanumeric and symbols.Mobile Number Enter the mobile number of the user.
Character limit: 50
Data type: Alphanumeric and symbols.Screen Name Enter the screen name for the user.
The screen name should be unique. If you do not enter any screen name
or if you have entered an already existing screen name while creating the
user, the system takes the username in the email address provided in the
Email Address field and updates the same as the screen name.
When you create a new organization, if you have checked the "Login
Using Username?" check box, you can log in to the organization using
the user name of the user instead of using the email address. The user
name of the user is updated in the Screen name field.
Character limit: 50
Data type: Alphanumeric and symbols.Gender* Select the gender of the user. Access Permission* Choose access permission for the user. 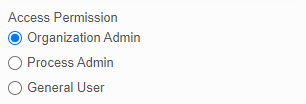
- Organization Admin: The Organization administrator is like a power
user who handles end-to-end features and functions in the Platform
that includes the handling of multiple organizations and the control
of all the users and permissions. - Process Admin: Process admin handles all the process-related aspects
in the Platform. The process admin has the access to all the
applications and features within the organization. - General User: The general user has access only to the processes or
tasks in which the user is a participant. User-based screen and details
are displayed for the general user.
Roles* Select the role for the user.
A user can have multiple roles.- Press CTRL and click the roles for the user one by one. multiple roles.
- Press CTRL+A for selecting all the roles.
Send Email Check the box to send notification email to the user after creating
the user account in the organization for that user in Platform. The email
content includes the details (like user information, automatically
generated username and password, Platform instance information, etc.)
that are composed for the email in the portal instance configuration.Reset Password Required Check the Reset Password Required checkbox if you want the user
to reset the password during the first-time login.
If you check Reset Password Required, the user gets
redirected to the Change Password page for
changing the password after logging into the
Platform for the first time. Subsequent login onwards,
the dashboard page is displayed after the login.Reminder Query Required If you check Reminder Query Required, the system prompts the user
for the answer to the reminder query (reminder query for - Organization Admin: The Organization administrator is like a power
-
Click Create. If you want to manually set the password, you need to edit the details of the created user. Refer to Viewing and Editing User Details. The Create User section displays checkboxes for Send Email, Reset Password Required, and Reminder Query Required as these actions are applicable only during the creation of the user.
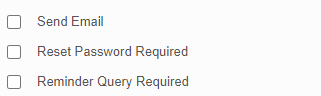
That is, Edit User section does not display these checkbox options.
Sorting Users
- Click Burger menu and navigate to Management > Organization Management.
- Click User. User name cards are displayed in ascending order by
default and the sort icon is descending (Z→A).
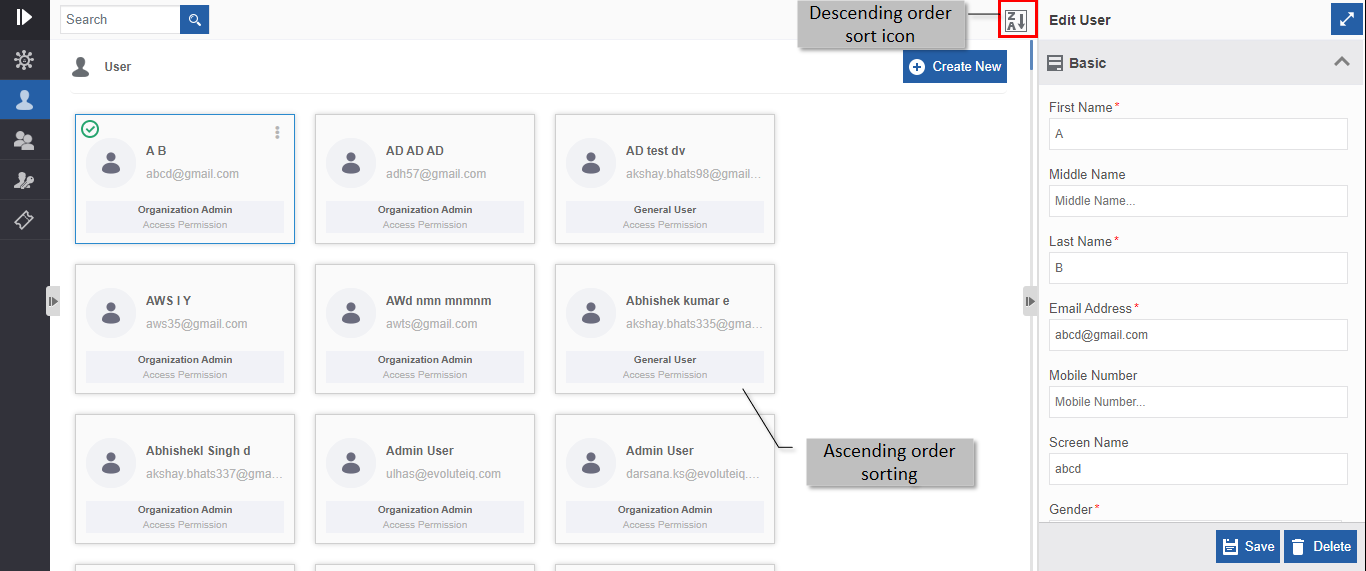
Figure 16.: Ascending order display with descending order sort icon - Click the Descending order sort icon (Z→A). The user cards get sorted
in descending order (A→Z) of the names. The Sort icon is now changed
to ascending order (A→Z).
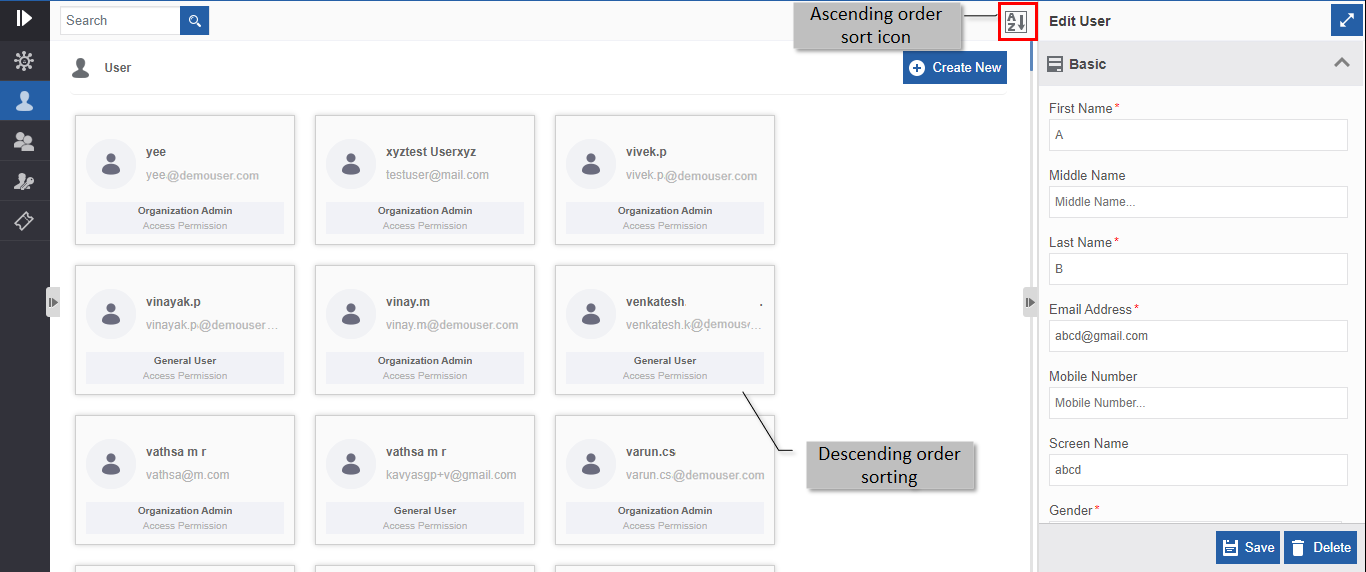
Figure 17.: Descending order display with ascending order sort icon - Click the Ascending order sort icon (A→Z) for sorting in the ascending order (A→Z). The sort icon changes to descending order (Z→A).
Deleting Users
Users are associated with various tasks in the process. Deleting users without checking the association or mapping of users with various entities can lead to errors in the applications or tasks with which that user is associated.
You need to remove the association or mapping of the user with any other entity in the Platform (if associated) before deleting the user for avoiding errors associated with the user.
- Go to Main Menu > Management > Organization Management.
- Click User. The list of all users within the organization is displayed.
- Click the User card of the user to be deleted. The lower-right of
the page displays the Delete button.
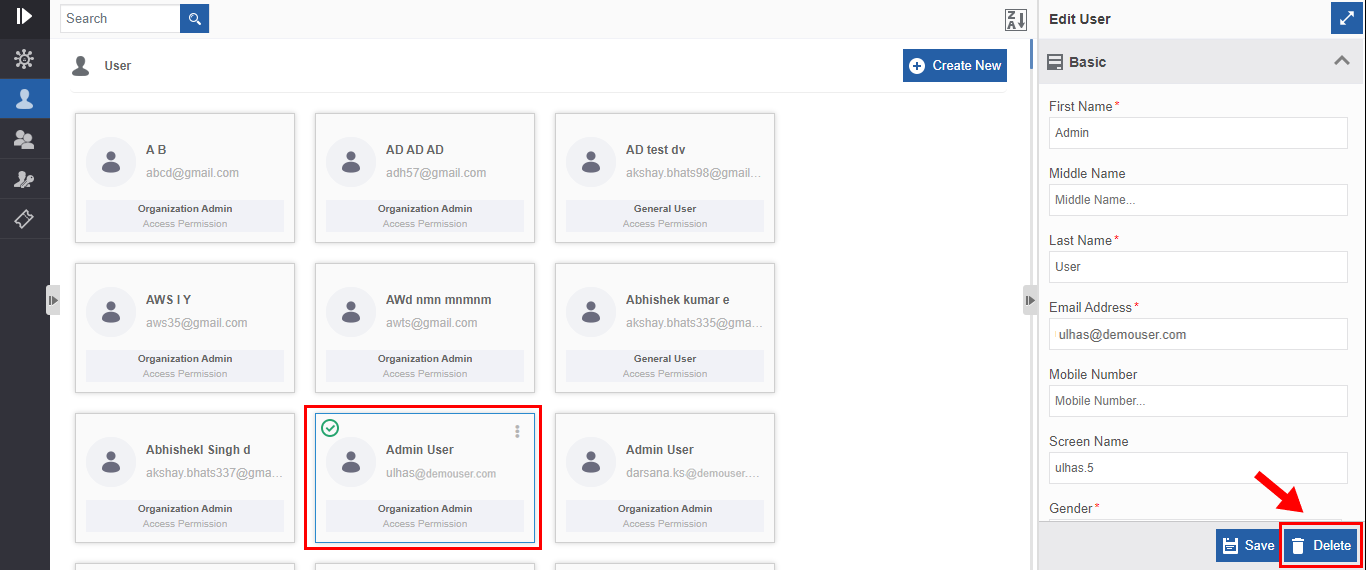
Figure 18.: Deleting a user - Click Delete action displayed on the lower right side. A
Confirmation pop-up for delete appears.
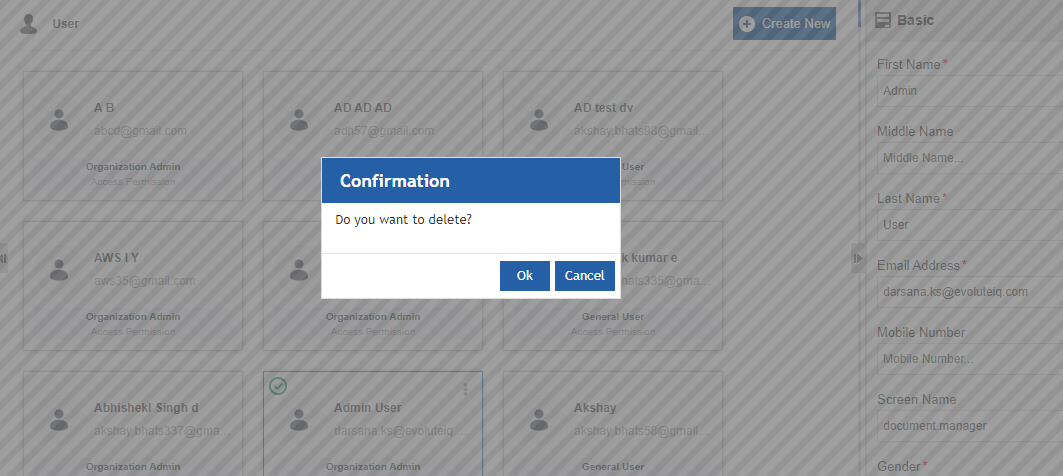
Figure 19.: Delete user confirmation - Click Ok to delete the user or click Cancel to cancel the delete action.
Alternatively, you can follow the below steps to delete a user:
- Click Burger menu, navigate to Manage > Organization Management > User
- Hover over the organization card. Three dots appear on the upper right side of the card.
- Click the three dots. More Actions appear.
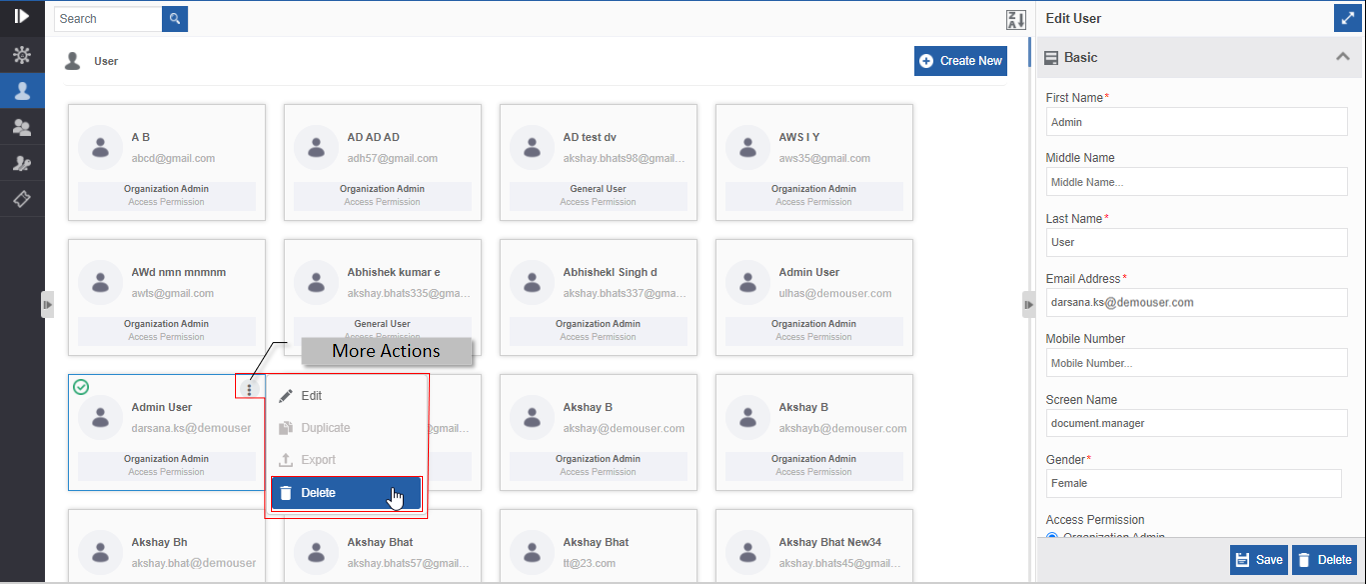
Figure 20.: Delete action in More Actions - Click Delete. Confirmation pop-up appears.
- Click Ok for deleting the user or click Cancel to discard action.
Roles
Introduction to Roles
Roles are categories in which users are organized in the organization. It can be departments or various categories based on the role and job profile of the user in the organization. It is mandatory to associate at least one role for a user. Multiple roles can be associated with a user.
Viewing and Editing Role Details
- Go to Main Menu > Management > Organization Management.
- Click Role. The list of all roles within the organization is displayed.
- Click a Role card. The details of the role are displayed in the
Edit Role.
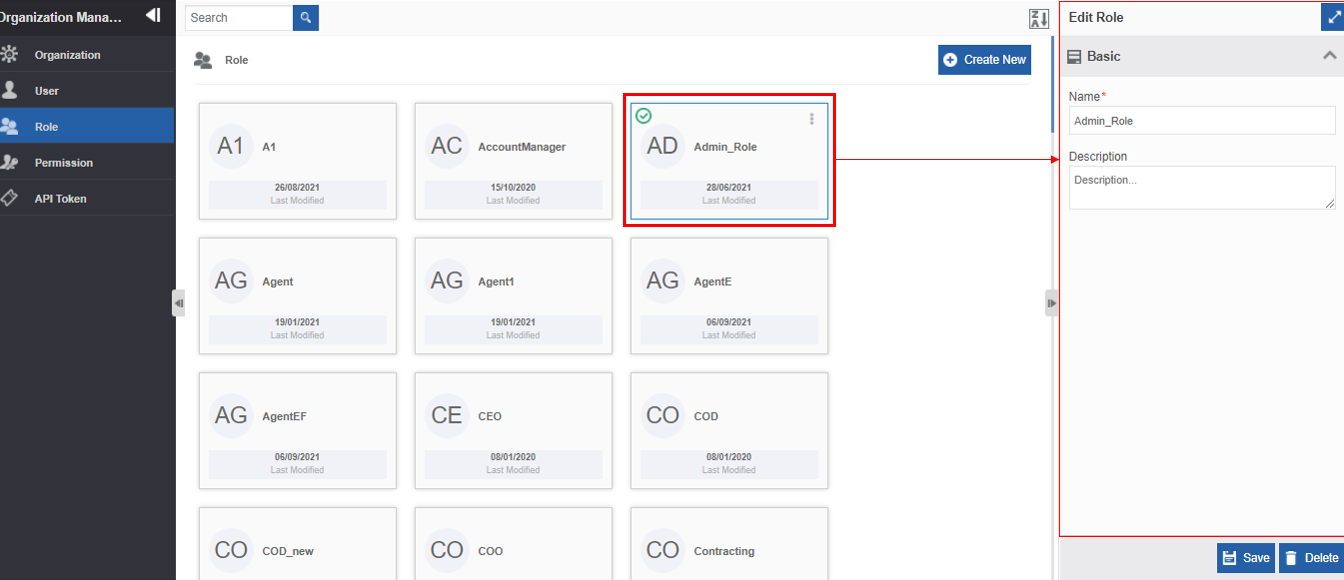
Figure 21.: Editing role details - Edit or modify the Name or Description of the role as needed.
- Click Save.
Creating New Role
- Go to Main Menu > Management > Organization Management.
- Click Role.
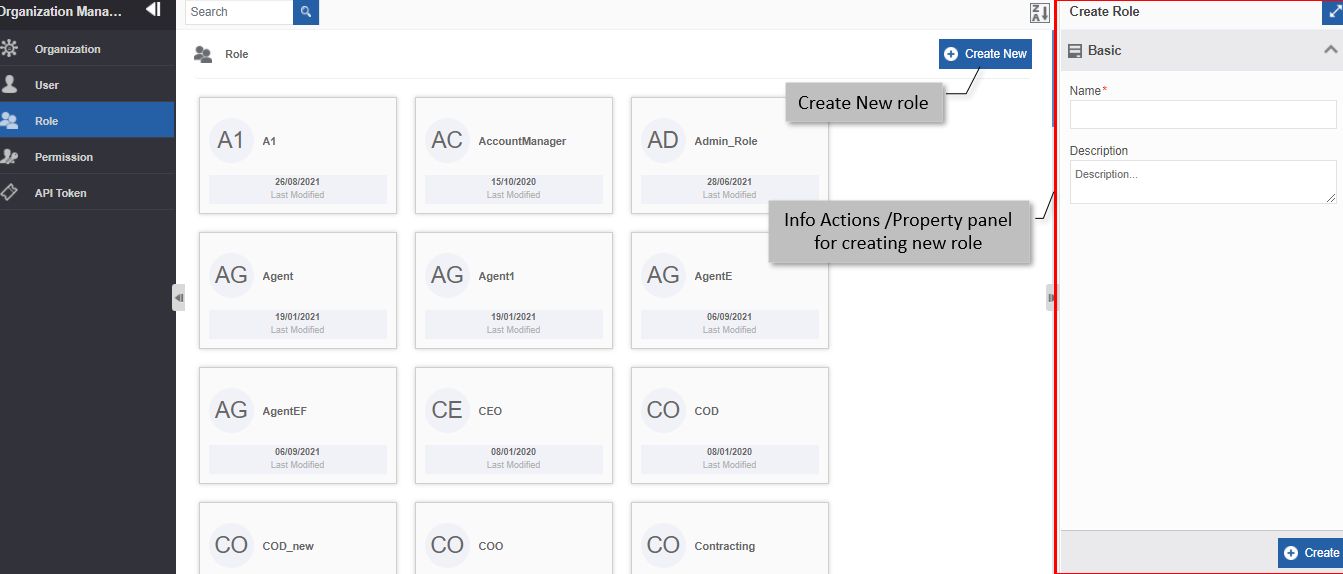
Figure 22.: Creating a new role - Click Create New.
- In the Create Role panel.
- Enter Name* for the role.
Character limit: 50
Data type: Alphanumeric and symbols. - Enter Description for the role (if any).
Character limit: 250
Data type: Alphanumeric and symbols. - Click Create.
Sorting Roles
- Click Burger menu, navigate to Management > Organization Management.
- Click Role. Role name cards are displayed in ascending order by
default and the sort icon is descending (Z→A).
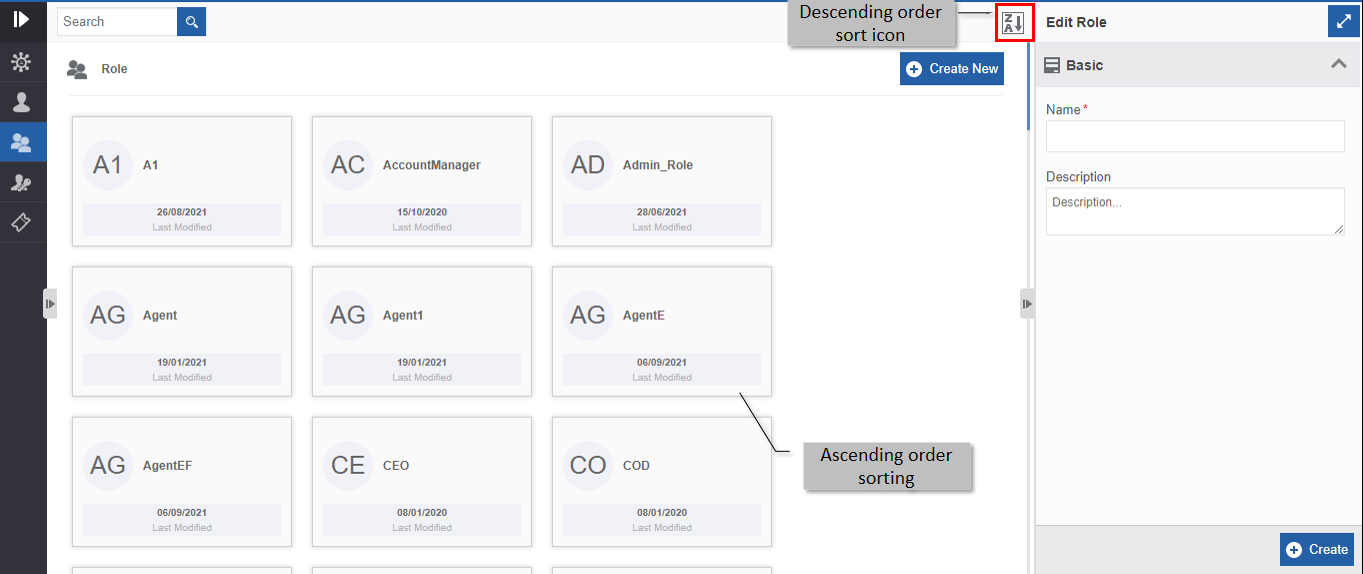
Figure 23.: Ascending order display with descending order sort icon - Click the Descending order sort icon (Z→A). The role cards get sorted
in descending order (A→Z) of the names. The Sort icon is now changed
to ascending order (A→Z).
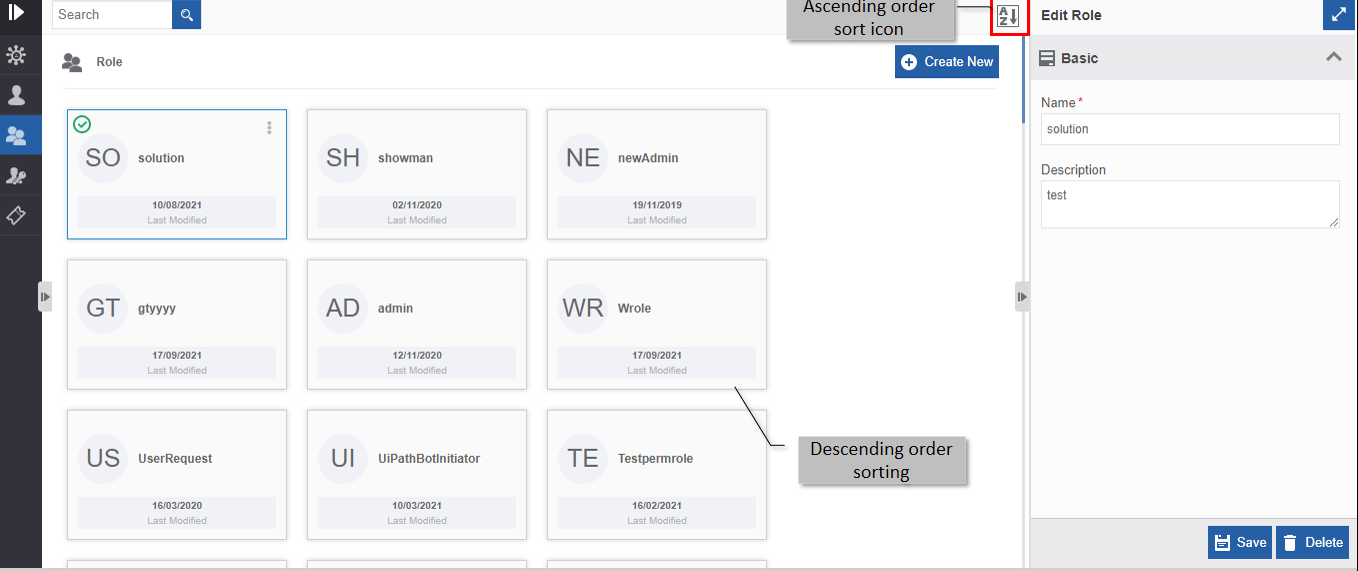
Figure 24.: Descending order display with ascending order sort icon - Click the Ascending order sort icon (A→Z) for sorting in the ascending order (A→Z). The sort icon changes to descending order (Z→A).
Duplicating Roles
Follow the below steps for duplicating an existing role.
- Go to Main Menu > Management > Organization Management.
- Click Role. The list of all roles within the organization is displayed.
- Hover over the role card. Three dots appear on the upper right side of the card.
- Click the three dots. More Actions appear.
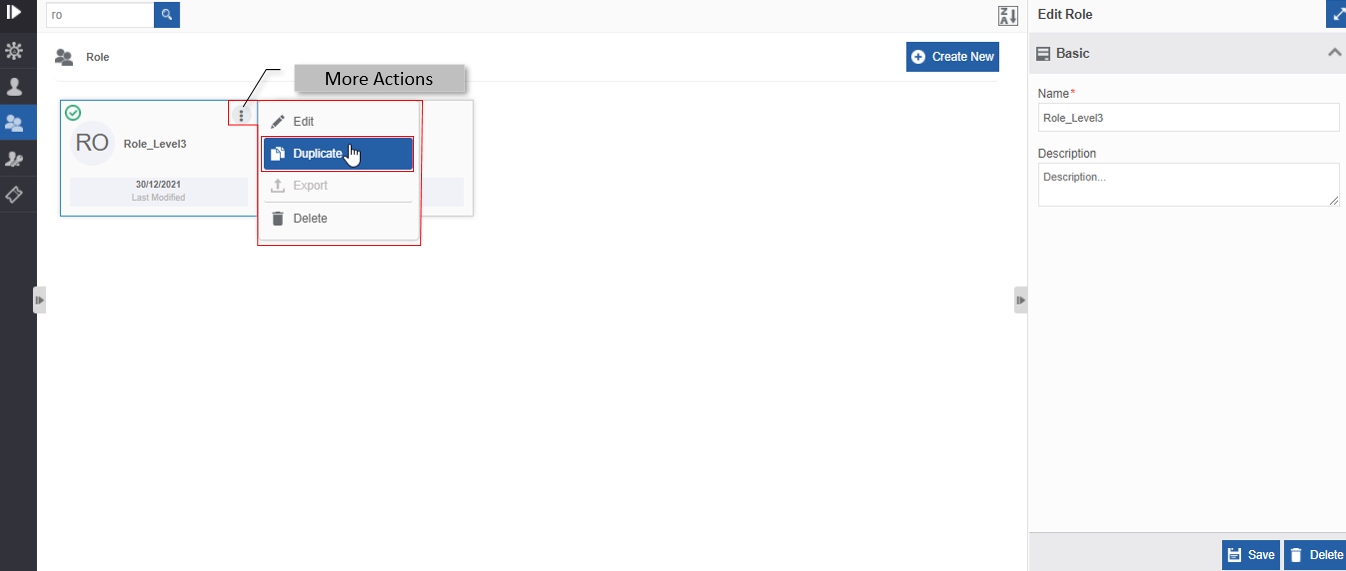
Figure 25.: Duplicating the role - Click Duplicate. Confirmation pop-up appears.
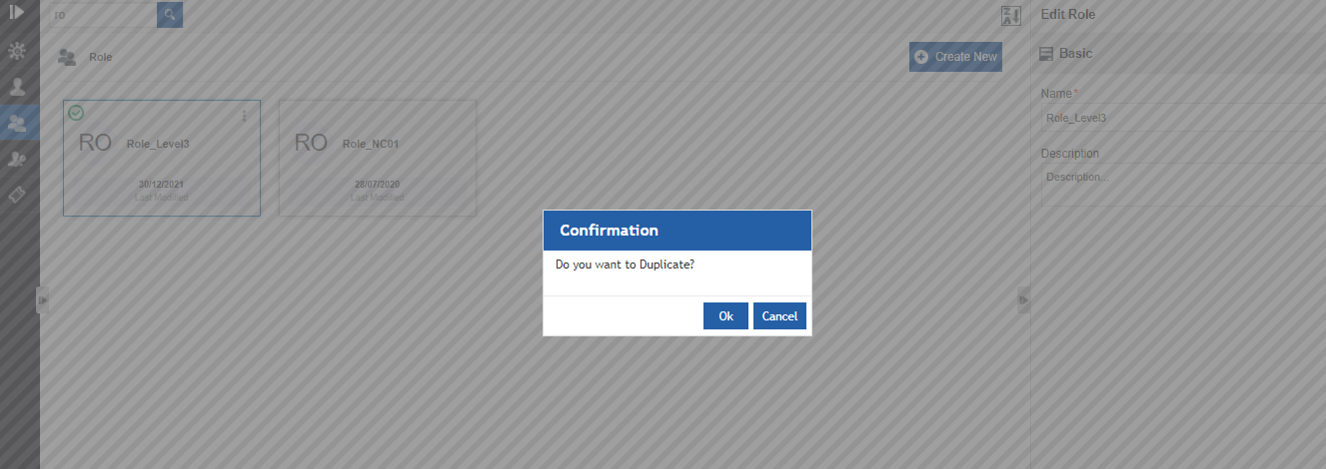
Figure 26.: Duplicate confirmation - Click Ok to duplicate the role (or you can click Cancel to
cancel the duplicate action). A Success message appears on
successful duplication of the role.
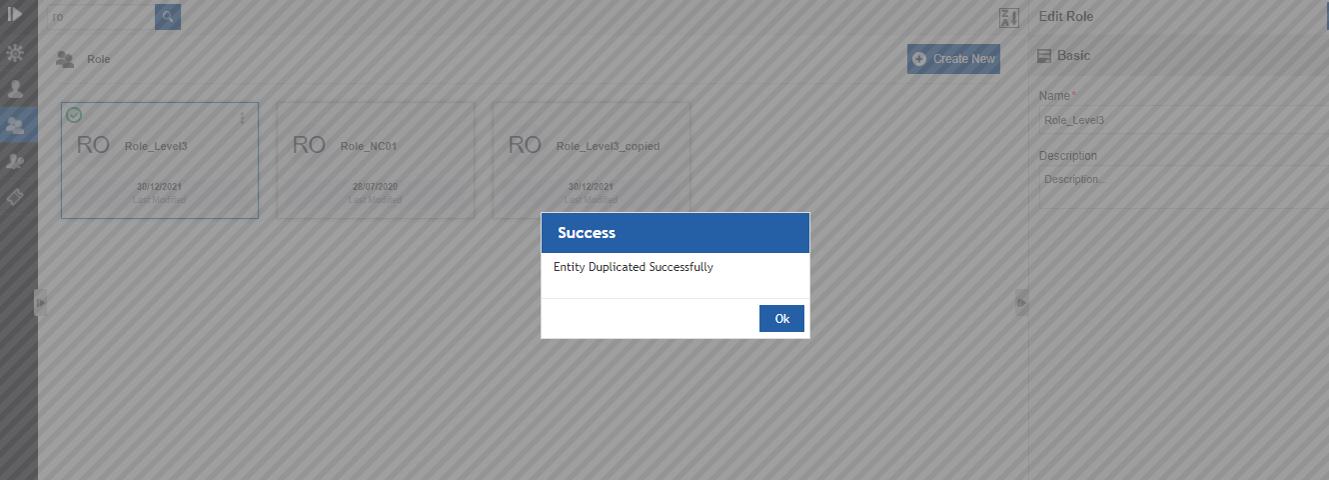
Figure 27.: Duplicate success message - Click Ok. A duplicate copy of the role appears on the role page
with the same role name suffixed with “_copied”.
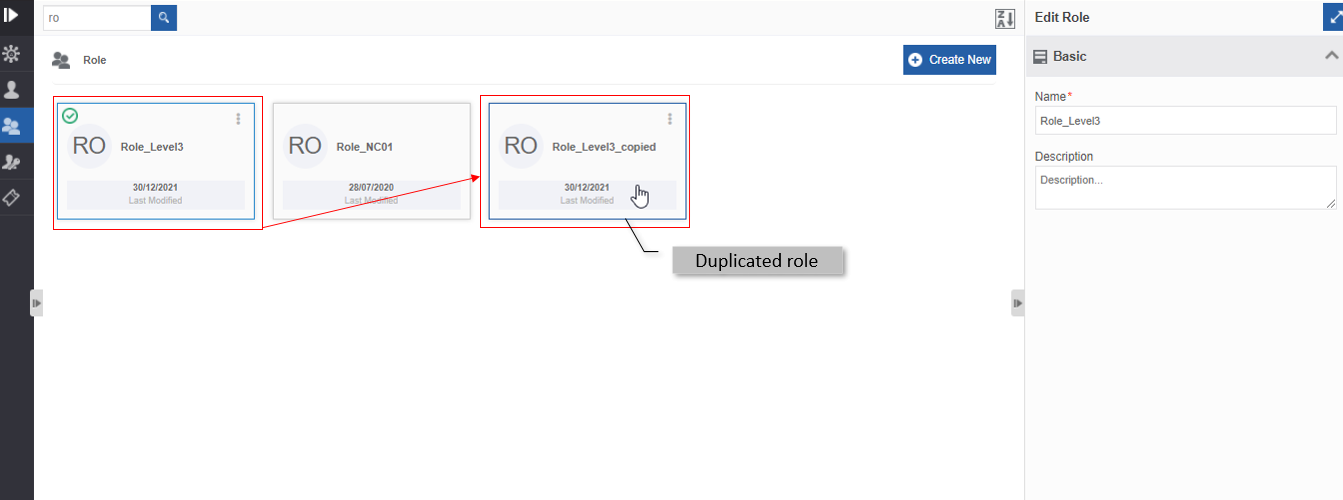
Figure 28.: The duplicated role
Deleting Roles
Roles are associated with Users. Deleting roles without removing the association or mapping of roles with the users can lead to errors in the applications or tasks with which the user with that role is associated.
You need to remove the association of the role with the mapped users before deleting the role for avoiding errors associated with the role.
- Go to Main Menu > Management > Organization Management.
- Click Role. The list of all roles within the organization is displayed.
- Click the Role card of the role to be deleted. The lower-right of
the page displays the Delete button.
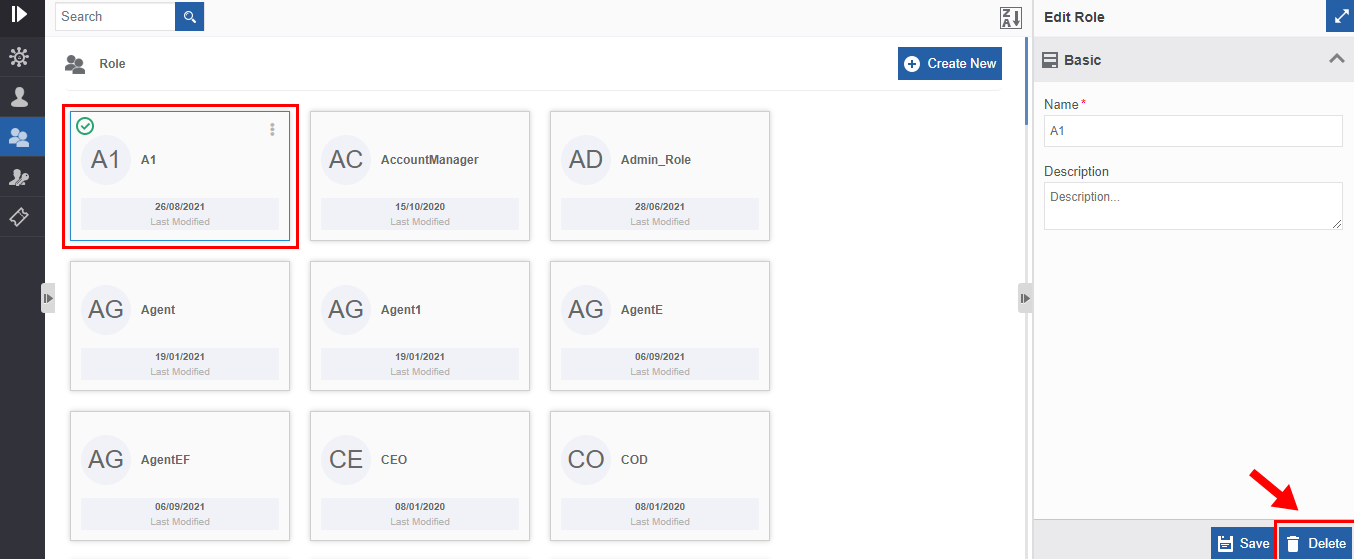
Figure 28.: Deleting Role - Click Delete action displayed on the lower right side. A
Confirmation pop-up for delete appears.
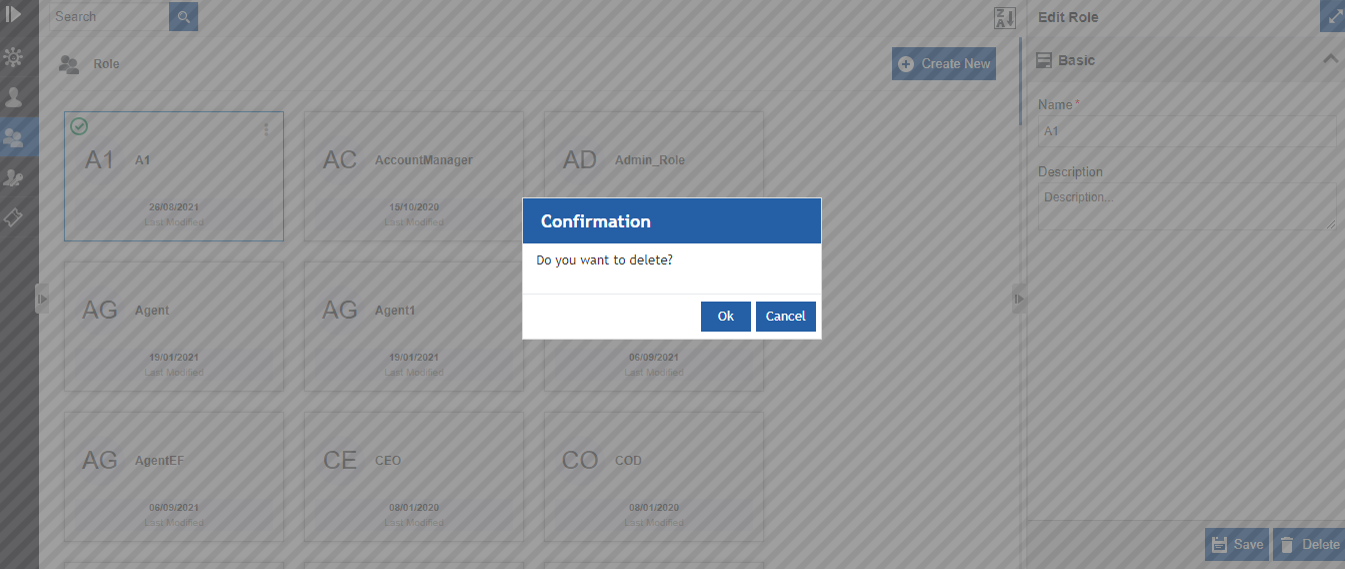
Figure 29.: Delete Role confirmation - Click Ok to delete the role or click Cancel to cancel the delete action.
Alternatively, you can follow the steps below to delete a role:
- Click Burger menu, navigate to Management > Organization Management > Role
- Hover over the organization card. Three dots appear on the upper right side of the card.
- Click the three dots. More Actions appear.
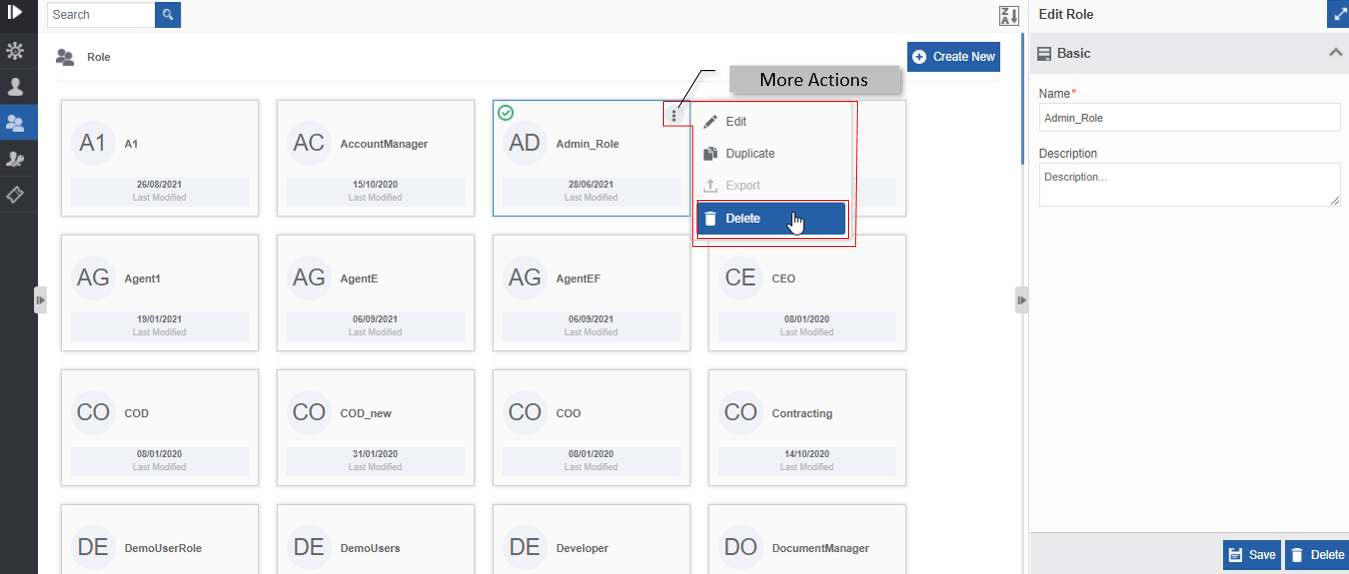
Figure 30.: Delete action in More Actions - Click Delete. Confirmation pop-up appears.
- Click OK for deleting the role or click Cancel to discard the action.
Permissions👑
Introduction to Organization Permissions
Permissions for accessing the various features and functionalities for different roles or users are managed in the Permission section. Permissions are given for module-wise accessibility and the business entities. The various accessibility permissions are Add Edit, View, Delete, and Disabled. The Deploy and Runtime permissions can be set for flow modules.
Viewing and Editing Permission Details
- Go to Main Menu > Management > Organization Management.
- Click Permission. The list of all permissions within the organization is displayed.
- Click a Permission card. The details of the permission are displayed
in the Edit Permission.
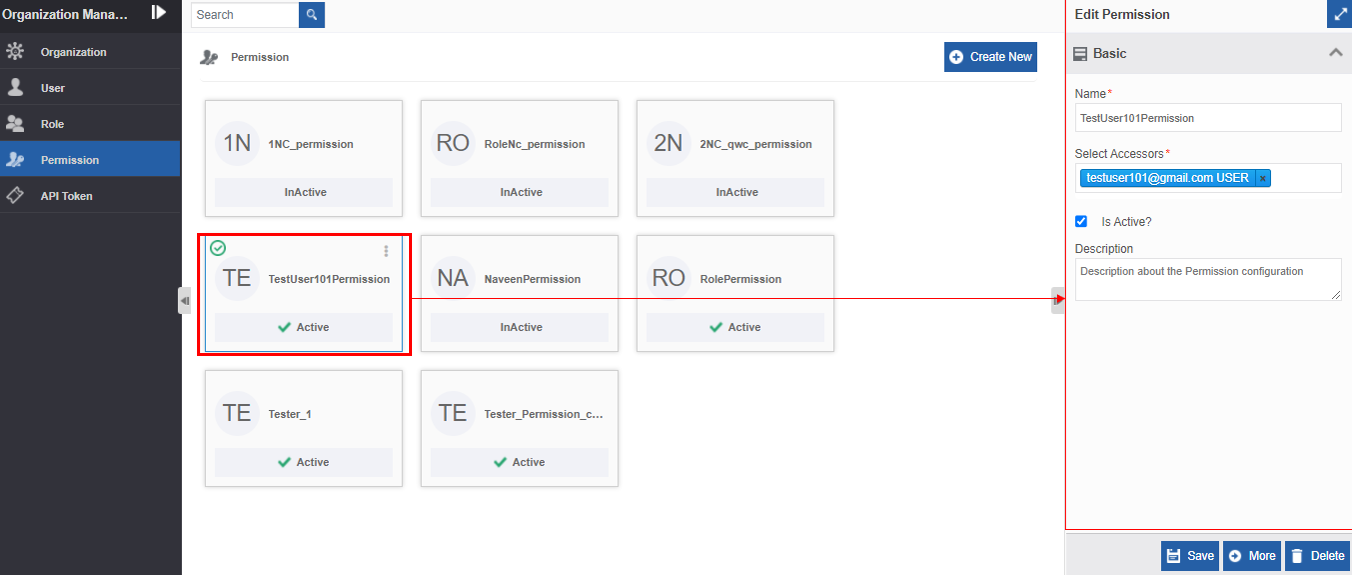
Figure 31.: Editing permission details - Click More for viewing the Entities and Permission details.
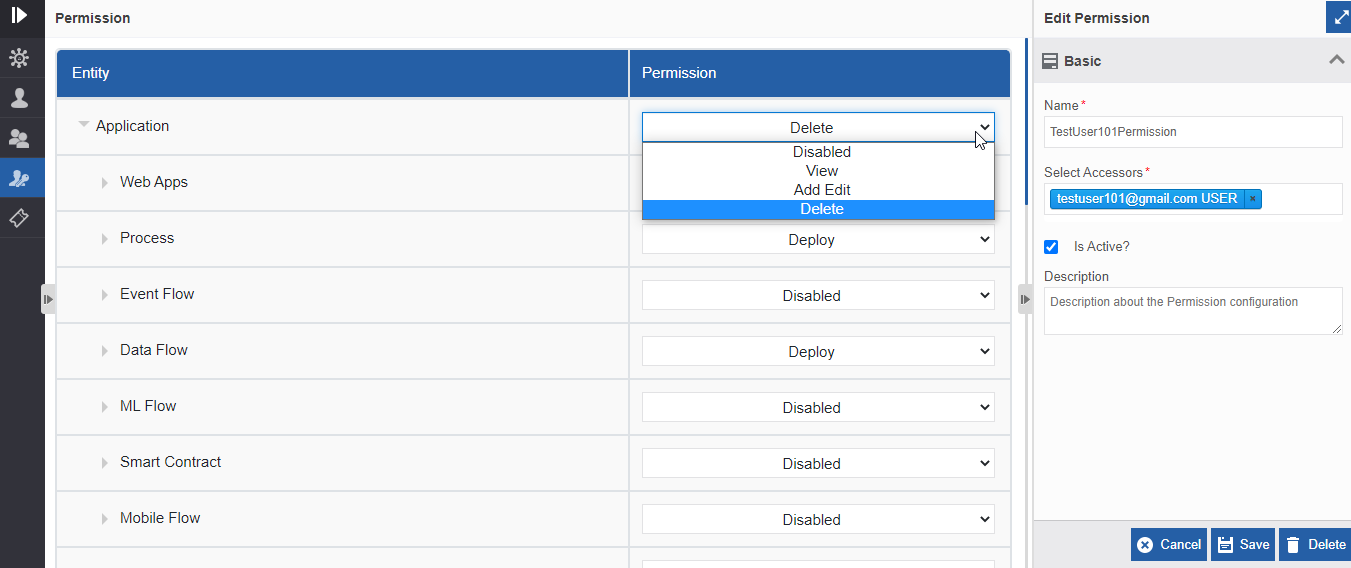
Figure 32.: Access permission details page (More) - Edit or modify the details of the permission as needed. Refer to Creating New Permission section for a detailed explanation of permission attributes.
- Click Save.
Creating New Permission
You can create permission and associate it with a role or user or both.
- Go to Main Menu > Management > Organization Management.
- Click Permission.
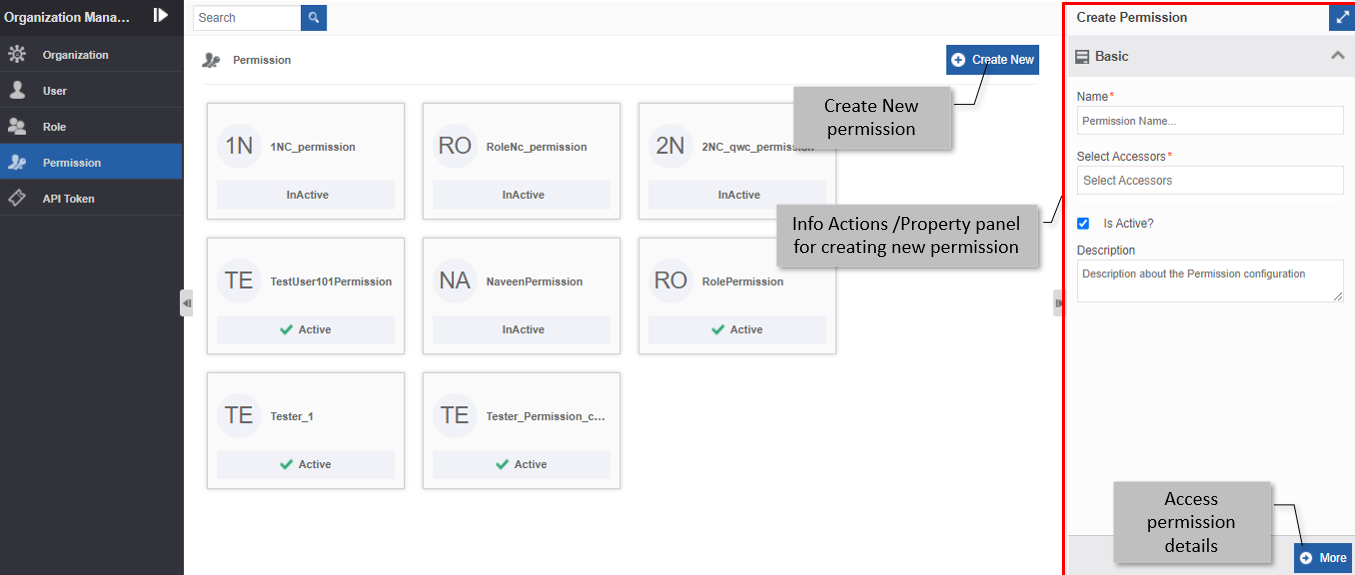
Figure 33.: Creating new permission - Click Create New.
- In the Create Permission panel, enter Name* for permission.
Character limit: 50
Data type: Alphanumeric and underscore characters. White space is not allowed. - Click Select Assessors* drop-down and select the user who
accesses the permission.
In this drop-down, roles names are displayed with suffix ROLES and user names are displayed with suffix USERS. You can select roles or users or both. You can select multiple roles or users or both.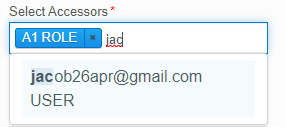
- If you need to keep the permission to be active, click
Is Active? checkbox.
Else uncheck the Is Active? checkbox. The permission becomes inactive for the roles and users associated with it. - Provide Description of the Permission configuration.
Character limit: 50
Data type: Alphanumeric and symbols - Click More at the bottom right of the permission list page. The
Entities and Permissions page appears.
Application and the organization-level business entities (Queries, Datamodel, and Decision Table) are the high-level entities displayed under the Entity column. All other flow modules and Web Apps are listed within the Application accordion.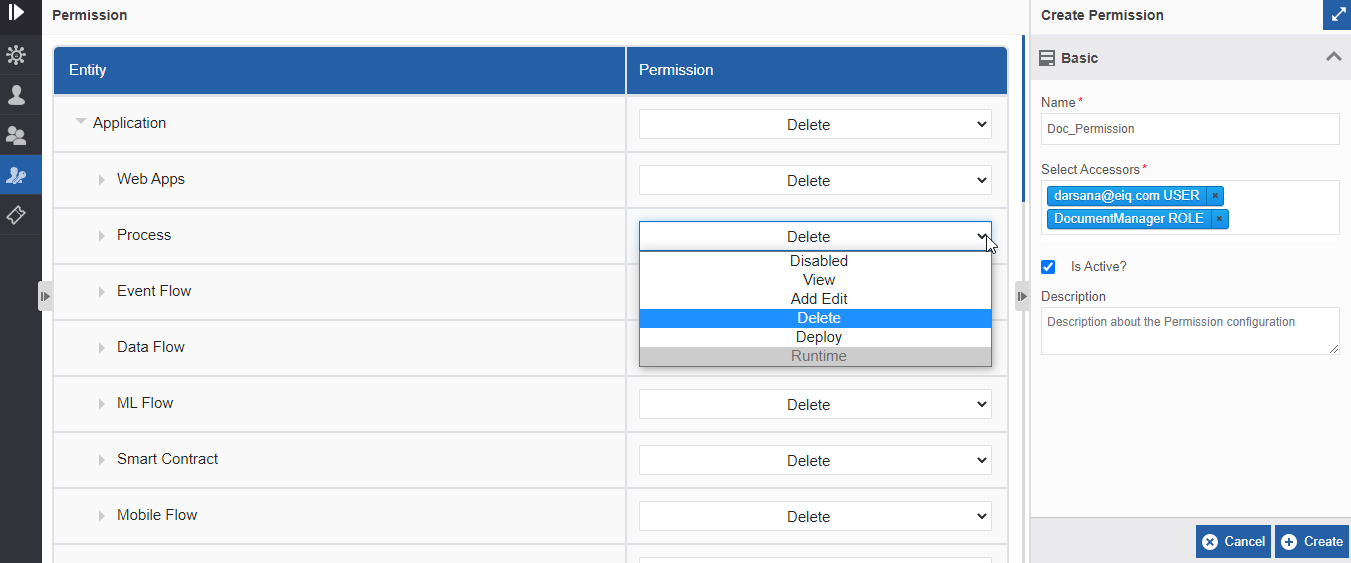
Figure 34.: The Entity and Permission page -
Below the Entity column, Application and organization entities (Data model, Decision Table, and Queries) are listed.
-
Click Application accordion for viewing the Web Apps and flow modules.
-
Within the Application accordion, click the flow modules accordion for viewing the business entities.
-
Within the Application accordion, click the Web Apps accordion for viewing the web pages.
-
-
Below the Permission column, select the permission from the drop-down list corresponding to each entity in the Entity column.
The description for each level of permission is tabulated below.
Access Permissions Description Delete The Delete permission allows you to View, Add Edit (Update), and Delete the
application/entity/flow.Disabled The Disabled permission disables the selected application/entity/flow. The
entity that is disabled cannot be viewed in the Platform for the user or role who
is associated with the permission.View The View permission allows you only to view the application/entity/flow. Add Edit The Add Edit permission allows you to View, Add and Edit/Update the
application/entity/flow.Deploy The Deploy permission allows you to View, Add and Edit/Update, Delete and
Deploy the flows. The deploy feature is applicable only for the flow modules.Runtime The Runtime feature is applicable only for the flow modules. -
Click Create for creating permission with the details provided.
Duplicating Permissions
Follow the steps below for duplicating an existing permission.
- Go to Main Menu > Management > Organization Management.
- Click Permission. The list of all permissions within the organization is displayed.
- Hover over the permission card. Three dots appear on the upper right side of the card.
- Click the three dots. More Actions appear.
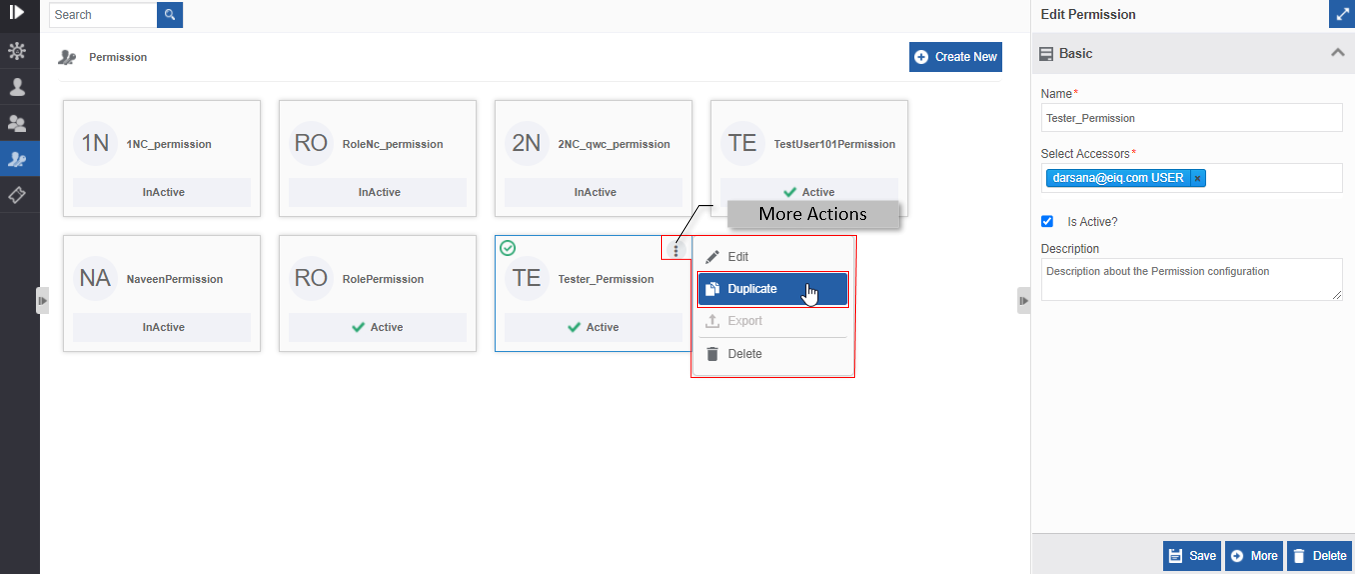
Figure 35.: Duplicating the permission - Click Duplicate. Confirmation pop-up appears.
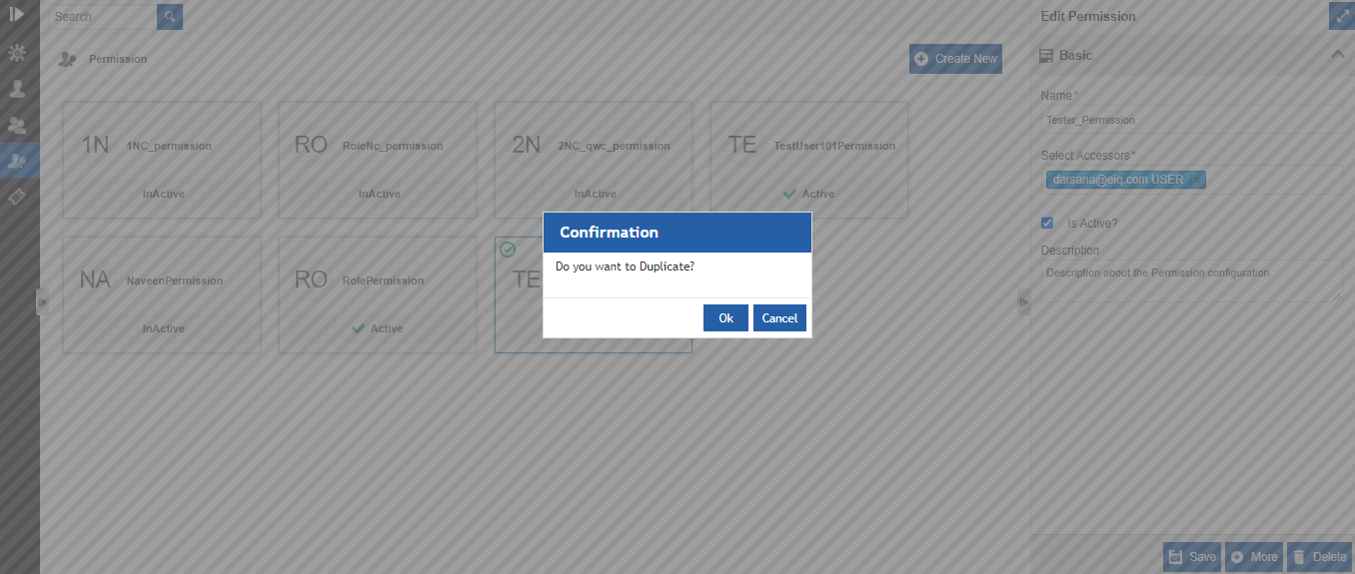
Figure 36.: Duplicate confirmation - Click Ok to duplicate the permission (or you can click
Cancel to cancel the duplicate action). A Success message
appears on successful duplication of the permission.
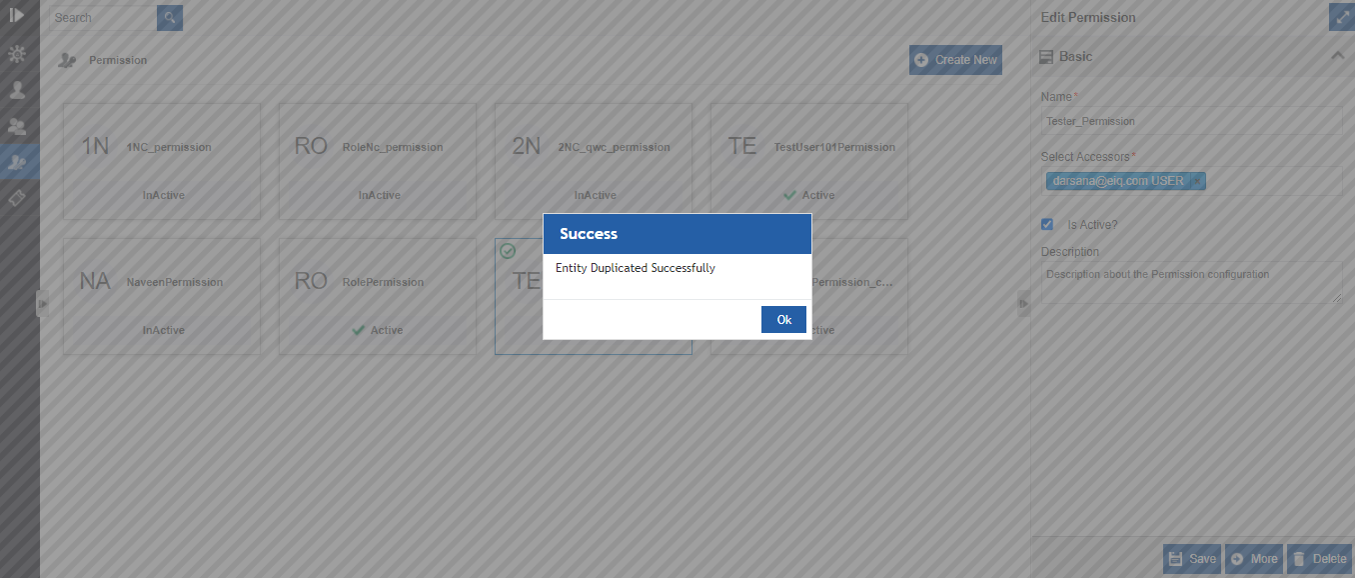
Figure 37.: Duplicate success message - Click Ok. A duplicate copy of permission appears in the role
page with the same permission name suffixed with “_copied”.
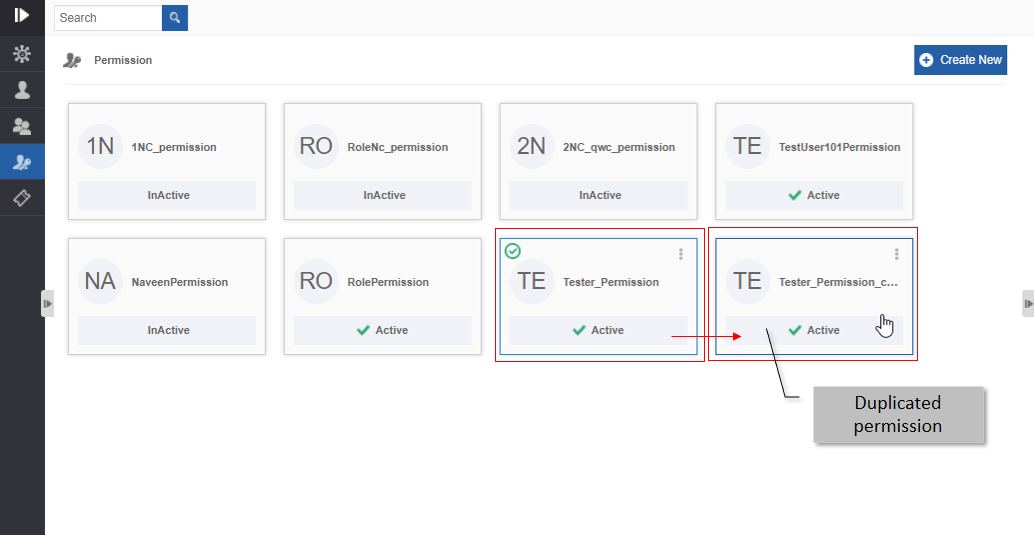
Figure 38.: The duplicated permission
Deleting Permissions
Permissions are associated with roles and/or users. You can delete Active or Inactive permission. If you delete active permission, the roles and users associated with that permission will lose the permissions associated with the permission. If you delete inactive permission, it is not affected anywhere.
- Go to Main Menu > Management > Organization Management.
- Click Permissions. The list of all permissions within the organization is displayed.
- Click the Permission card of the permission to be deleted. The
lower-right of the page displays the Delete button.
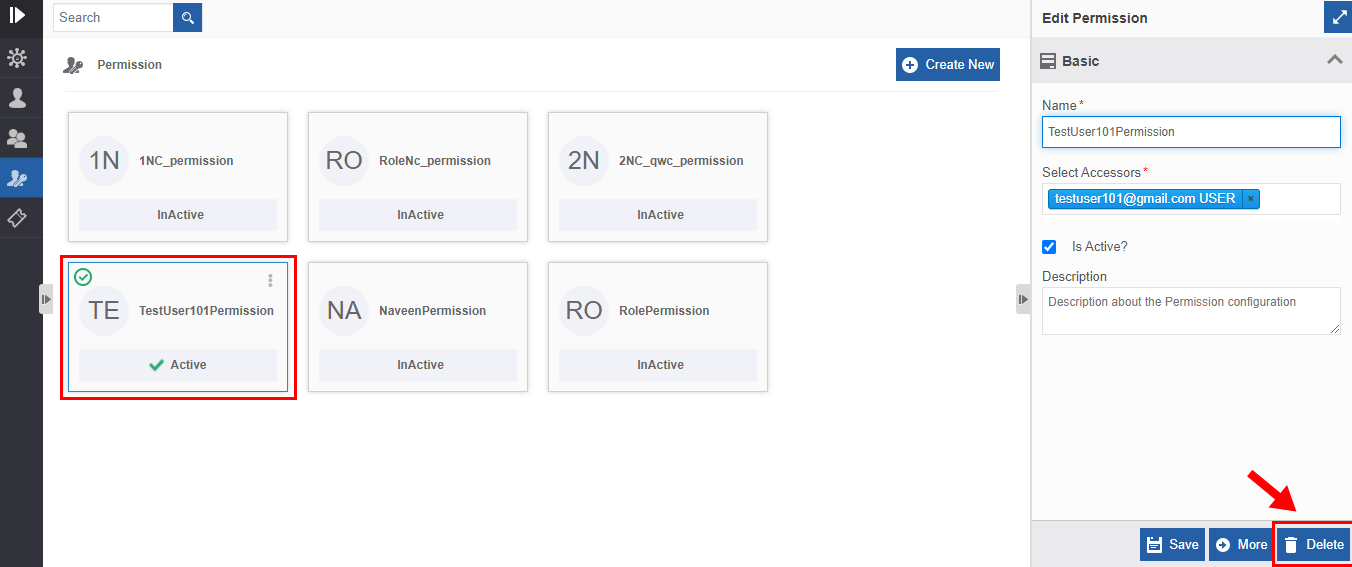
Figure 39.: Deleting permission - Click Delete action displayed on the lower right side. A
Confirmation pop-up for delete appears.
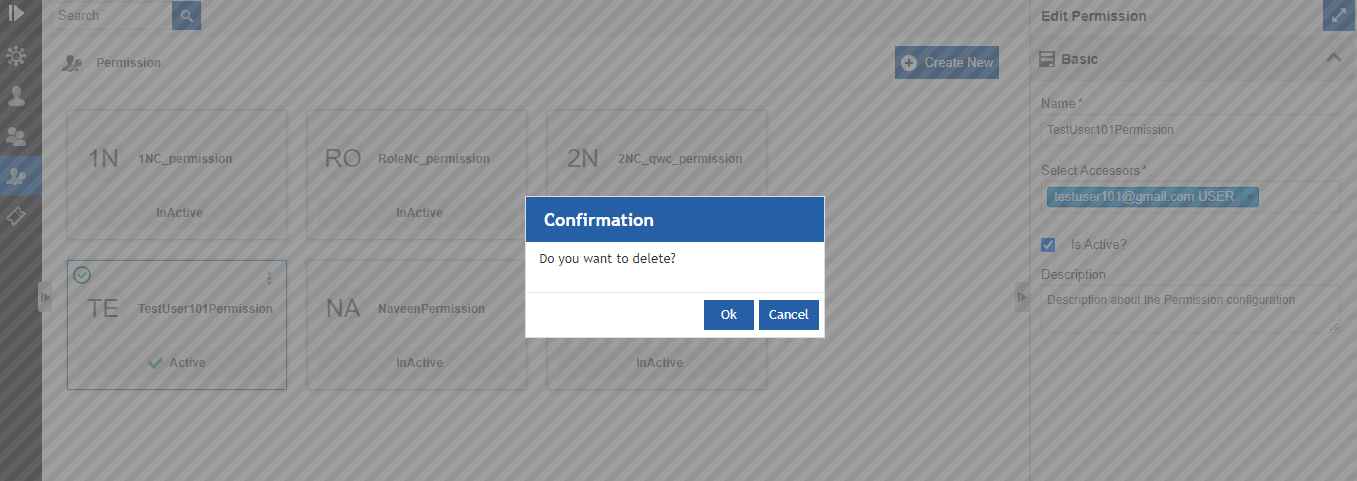
Figure 40.: Delete permission confirmation - Click Ok to delete the permission or click Cancel to cancel the delete action.
Alternatively, you can follow the below steps to delete permission:
- Click Burger menu, navigate to Management > Organization Management > Permission.
- Hover over the organization card. Three dots appear on the upper right side of the card.
- Click the three dots. More Actions appear.
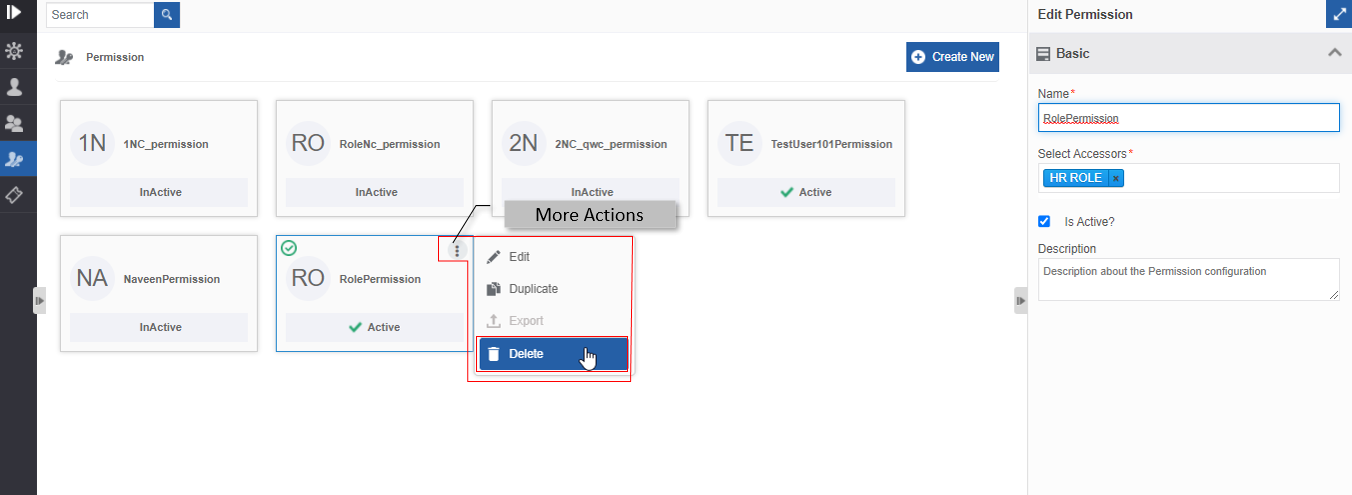
Figure 41.: Delete action in More Actions - Click Delete. Confirmation pop-up appears.
- Click ok for deleting the permission or click Cancel to discard action.
User Tokens
Introduction to API Tokens
API Tokens are used for generating access tokens for your credentials so that you can utilize them for authenticating any API (exposed internal APIs in the Platform) through that token. APIs need to be authenticated with proper user credentials. You can use the API token generated for authentication purposes.
Viewing API Token Details
- Go to Main Menu > Management > Organization Management.
-
Click API Token. The list of all API tokens is displayed in a grid with the status and details.
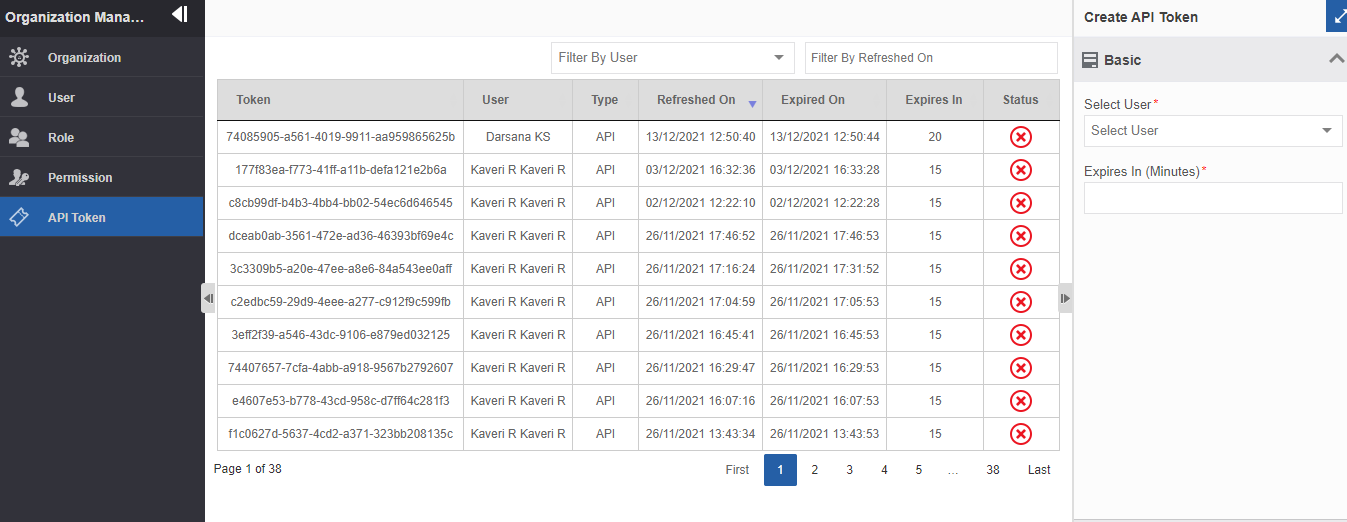
Figure 42.: API Token page-
Tokens are displayed in the latest first order.
-
Token ID is displayed below the column “Token”.
-
Click token Id in the Token column for copying the token Id.
-
Type = API indicates that the token is API Token.
-
Refreshed On – Displays the date and time on which the token is refreshed recently (if not refreshed, it displays the created date and time). Refer to Refreshing the API Token.
-
Expired On – Displays the date and time on which the token is expired. NA in the “Expired On” field indicates that the token is not expired.
-
Status = Green tick – Token not expired.
-
Status = Red cross – Token expired.
-
Click and navigate through the page numbers displayed at the bottom right of the Token table for viewing the tokens. Ten tokens are listed per page.
-
Click the arrow beside Refreshed On column head for sorting the token date-wise (ascending and descending order).
-
Creating New API Token
- Go to Main Menu > Management > Organization Management.
- Click API Token.
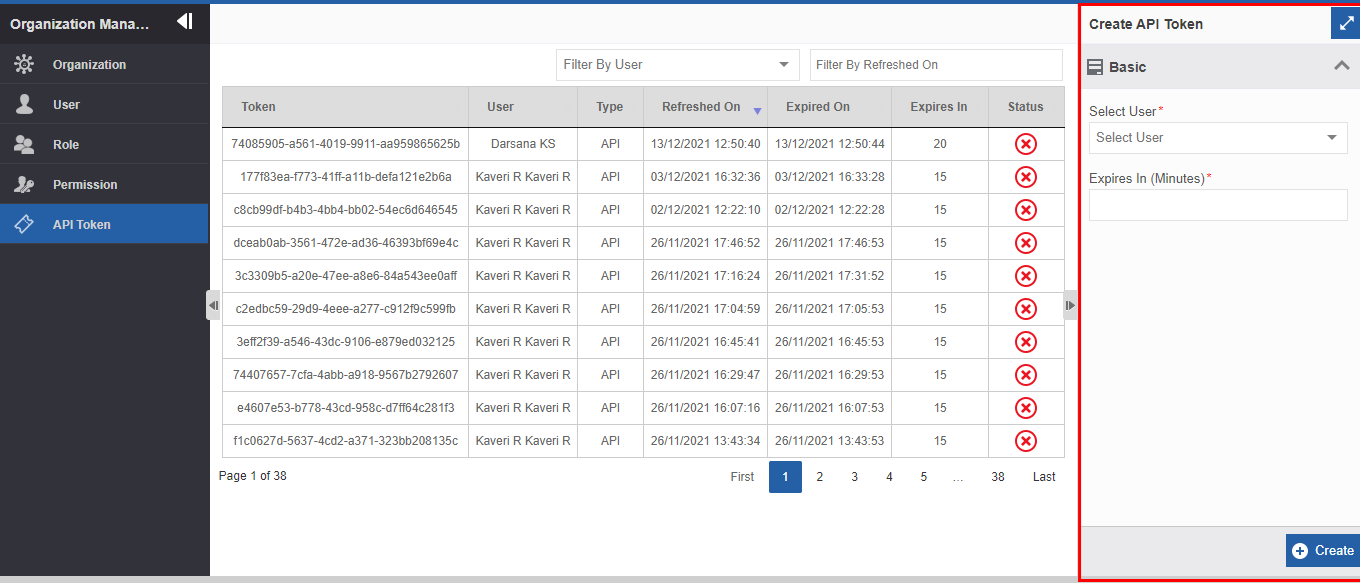
Figure 43.: Creating a new API Token - Click Create at the bottom right of the page.
- In the Create API Token panel, click the Select User drop-down and select a user name.
- Enter the expiry time in the Expiry In (Minutes) field. You can
also use the spin button in the Expiry In (Minutes) field for
entering the time.
The expiry time starts counting from the time you create the token and it will expire after the specified minutes in the Expiry In (Minutes) textbox. -
Click Create. A new API Token is generated and added to the list grid with an auto-generated Token Id and other details as shown below.
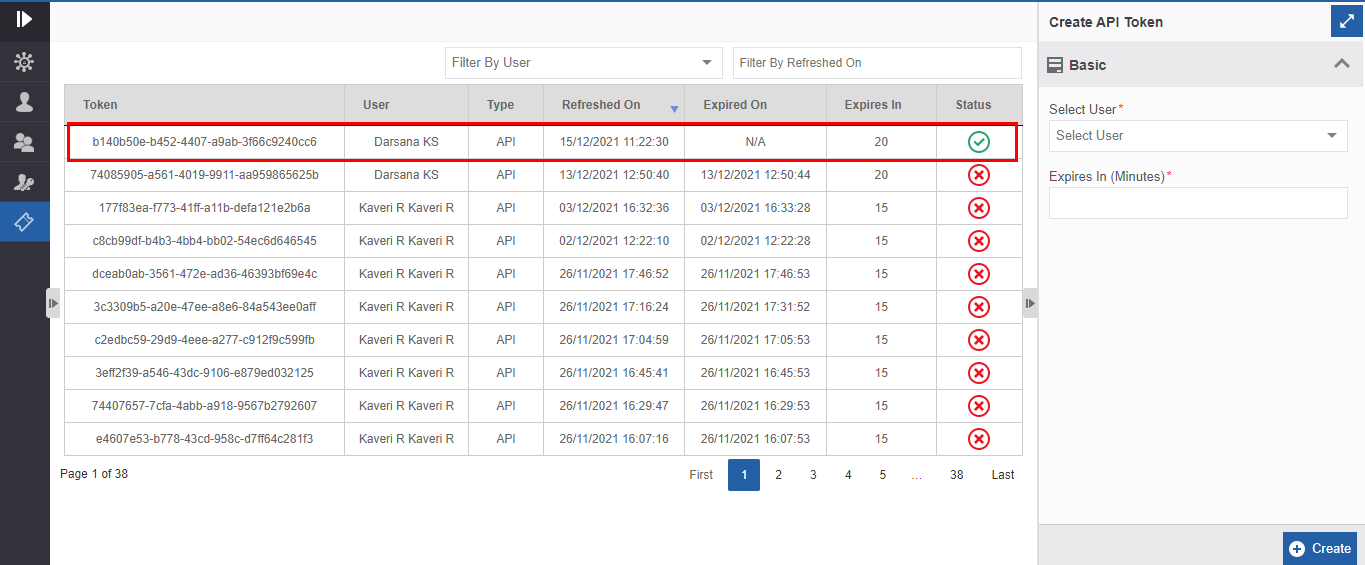
Figure 44.: Newly created API token with status as Active- Click token id from below the Token column for copying the token Id.
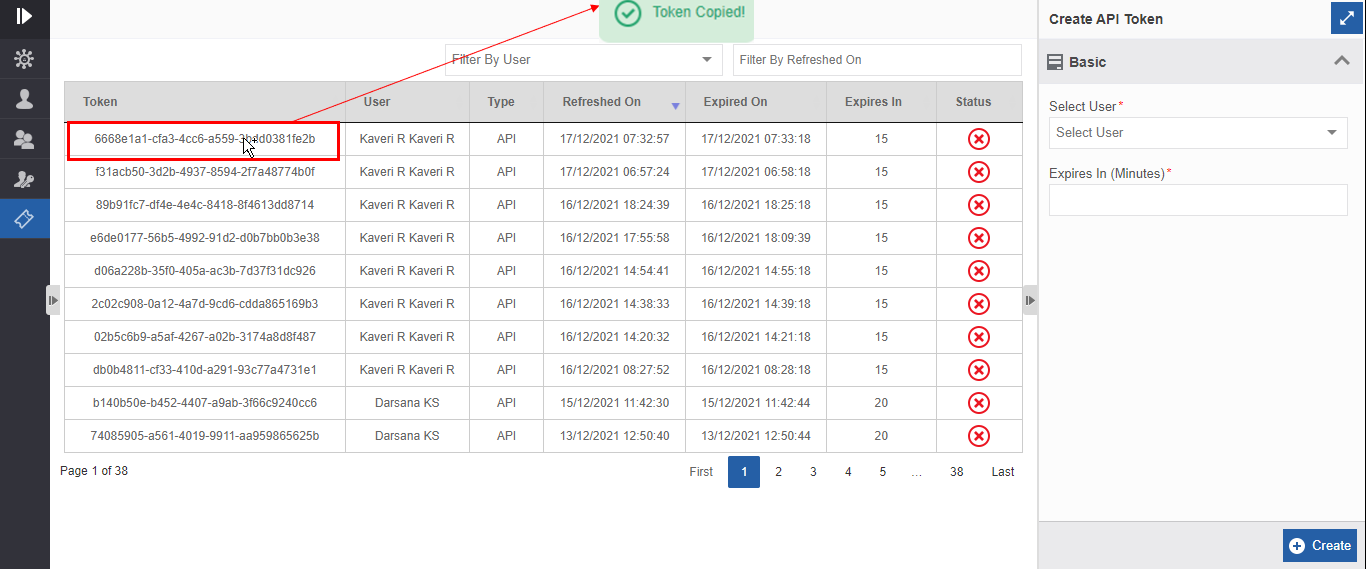
Figure 45.: Copying API Token Id
- Click token id from below the Token column for copying the token Id.
Refreshing the API Token
When you create a new token, the date and time of the token creation are displayed in the “Refreshed On” column in the API Token list grid. You can extend the time of expiry of the API Tokens by extending the time of expiry and hence refresh the API tokens before they expire. When you refresh the token, the created date in the “Refreshed On” column is replaced with the refreshed date and time. The date and time are replaced as only one API token is generated for a particular user.
-Go to Main Menu > Management > Organization Management > API Token and create a new API token.
-
For refreshing the API Token the token should not be expired. (Expired On = NA and Status = green tick in the API token details grid)
-
Call the Extend service of the API Token (provide value for “expires in” in minutes as needed) for refreshing the API token externally (not through Platform UI).
-
The expiry time is counted from the time you refresh the token till the expiry time.
-
When you refresh the token, it is updated in the “Refreshed On” column in the API token details.
Filtering API Tokens by “Filter By User”
- Go to Main Menu > Management > Organization Management.
- Click API Token. The list of all API tokens is displayed in a
grid with the status and details.
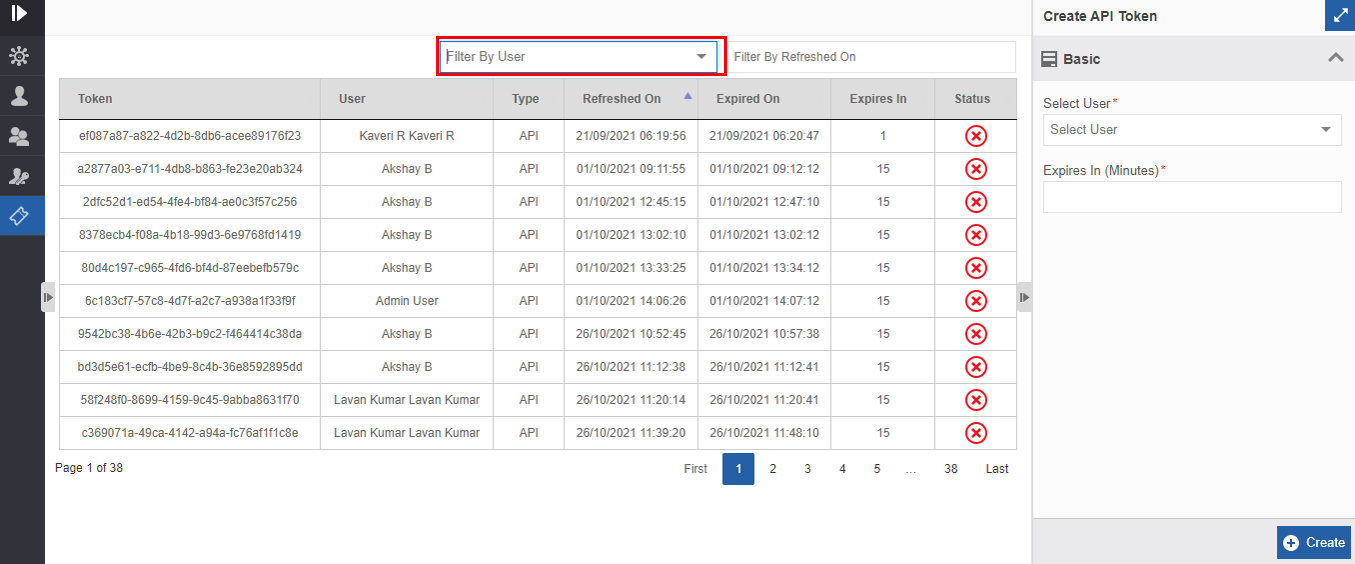
Figure 46.: Filter By User - In the Filter By User drop-down, enter the name of the user name. The matching user name is listed as you start typing the username.
- Select the username from the drop-down list. The tokens for the
selected user are filtered and displayed.
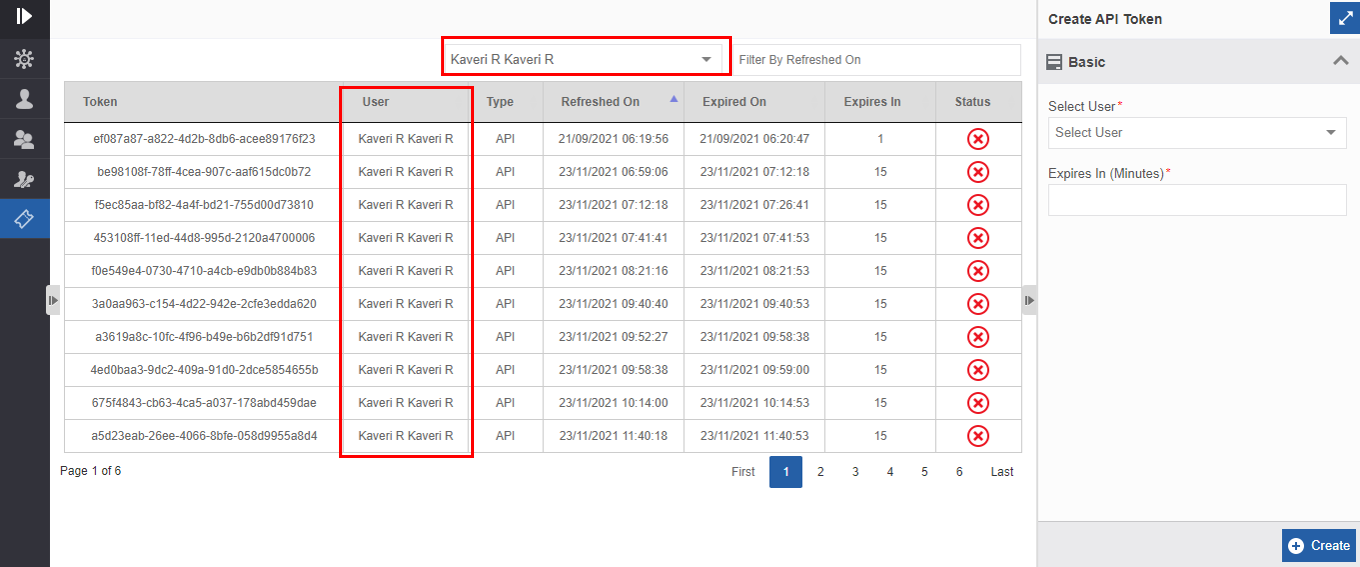
Figure 47.: Filter By User - Filtered results - For removing the filtered result, delete the username from the Filter By User field.
Filtering API Tokens by “Refreshed On” Date
- Go to Main Menu > Management > Organization Management.
- Click API Token. The list of all API tokens is displayed in a grid with the status and details.
- Click the Filter By Refreshed On field. Calendar appears.
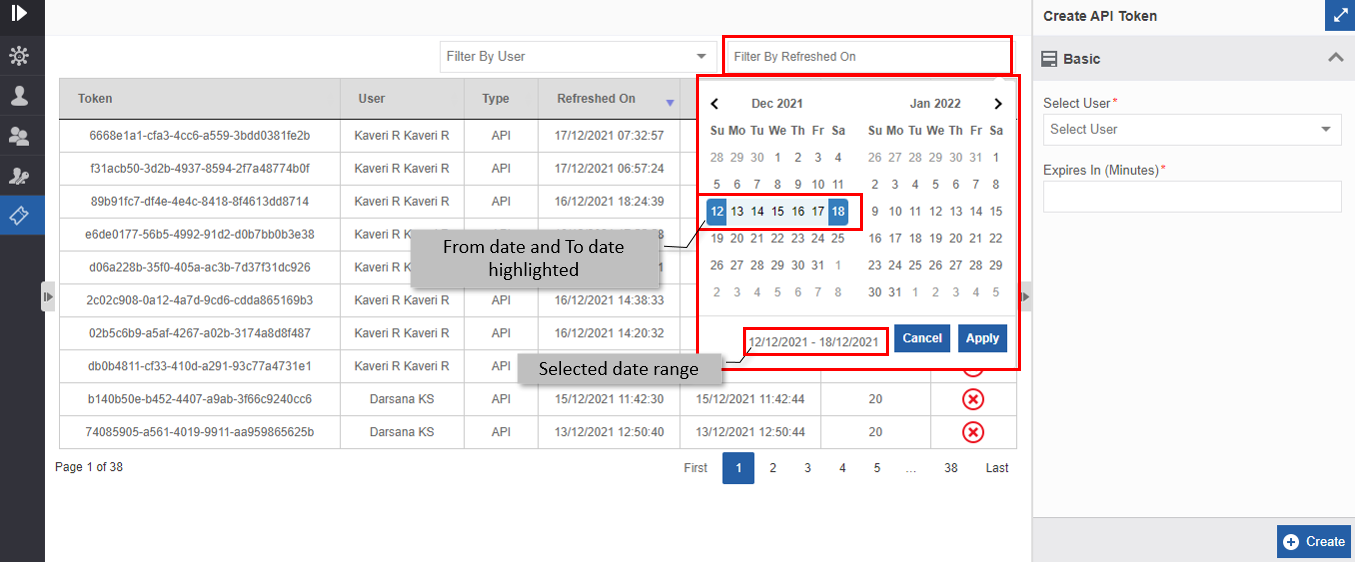
Figure 48.: Selecting “Refreshed On” Date - Click a From Date and click a To Date. The selected date range is highlighted. For selecting a single date, double-click the date. The Apply button is enabled after selecting the date.
- Click Apply. The tokens refreshed in the specified interval of
dates are filtered and displayed.
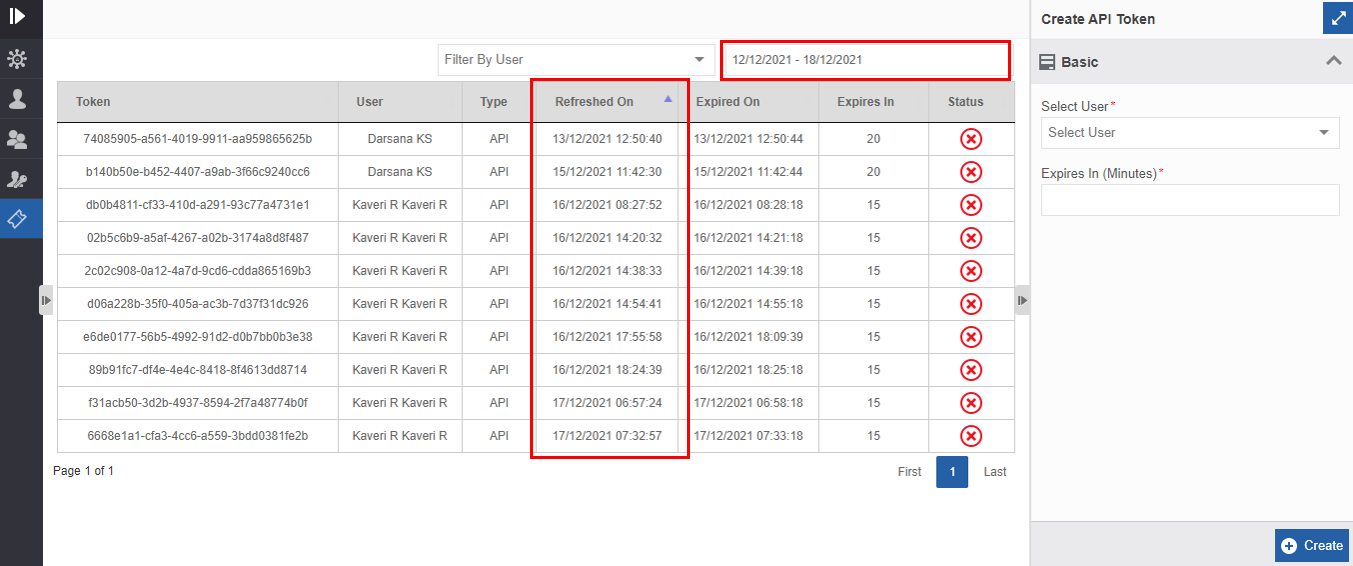
Figure 49.: Filtered results within the specified date interval - For removing the filtered result, click Filter By Refreshed On and click Cancel in the calendar.
Deleting API Token
You cannot delete an API Token from the API token list. An API token expires automatically after the specified expiry time.