Data Flow Activities
Configuring Aggregate in Data Flows
Aggregate activity is used to transform data of the input data model by using aggregation. You can use Group by, Having, and / or Order By options in the activity for data aggregation. You can add or remove attributes of the configured input data model. Business rules are applied using the Expression builder when adding a new data model attribute.
Properties: Basic, Aggregate, Error Handling
Dependent entities: Output data model of any preceding activity in the flow
Dependent configuration(s): NA
Basic
The basic activities in the data flows have basic details related to that activity. This is common to all the activities in the data flow.
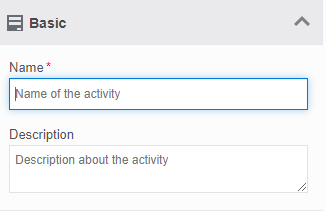
- Click an activity in the canvas and then the Basic accordion in the Property panel to enter the basic details.
| Field | Description |
|---|---|
| Name* | Enter the name of the activity. Character limit:50 Data Type: Alphanumeric and underscore. |
| Description | Describe the activity. Character limit: 1000 Data Type: Alphanumeric and symbols. |
Governance: Select Governance if you want governance on your data manipulation.
Governance is required when there are chances that errors or biases at the aggregate level can lead to massive business mistakes.
Governance ensures accuracy, data privacy, and consistency.
Aggregate
-
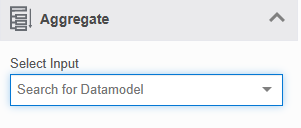
Click Aggregate accordion.
-
Select the input data model from the drop-down.
The input can be the output of any of the preceding activities that appear in the select Input data model drop-down as {activity_name}_Output.
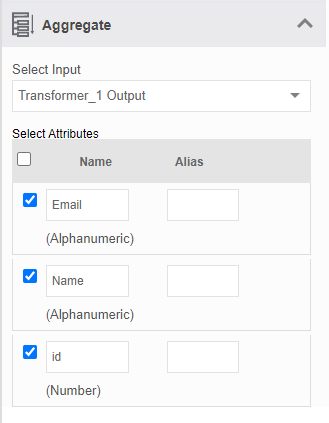
On selection of the required data model, the attributes of that data model appear in the property panel.
-
Below the Select Attributes, select the attributes that you prefer to keep.
- Below the Alias, enter the alias for the attribute name.
-
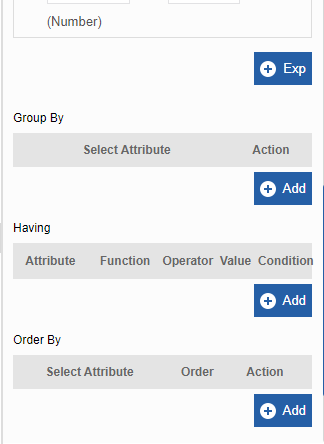
Scroll down below Select Attributes section. Adding Expressions and Group by options appears.
-
Click Exp to define a new attribute for the input data model using expressions.
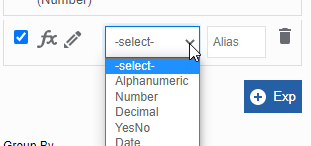
-
Select the data type of the new attribute added and enter the Alias for the attribute.
-
Click fx edit (pencil) icon. The Expression Builder opens, where you can define the rules as per your requirement. Make sure that the check box adjacent to fx is selected to include the attribute as the output data model.
You can add multiple expressions. Refer to Expression Builder. -
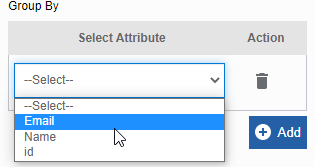
Below Group By section, click ++Add for selecting the Group by criteria.
-
Select the Attribute by which you need to group. You can add multiple Group By criteria.
-
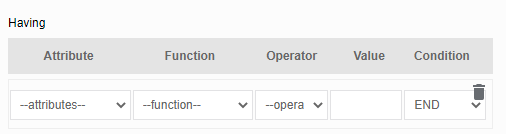
Below the Having section, click Add for adding Having criteria.
-
Select the Attribute, function for the attribute, the operation required to be performed, and the expected value for the attribute for which you need to apply the criteria.
- Select AND or OR condition to add multiple conditions. For a single condition or while defining the final condition, select the condition as END.
-
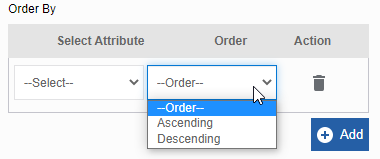
Below the Order By section, click +Add for adding Order by criteria.
-
Select the Attribute by which you need to order.
- Select the Order (Ascending or Descending order) that you need. You can add multiple Order By criteria.
Error Handling
When an error occurs in an activity, the system either proceeds with the error or will hang up the process based on the configuration. Error handling allows you to handle the error occurred in the activity level through configurations.
To configure error handling for a particular activity:
-
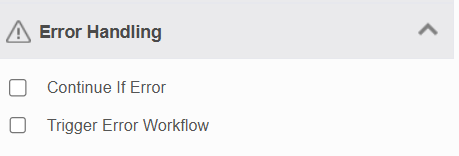
Click Error Handling accordion for the activity.
-
Check the Continue If Error check box if you want to continue the workflow even if the error occurs.
Else uncheck the checkbox to break or stop the workflow execution when an error occurs. -
Select Trigger Error Workflow, if you want to trigger the process flow mapped in the dataflow configuration during an error in the dataflow.
Consider you have configured the Error Handling in the data flow level. That is, you have mapped a Error Process flow in the Data Flow Error Handling section.
You must select Error Workflow in flow level and then select Trigger Error Wrokflow in the activity level to trigger that workflow.
Currently, the same error workflow is triggered for any activity as the error workflow is in the data flow level.
Different workflow for different activities: If you want to trigger different workflow for different activities, you can capture the activity details from the error workflow Node variable and based on the captured node details, you can apply rules for the further execution of the flow.
Configuring Azure IOT Publish Event in Data Flows
The activity Azure IOT Publish is used to publish information on a specific Azure IOT hub connection. The connection configuration of IOT hub needs to be set to this activity.
Properties: Basic, Azure IOT Publish Event, Error Handling
Dependent entities: Output data model of any preceding activity in the flow
Dependent configuration(s): NA
Basic
The basic activities in the data flows have basic details related to that activity. This is common to all the activities in the data flow.
- Click an activity in the canvas and then the Basic accordion in the Property panel to enter the basic details.
| Field | Description |
|---|---|
| Name* | Enter the name of the activity. Character limit:50 Data Type: Alphanumeric and underscore. |
| Description | Describe the activity. Character limit: 1000 Data Type: Alphanumeric and symbols. |
Azure IoT Publish
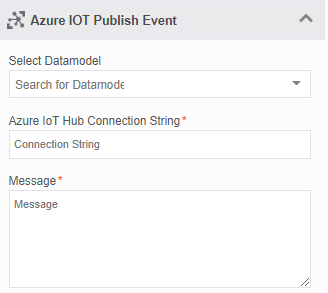
- Click Azure IOT Publish accordion.
-
Enter the details as explained below.
Field Description Select Data model Select the input data model.
The input can be the output of any of the proceeding activities.Azure IoT Hub Connection String* Enter the Azure IoT Hub connection string.
The connection string enables the activity to connect to the specific IoT hub.Message* Enter the message details. Message should be in JSON format (key-value pairs). The values should be the name of the attributes of the input data model mapped enclosed with in <@**{attribute_name}** @>
Error Handling
When an error occurs in an activity, the system either proceeds with the error or will hang up the process based on the configuration. Error handling allows you to handle the error occurred in the activity level through configurations.
To configure error handling for a particular activity:
-
Click Error Handling accordion for the activity.
-
Check the Continue If Error check box if you want to continue the workflow even if the error occurs.
Else uncheck the checkbox to break or stop the workflow execution when an error occurs. -
Select Trigger Error Workflow, if you want to trigger the process flow mapped in the dataflow configuration during an error in the dataflow.
Consider you have configured the Error Handling in the data flow level. That is, you have mapped a Error Process flow in the Data Flow Error Handling section.
You must select Error Workflow in flow level and then select Trigger Error Wrokflow in the activity level to trigger that workflow.
Currently, the same error workflow is triggered for any activity as the error workflow is in the data flow level.
Different workflow for different activities: If you want to trigger different workflow for different activities, you can capture the activity details from the error workflow Node variable and based on the captured node details, you can apply rules for the further execution of the flow.
Configuring Custom Query in Data Flows
The activity Custom Query is used to define custom SQL queries for fetching the data from the input data model.

Properties: Basic, Custom Query, Error Handling
Dependent entities: NA
Dependent configuration(s): NA
Basic
The basic activities in the data flows have basic details related to that activity. This is common to all the activities in the data flow.
- Click an activity in the canvas and then the Basic accordion in the Property panel to enter the basic details.
| Field | Description |
|---|---|
| Name* | Enter the name of the activity. Character limit:50 Data Type: Alphanumeric and underscore. |
| Description | Describe the activity. Character limit: 1000 Data Type: Alphanumeric and symbols. |
Custom Query
-
Click Custom Query accordion.
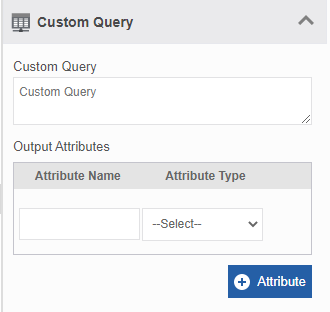
Custom Query property -
Enter the details as explained below.
Field Description Custom Query Enter the custom query. The input data model of the custom query is the output data model name of any of the preceding activities that is written in the specific format. The output data model name is the table name for the custom query activity. The table name format should be like the example provided below.
Select * from <#{Preceding_activity_name}_Output#>
Example: Select * from <#Reader_2_Output#>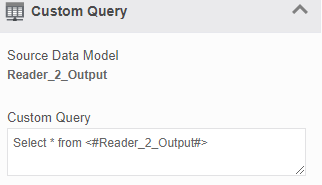
Output Attributes Click Attribute .
Provide the Attribute Name and select the Attribute Type .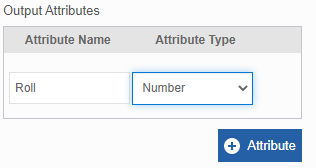
You can add multiple attributes. At least one attribute is mandatory.
- Note that the preview of the Custom Query will display the query output.
Error Handling
When an error occurs in an activity, the system either proceeds with the error or will hang up the process based on the configuration. Error handling allows you to handle the error occurred in the activity level through configurations.
To configure error handling for a particular activity:
-
Click Error Handling accordion for the activity.
-
Check the Continue If Error check box if you want to continue the workflow even if the error occurs.
Else uncheck the checkbox to break or stop the workflow execution when an error occurs. -
Select Trigger Error Workflow, if you want to trigger the process flow mapped in the dataflow configuration during an error in the dataflow.
Consider you have configured the Error Handling in the data flow level. That is, you have mapped a Error Process flow in the Data Flow Error Handling section.
You must select Error Workflow in flow level and then select Trigger Error Wrokflow in the activity level to trigger that workflow.
Currently, the same error workflow is triggered for any activity as the error workflow is in the data flow level.
Different workflow for different activities: If you want to trigger different workflow for different activities, you can capture the activity details from the error workflow Node variable and based on the captured node details, you can apply rules for the further execution of the flow.
Configuring DB in Data Flows
The activity Database (DB) is used to execute Data Manipulation Language (DML) statements. DMLs are elements in the SQL language used for data retrieval and manipulation. Using DML statements, you can perform operations such as adding new rows, updating and deleting existing rows, merging tables, and so on. You can map multiple scripts in the DB.
Note
You cannot preview the database activity output or use the database output as the input for any other activity.

Properties: Basic, Database, Error Handling
Dependent entities: Database Script, Output data model of any preceding activity in the flow
Dependent configuration(s): NA
Basic
The basic activities in the data flows have basic details related to that activity. This is common to all the activities in the data flow.
- Click an activity in the canvas and then the Basic accordion in the Property panel to enter the basic details.
| Field | Description |
|---|---|
| Name* | Enter the name of the activity. Character limit:50 Data Type: Alphanumeric and underscore. |
| Description | Describe the activity. Character limit: 1000 Data Type: Alphanumeric and symbols. |
Database
Note
You should configure the database script(s) - business entitiy before configuring the activity, database.
-
Click Database accordion.
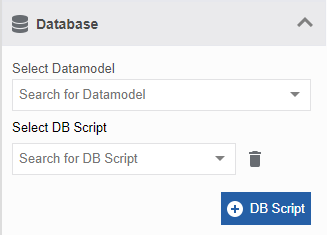
-
Select the Data Model. Data model can be a data model entity or output from any of the preceding activities.
- Select the DB Script.
- Click DB Script to add multiple scripts.
Error Handling
When an error occurs in an activity, the system either proceeds with the error or will hang up the process based on the configuration. Error handling allows you to handle the error occurred in the activity level through configurations.
To configure error handling for a particular activity:
-
Click Error Handling accordion for the activity.
-
Check the Continue If Error check box if you want to continue the workflow even if the error occurs.
Else uncheck the checkbox to break or stop the workflow execution when an error occurs. -
Select Trigger Error Workflow, if you want to trigger the process flow mapped in the dataflow configuration during an error in the dataflow.
Consider you have configured the Error Handling in the data flow level. That is, you have mapped a Error Process flow in the Data Flow Error Handling section.
You must select Error Workflow in flow level and then select Trigger Error Wrokflow in the activity level to trigger that workflow.
Currently, the same error workflow is triggered for any activity as the error workflow is in the data flow level.
Different workflow for different activities: If you want to trigger different workflow for different activities, you can capture the activity details from the error workflow Node variable and based on the captured node details, you can apply rules for the further execution of the flow.
Configuring Decision Table Executor in Data Flows
A decision table executor activity is used when you need to do some calculations based on conditions or rules and display the result. You can define multiple conditions and calculations in the decision table.
The Decision Model and Notation (DMN) standard provides the industry with a modeling notation for decisions that will support decision management and business rules. The decision table executor activity uses DMN. Configuring conditions or rules in DMN are done using Friendly Enough Expression Language (FEEL). It is mandatory to understand DMN and FEEL before configuring the decision table.

Properties: Basic, Decision Table, Error Handling
Dependent entities: Decision Table, Output data model of any preceding activity in the flow
Dependent configuration(s): NA
Basic
The basic activities in the data flows have basic details related to that activity. This is common to all the activities in the data flow.
- Click an activity in the canvas and then the Basic accordion in the Property panel to enter the basic details.
| Field | Description |
|---|---|
| Name* | Enter the name of the activity. Character limit:50 Data Type: Alphanumeric and underscore. |
| Description | Describe the activity. Character limit: 1000 Data Type: Alphanumeric and symbols. |
Decision Table Executor
Note
You should configure a decision table entity and deploy this entity before mapping it to the activity.
-
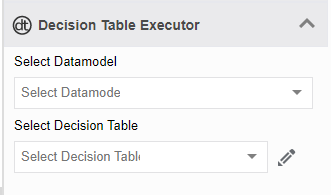
Click Decision Table Executor accordion.
-
Select Data Model from the Select Datamodel drop-down.
- In the Select Decision Table, select the decision table that you have created.
-
Click the Input / Output variable mapping icon (
 ). The details displayed are as per the decision table designed.
The input Mapping tab section is active by default. Input Mapping details with an option to choose variables.
This is a mandatory configuration for the decision table if variable mappings appear.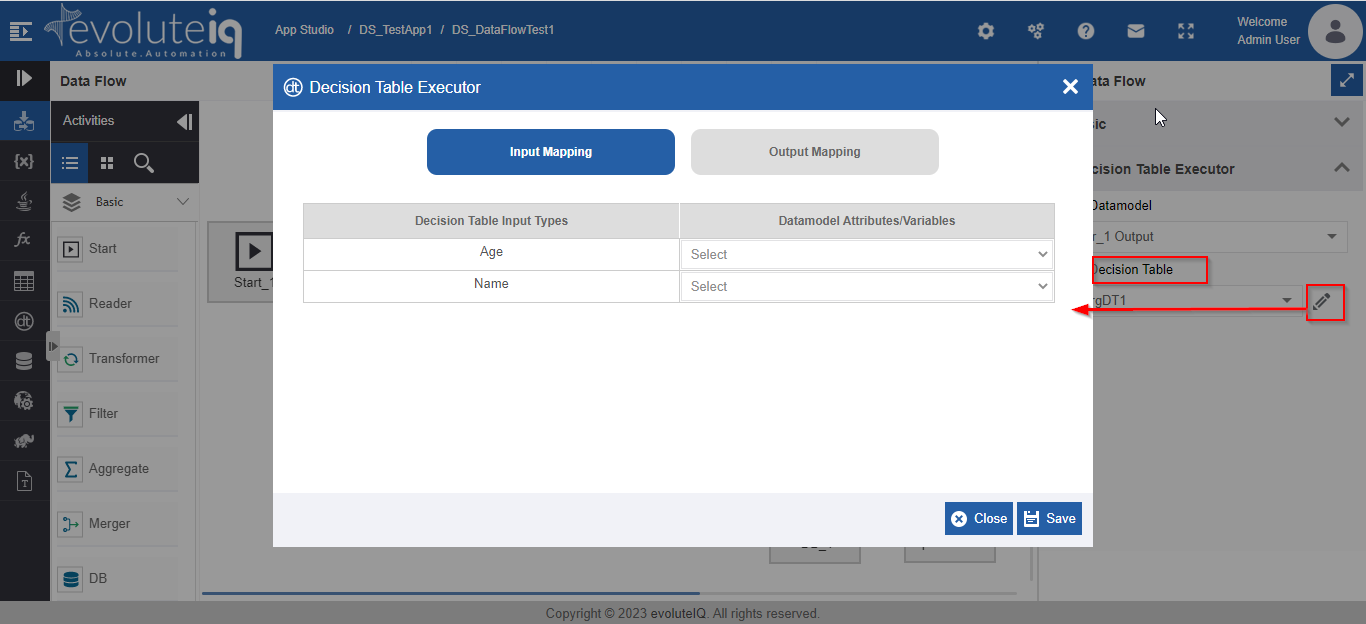
-
Select the Data model Attributes Variables from the drop-down for each of the Decision Table Input Types.
Variables of relevant data types that match the input types appear. -
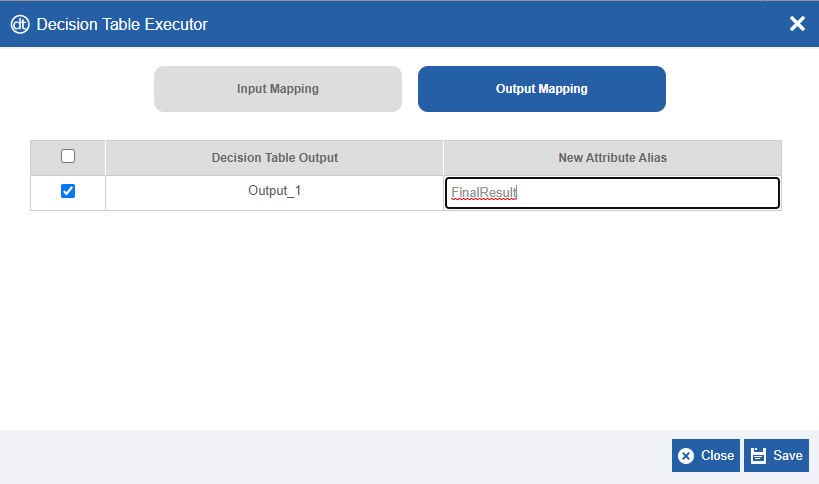
Click Output Mapping tab section. Output Mapping details with an option to choose variables.
-
Select the Variables from the drop-down for each of the Decision Table Output. Output data is stored in this variable.
Select the checkbox on the left side to select and map only those output variables that are needed. At least one output configuration is mandatory for the decision table. - Click Save to save the decision table executor configurations.
Error Handling
When an error occurs in an activity, the system either proceeds with the error or will hang up the process based on the configuration. Error handling allows you to handle the error occurred in the activity level through configurations.
To configure error handling for a particular activity:
-
Click Error Handling accordion for the activity.
-
Check the Continue If Error check box if you want to continue the workflow even if the error occurs.
Else uncheck the checkbox to break or stop the workflow execution when an error occurs. -
Select Trigger Error Workflow, if you want to trigger the process flow mapped in the dataflow configuration during an error in the dataflow.
Consider you have configured the Error Handling in the data flow level. That is, you have mapped a Error Process flow in the Data Flow Error Handling section.
You must select Error Workflow in flow level and then select Trigger Error Wrokflow in the activity level to trigger that workflow.
Currently, the same error workflow is triggered for any activity as the error workflow is in the data flow level.
Different workflow for different activities: If you want to trigger different workflow for different activities, you can capture the activity details from the error workflow Node variable and based on the captured node details, you can apply rules for the further execution of the flow.
Configuring End in Data Flows
End activity represents the end of a flow. There is no outgoing transition link from the End. Multiple End activities can be included in a flow based on the business requirement.
Properties: Basic
Dependent entities: NA
Dependent configurations: NA
Basic
The basic activities in the data flows have basic details related to that activity. This is common to all the activities in the data flow.
- Click an activity in the canvas and then the Basic accordion in the Property panel to enter the basic details.
| Field | Description |
|---|---|
| Name* | Enter the name of the activity. Character limit:50 Data Type: Alphanumeric and underscore. |
| Description | Describe the activity. Character limit: 1000 Data Type: Alphanumeric and symbols. |
Configuring Execute Dataflow in Data Flows
The Execute Dataflow activity is used to call/trigger and execute a predefined data flow. You need to create a data flow and then map the data flow in the Execute dataflow activity.
Properties: Basic, Execute Data Flow, Error Handling
Dependent entities: Output data model of any other activity
Dependent configuration(s): NA
Basic
The basic activities in the data flows have basic details related to that activity. This is common to all the activities in the data flow.
- Click an activity in the canvas and then the Basic accordion in the Property panel to enter the basic details.
| Field | Description |
|---|---|
| Name* | Enter the name of the activity. Character limit:50 Data Type: Alphanumeric and underscore. |
| Description | Describe the activity. Character limit: 1000 Data Type: Alphanumeric and symbols. |
Execute Data Flow
-
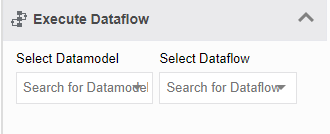
Click Execute Data Flow accordion.
-
In the Select Data model, click the drop-down and select the required data model.
-
In the Select Data Flow, click the drop-down and select the data flow that needs to be executed as part of the current data flow.
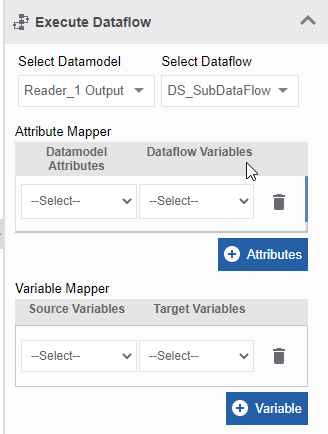
Attribute Mapper and Variable Mapper sections appear.
-
Select Data Model Attributes from the Attributes Mapper > Data model Attributes. Attributes in the selected data model appear in the drop-down.
- Select Data Model Variables from the Attributes Mapper > Data model Variables. Variables of the data flow that is mapped (child flow) are listed based on the data type of the attribute selected.
- Click Attributes to add multiple attributes and provide details as mentioned in Steps 4 and 5.
- Select Source Variables from the Variable Mapper > Source Variables. Variables of the current flow are listed in the drop-down.
- Select Target Variables from the Variable Mapper > Target Variables. Variables from the data flow that is mapped (child flow) are listed based on the data type of the Source Variable.
- Click Variable to add multiple variables and provide details as mentioned in Steps 7 and 8.
Error Handling
When an error occurs in an activity, the system either proceeds with the error or will hang up the process based on the configuration. Error handling allows you to handle the error occurred in the activity level through configurations.
To configure error handling for a particular activity:
-
Click Error Handling accordion for the activity.
-
Check the Continue If Error check box if you want to continue the workflow even if the error occurs.
Else uncheck the checkbox to break or stop the workflow execution when an error occurs. -
Select Trigger Error Workflow, if you want to trigger the process flow mapped in the dataflow configuration during an error in the dataflow.
Consider you have configured the Error Handling in the data flow level. That is, you have mapped a Error Process flow in the Data Flow Error Handling section.
You must select Error Workflow in flow level and then select Trigger Error Wrokflow in the activity level to trigger that workflow.
Currently, the same error workflow is triggered for any activity as the error workflow is in the data flow level.
Different workflow for different activities: If you want to trigger different workflow for different activities, you can capture the activity details from the error workflow Node variable and based on the captured node details, you can apply rules for the further execution of the flow.
Configuring Filter in Data Flows
The activity filter is used to filter the details from the input data by applying functions and conditions.

Properties: Basic, Filter, Error Handling
Dependent entities: Output data model of any preceding activity in the flow
Dependent configuration(s): NA
Basic
The basic activities in the data flows have basic details related to that activity. This is common to all the activities in the data flow.
- Click an activity in the canvas and then the Basic accordion in the Property panel to enter the basic details.
| Field | Description |
|---|---|
| Name* | Enter the name of the activity. Character limit:50 Data Type: Alphanumeric and underscore. |
| Description | Describe the activity. Character limit: 1000 Data Type: Alphanumeric and symbols. |
Filter
-
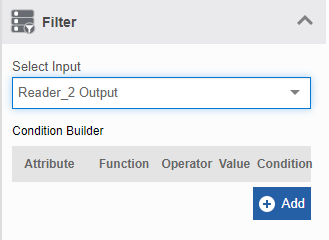
Click Filter accordion.
-
Select the input data model from the drop-down. The input can be the output of any of the preceding activities that appears in the select Input data model drop-down as {activity_name}_Output.
The Condition Builder template appears. - Click Add to add a condition. Condition Builder prompts you with drop-downs and textbox for entering input.
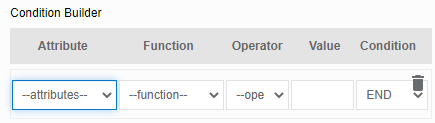
- Select the Attribute, Function for the attribute, and the operation to be done in the respective drop-downs.
- Enter the Value for the attribute for which you need to apply the criteria.
- Select AND and OR condition to add multiple conditions.
For a single condition or to end a condition, select condition as END. - Click the delete icon to delete the condition.
Error Handling
When an error occurs in an activity, the system either proceeds with the error or will hang up the process based on the configuration. Error handling allows you to handle the error occurred in the activity level through configurations.
To configure error handling for a particular activity:
-
Click Error Handling accordion for the activity.
-
Check the Continue If Error check box if you want to continue the workflow even if the error occurs.
Else uncheck the checkbox to break or stop the workflow execution when an error occurs. -
Select Trigger Error Workflow, if you want to trigger the process flow mapped in the dataflow configuration during an error in the dataflow.
Consider you have configured the Error Handling in the data flow level. That is, you have mapped a Error Process flow in the Data Flow Error Handling section.
You must select Error Workflow in flow level and then select Trigger Error Wrokflow in the activity level to trigger that workflow.
Currently, the same error workflow is triggered for any activity as the error workflow is in the data flow level.
Different workflow for different activities: If you want to trigger different workflow for different activities, you can capture the activity details from the error workflow Node variable and based on the captured node details, you can apply rules for the further execution of the flow.
Configuring Fork in Data Flows
The activity Fork is used to split a transition link into several sub-transition links. These sub-transition links follow a parallel, but, a different course of action. The sub-transition links are eventually joined together using the activity-Join at some point in the flow. You can use multiple Fork and Join activities; however, to be noted that a flow should have an equal number of Fork and Join activities.

Properties: Basic
Dependent entities: NA
Dependent configuration(s): NA
Basic
The basic activities in the data flows have basic details related to that activity. This is common to all the activities in the data flow.
- Click an activity in the canvas and then the Basic accordion in the Property panel to enter the basic details.
| Field | Description |
|---|---|
| Name* | Enter the name of the activity. Character limit:50 Data Type: Alphanumeric and underscore. |
| Description | Describe the activity. Character limit: 1000 Data Type: Alphanumeric and symbols. |
Configuring Hadoop Writer in Data Flows
The activity Hadoop Writer is used to write new data or result set to a Hadoop file system.

Properties: Basic, Hadoop Writer, Error Handling
Dependent entities: Hadoop Entity
Dependent configuration(s): Hadoop
Basic
The basic activities in the data flows have basic details related to that activity. This is common to all the activities in the data flow.
- Click an activity in the canvas and then the Basic accordion in the Property panel to enter the basic details.
| Field | Description |
|---|---|
| Name* | Enter the name of the activity. Character limit:50 Data Type: Alphanumeric and underscore. |
| Description | Describe the activity. Character limit: 1000 Data Type: Alphanumeric and symbols. |
Hadoop Writer
-
Click Hadoop Writer accordion.
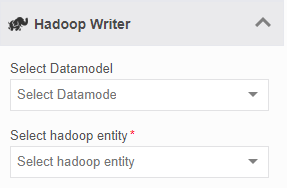
-
Select the input data model from the drop-down. The input can be the output of any of the preceding activities that appear in the select Input data model drop-down as {activity_name}_Output.
- In the Select Hadoop Entity, select the Hadoop entity name. Only the write-type entities appear in the list.
Error Handling
When an error occurs in an activity, the system either proceeds with the error or will hang up the process based on the configuration. Error handling allows you to handle the error occurred in the activity level through configurations.
To configure error handling for a particular activity:
-
Click Error Handling accordion for the activity.
-
Check the Continue If Error check box if you want to continue the workflow even if the error occurs.
Else uncheck the checkbox to break or stop the workflow execution when an error occurs. -
Select Trigger Error Workflow, if you want to trigger the process flow mapped in the dataflow configuration during an error in the dataflow.
Consider you have configured the Error Handling in the data flow level. That is, you have mapped a Error Process flow in the Data Flow Error Handling section.
You must select Error Workflow in flow level and then select Trigger Error Wrokflow in the activity level to trigger that workflow.
Currently, the same error workflow is triggered for any activity as the error workflow is in the data flow level.
Different workflow for different activities: If you want to trigger different workflow for different activities, you can capture the activity details from the error workflow Node variable and based on the captured node details, you can apply rules for the further execution of the flow.
Configuring Insert Data Entity in Data Flows
The activity, Insert Data Entity is used to insert records into the data entity table from the selected data model.
A data entity is a custom-defined data type variable. The data entity is created and managed in the Manage > Data Catalog section.
Tip
Refer to Manage - Data Catalog – Data Entities to create and Management > Data Catalog > Data Entities.

Properties: Basic, Insert Data Entity
Dependent entities: NA
Dependent configuration(s): Data Entity (configured in Manage > Data Catalog)
Basic
The basic activities in the data flows have basic details related to that activity. This is common to all the activities in the data flow.
- Click an activity in the canvas and then the Basic accordion in the Property panel to enter the basic details.
| Field | Description |
|---|---|
| Name* | Enter the name of the activity. Character limit:50 Data Type: Alphanumeric and underscore. |
| Description | Describe the activity. Character limit: 1000 Data Type: Alphanumeric and symbols. |
Insert Data Entity
-
Click Insert Data Entity accordion.
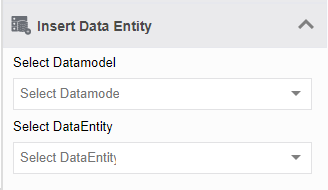
Insert Data Entity properties -
In the Select Data model, select the data model. The input model can be the output of any of the preceding activities that appear in the select Input data model drop-down as {activity_name}_Output.
-
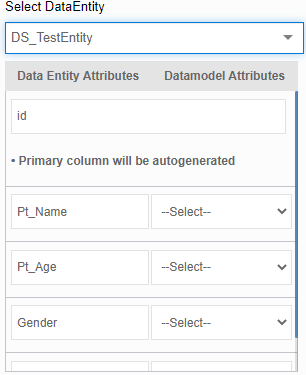
Select DataEntity. When you select the data entity, the attributes of that data entity table appear below as the left-side columns. On the right side the data model details appear.
The primary column of the data entity table and the data model are mapped automatically.
-
In the right-side drop-down, corresponding to each attribute select the data model attribute. The data model attributes appear based on the data type of the data entity on the left side.
Error Handling
When an error occurs in an activity, the system either proceeds with the error or will hang up the process based on the configuration. Error handling allows you to handle the error occurred in the activity level through configurations.
To configure error handling for a particular activity:
-
Click Error Handling accordion for the activity.
-
Check the Continue If Error check box if you want to continue the workflow even if the error occurs.
Else uncheck the checkbox to break or stop the workflow execution when an error occurs. -
Select Trigger Error Workflow, if you want to trigger the process flow mapped in the dataflow configuration during an error in the dataflow.
Consider you have configured the Error Handling in the data flow level. That is, you have mapped a Error Process flow in the Data Flow Error Handling section.
You must select Error Workflow in flow level and then select Trigger Error Wrokflow in the activity level to trigger that workflow.
Currently, the same error workflow is triggered for any activity as the error workflow is in the data flow level.
Different workflow for different activities: If you want to trigger different workflow for different activities, you can capture the activity details from the error workflow Node variable and based on the captured node details, you can apply rules for the further execution of the flow.
Configuring Join in Data Flows
The activity Join is used for joining parallel transition links which are split by the Fork activity. The number of Join activity in a workflow is equal to the number of Fork activity.

Properties: Basic
Dependent entities: NA
Dependent configuration(s): NA
Basic
The basic activities in the data flows have basic details related to that activity. This is common to all the activities in the data flow.
- Click an activity in the canvas and then the Basic accordion in the Property panel to enter the basic details.
| Field | Description |
|---|---|
| Name* | Enter the name of the activity. Character limit:50 Data Type: Alphanumeric and underscore. |
| Description | Describe the activity. Character limit: 1000 Data Type: Alphanumeric and symbols. |
Configuring Merger in Data Flows
The activity Merger is used to merge two different data models. The data models can be merged based on attributes that are logically matching. You can choose to select the required attributes or all of the attributes from both the data models.

Properties: Basic, Merger, Error Handling
Dependent entities: Output data model of any preceding activity in the flow
Dependent configuration(s): NA
Basic
The basic activities in the data flows have basic details related to that activity. This is common to all the activities in the data flow.
- Click an activity in the canvas and then the Basic accordion in the Property panel to enter the basic details.
| Field | Description |
|---|---|
| Name* | Enter the name of the activity. Character limit:50 Data Type: Alphanumeric and underscore. |
| Description | Describe the activity. Character limit: 1000 Data Type: Alphanumeric and symbols. |
Merger
-
Click Merger accordion.
-
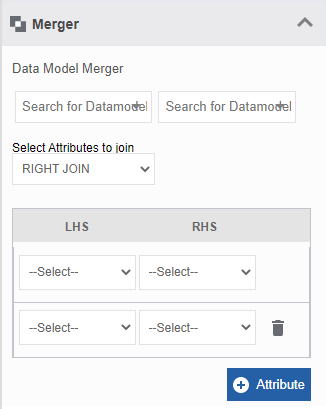
In the Data Model Merger section, select the input data model from the drop-down for both the LHS and RHS. The input can be the output of any of the preceding activities that appear in the select Input data model drop-down as {activity_name}_Output.
The data of these data models are merged based on your mapping. -
In the Select Attributes to Join, select the JOIN type that you want to apply for the two data models.
- JOIN: The JOIN returns all records when there is a match in the left (table 1) or right (table 2) table records.
- INNER JOIN: The INNER JOIN selects records that have matching values in both tables.
- LEFT JOIN: The LEFT JOIN returns all records from the left table (table 1), and the matching records from the right table (table 2). The result is “0” records from the right side if there is no match.
- LEFT OUTER JOIN: The LEFT OUTER JOIN returns all the records from the left table (table 1) that are not matching with the right table (table 2).
- RIGHT JOIN: The RIGHT JOIN returns all records from the right table (table 2), and the matching records from the left table (table 1). The result is “0” records from the left side if there is no match.
- RIGHT OUTER JOIN: The RIGHT OUTER JOIN returns all the records from the right table (table 2) that are not matching with the left table (table 1).
-
In the LHS select an attribute and select a corresponding attribute in the RHS.
-
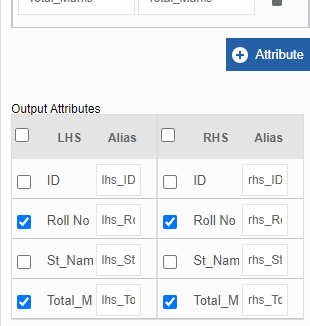
Click Attribute to add and map more attributes of the data model. Only those attributes that are mapped are considered for merging. Based on the mapping, Output Attribute gets listed.
-
Select (check) the required items in the Output Attributes. (Click header checkbox [Select All] to select all the attributes.)
- In the Alias field, provide the alias name for the attribute.
At runtime, as per the selection of the attributes and the configurations, the merger activity merges the data.
Error Handling
When an error occurs in an activity, the system either proceeds with the error or will hang up the process based on the configuration. Error handling allows you to handle the error occurred in the activity level through configurations.
To configure error handling for a particular activity:
-
Click Error Handling accordion for the activity.
-
Check the Continue If Error check box if you want to continue the workflow even if the error occurs.
Else uncheck the checkbox to break or stop the workflow execution when an error occurs. -
Select Trigger Error Workflow, if you want to trigger the process flow mapped in the dataflow configuration during an error in the dataflow.
Consider you have configured the Error Handling in the data flow level. That is, you have mapped a Error Process flow in the Data Flow Error Handling section.
You must select Error Workflow in flow level and then select Trigger Error Wrokflow in the activity level to trigger that workflow.
Currently, the same error workflow is triggered for any activity as the error workflow is in the data flow level.
Different workflow for different activities: If you want to trigger different workflow for different activities, you can capture the activity details from the error workflow Node variable and based on the captured node details, you can apply rules for the further execution of the flow.
Configuring ML Predictor in Data Flows
ML Predictor is used for predicting a particular output based on the input data model and the configurations. Two types of Machine Learning (ML) models can be mapped to the ML predictor: ML Dataset and SKLearn model using Python coding through Jupyter Notebook.
The ML models created through the SKLearn model (in Main menu > Jupyter Notebook) should be published for utilizing them in the ML predictor activity. The ML models are listed in the Input ML model drop-down of the ML Predictor property.
Based on the input ML model (and the configurations defined for that model), the ML predictor predicts the output value. The accuracy of the predicted value depends on the input data provided for the ML model.
Properties: Basic, ML Predictor, Error Handling
Dependent entities: Output data model of any preceding activity in the flow
Dependent configuration(s): ML Model (Platform ML and Jupyter Notebook)
Basic
The basic activities in the data flows have basic details related to that activity. This is common to all the activities in the data flow.
- Click an activity in the canvas and then the Basic accordion in the Property panel to enter the basic details.
| Field | Description |
|---|---|
| Name* | Enter the name of the activity. Character limit:50 Data Type: Alphanumeric and underscore. |
| Description | Describe the activity. Character limit: 1000 Data Type: Alphanumeric and symbols. |
ML Predictor
-
Click ML Predictor accordion.
The ML Predictor properties -
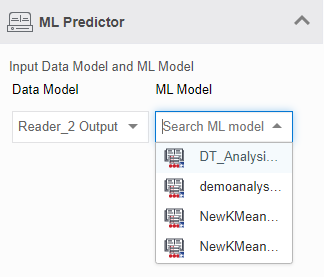
Below the Input Data Model select a data model from the Data Model list. This can be the output of any of the preceding activities as applicable.
-
Below the ML Model, select an ML model from the drop-down. The ML model lists the models that are created through the Manage > ML Projects and Main menu > Jupyter Notebook Portlet.
When you select the ML Model, the Variables and ML Attributes section appears.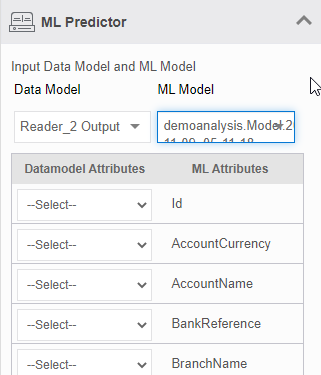
-
Select a data model attribute corresponding to each ML Attribute. Based on the data type of the ML attribute, data attributes are listed in each drop-down.
-
Scroll down to view further properties that appear as part of the ML model.
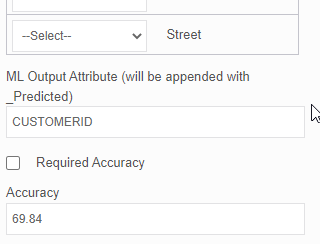
- The ML Output Attribute is the prediction column in the model that gets populated when you select the ML model.
- Select Required Accuracy. This creates a column named “Model Accuracy” as the last column of your result set and the accuracy value is populated in that column.
- Accuracy is the accuracy value that the model provides and this is automatically captured from the ML model. Model Accuracy appears based on the ML model selected.
Error Handling
When an error occurs in an activity, the system either proceeds with the error or will hang up the process based on the configuration. Error handling allows you to handle the error occurred in the activity level through configurations.
To configure error handling for a particular activity:
-
Click Error Handling accordion for the activity.
-
Check the Continue If Error check box if you want to continue the workflow even if the error occurs.
Else uncheck the checkbox to break or stop the workflow execution when an error occurs. -
Select Trigger Error Workflow, if you want to trigger the process flow mapped in the dataflow configuration during an error in the dataflow.
Consider you have configured the Error Handling in the data flow level. That is, you have mapped a Error Process flow in the Data Flow Error Handling section.
You must select Error Workflow in flow level and then select Trigger Error Wrokflow in the activity level to trigger that workflow.
Currently, the same error workflow is triggered for any activity as the error workflow is in the data flow level.
Different workflow for different activities: If you want to trigger different workflow for different activities, you can capture the activity details from the error workflow Node variable and based on the captured node details, you can apply rules for the further execution of the flow.
Configuring Reader in Data Flows
The activity Reader is used to read the data from the source file (data source). The data model entity will have the configuration details of what all to be read from the data source.

Properties: Basic, Reader, Variable Mapping, Error Handling
Dependent entities: Data Model (business entity), Variable
Dependent configuration(s): NA
Basic
The basic activities in the data flows have basic details related to that activity. This is common to all the activities in the data flow.
- Click an activity in the canvas and then the Basic accordion in the Property panel to enter the basic details.
| Field | Description |
|---|---|
| Name* | Enter the name of the activity. Character limit:50 Data Type: Alphanumeric and underscore. |
| Description | Describe the activity. Character limit: 1000 Data Type: Alphanumeric and symbols. |
Data Reader
- Click Reader accordion.
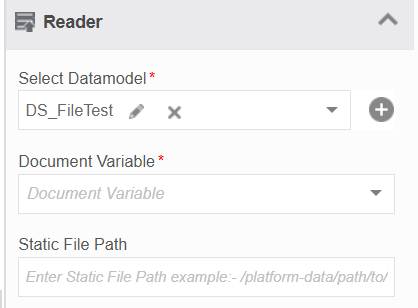
| Field | Description |
|---|---|
| Select Datamodel* | Select the input data model from the drop-down that lists the data model names |
| Document Variable* | Enter a variable of type document. You must create a variable in the variable section and select it here. |
| Static File path | Enter the file path of the document. |
Variable Mapping
Variable is used when the data needs to be dynamically passed as a file path or JSON data.
-
Click Variable Mapping accordion.
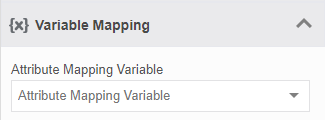
-
Enter the Attribute Mapping Variable. The variables are created in the business activity section and they should be of the type, alphanumeric. This variable will hold the data for the Reader activity; for example, a JSON format of the input file that can read by the Reader activity.
Error Handling
When an error occurs in an activity, the system either proceeds with the error or will hang up the process based on the configuration. Error handling allows you to handle the error occurred in the activity level through configurations.
To configure error handling for a particular activity:
-
Click Error Handling accordion for the activity.
-
Check the Continue If Error check box if you want to continue the workflow even if the error occurs.
Else uncheck the checkbox to break or stop the workflow execution when an error occurs. -
Select Trigger Error Workflow, if you want to trigger the process flow mapped in the dataflow configuration during an error in the dataflow.
Consider you have configured the Error Handling in the data flow level. That is, you have mapped a Error Process flow in the Data Flow Error Handling section.
You must select Error Workflow in flow level and then select Trigger Error Wrokflow in the activity level to trigger that workflow.
Currently, the same error workflow is triggered for any activity as the error workflow is in the data flow level.
Different workflow for different activities: If you want to trigger different workflow for different activities, you can capture the activity details from the error workflow Node variable and based on the captured node details, you can apply rules for the further execution of the flow.
Configuring Rule Executor in Data Flows
The activity, Rule Executor is used for executing rules for the selected data model and getting an output based on the success or failure of the rule.

Properties: Basic, Rule Executor, Error Handling
Dependent entities: Output data model of any preceding activity in the flow, Query
Dependent configuration(s): NA
Basic
The basic activities in the data flows have basic details related to that activity. This is common to all the activities in the data flow.
- Click an activity in the canvas and then the Basic accordion in the Property panel to enter the basic details.
| Field | Description |
|---|---|
| Name* | Enter the name of the activity. Character limit:50 Data Type: Alphanumeric and underscore. |
| Description | Describe the activity. Character limit: 1000 Data Type: Alphanumeric and symbols. |
Rule Executor
-
Click Rule Executor accordion.
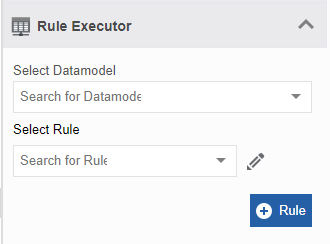
-
Below the Select Data Model, select a data model from the list. This can be the output of any of the preceding activities as applicable.
- In the Select Rule, select a Query that you have defined. Queries are business entities. You can create and define a local query or organization-level query.
-
Click the pencil icon adjacent to Select Rule. The Rule Mapper pop-up appears.
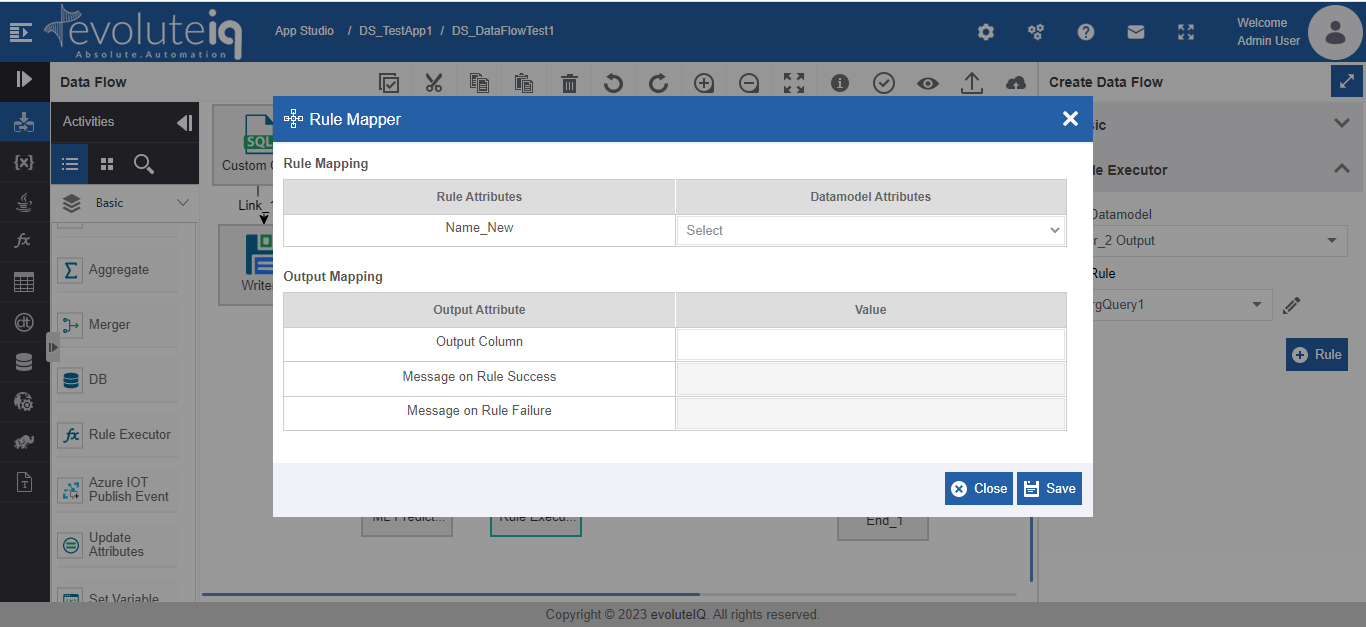
-
In the Rule Mapping, select the Data Model Attributes (RHS) corresponding to the Rule Attributes (LHS).
-
In the Output Mapping table, for each Output Attribute enter the Value (RHS) as explained below.
Output Attributes Description Output Column Enter the name that is to be displayed for the output column. A column with this name is amended to the result set and the output messages (Rule success or Failure message which are defined below) are stored in that column Message on Rule Success Success message that is to be displayed on the output column if the execution result is a success Message on Rule Failure Failure message that is to be displayed on the output column if the execution result is a failure -
Click Save to save the Rule Mapping configurations.
Error Handling
When an error occurs in an activity, the system either proceeds with the error or will hang up the process based on the configuration. Error handling allows you to handle the error occurred in the activity level through configurations.
To configure error handling for a particular activity:
-
Click Error Handling accordion for the activity.
-
Check the Continue If Error check box if you want to continue the workflow even if the error occurs.
Else uncheck the checkbox to break or stop the workflow execution when an error occurs. -
Select Trigger Error Workflow, if you want to trigger the process flow mapped in the dataflow configuration during an error in the dataflow.
Consider you have configured the Error Handling in the data flow level. That is, you have mapped a Error Process flow in the Data Flow Error Handling section.
You must select Error Workflow in flow level and then select Trigger Error Wrokflow in the activity level to trigger that workflow.
Currently, the same error workflow is triggered for any activity as the error workflow is in the data flow level.
Different workflow for different activities: If you want to trigger different workflow for different activities, you can capture the activity details from the error workflow Node variable and based on the captured node details, you can apply rules for the further execution of the flow.
Configuring Set Variable in Data Flows
The Set Variable activity is used to hold the result set data output in a variable. You can either hold the complete result set in a variable or the last row data output to variable(s) based on the configuration.
Properties: Basic, Set Variable, Error Handling
Dependent entities: Variables
Dependent configuration(s): NA
Basic
The basic activities in the data flows have basic details related to that activity. This is common to all the activities in the data flow.
- Click an activity in the canvas and then the Basic accordion in the Property panel to enter the basic details.
| Field | Description |
|---|---|
| Name* | Enter the name of the activity. Character limit:50 Data Type: Alphanumeric and underscore. |
| Description | Describe the activity. Character limit: 1000 Data Type: Alphanumeric and symbols. |
Set Variable
-
Click {x}Set Variable accordion.
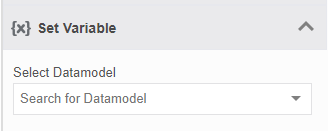
-
Select the data model. When you select the data model, the variable mapping details appear.
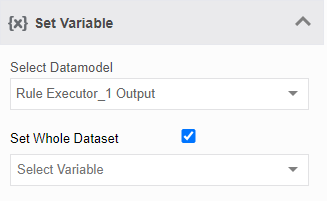
Setting the Whole data set as variable and mapping variables to attribute. -
If you want to set the complete result set to accommodate in a variable, select the Set Whole Data Set box.
In the Select Variable, select the variable in which you want to hold the complete data. You should create the required variable in the entity section.
Or if you want to set each of attribute of the last entry of the result set to different variables, deselect the Set Whole Data Set box.
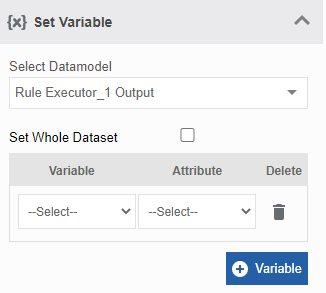
-
Select the Variable and Attribute. You should create the required variables in the entity section. Attributes are listed from the data model that you selected.
- Click the delete icon to delete a variable mapping that you entered.
- Click Variable to add multiple variable-attribute mapping.
Error Handling
When an error occurs in an activity, the system either proceeds with the error or will hang up the process based on the configuration. Error handling allows you to handle the error occurred in the activity level through configurations.
To configure error handling for a particular activity:
-
Click Error Handling accordion for the activity.
-
Check the Continue If Error check box if you want to continue the workflow even if the error occurs.
Else uncheck the checkbox to break or stop the workflow execution when an error occurs. -
Select Trigger Error Workflow, if you want to trigger the process flow mapped in the dataflow configuration during an error in the dataflow.
Consider you have configured the Error Handling in the data flow level. That is, you have mapped a Error Process flow in the Data Flow Error Handling section.
You must select Error Workflow in flow level and then select Trigger Error Wrokflow in the activity level to trigger that workflow.
Currently, the same error workflow is triggered for any activity as the error workflow is in the data flow level.
Different workflow for different activities: If you want to trigger different workflow for different activities, you can capture the activity details from the error workflow Node variable and based on the captured node details, you can apply rules for the further execution of the flow.
Configuring Start in Data Flows
Start activity is used to indicate the start of a workflow. All the workflows start with Start. There will be only one Start activity for a workflow.
Properties: Basic
Dependent entities: NA
Dependent configuration(s): NA
Basic
The basic activities in the data flows have basic details related to that activity. This is common to all the activities in the data flow.
- Click an activity in the canvas and then the Basic accordion in the Property panel to enter the basic details.
| Field | Description |
|---|---|
| Name* | Enter the name of the activity. Character limit:50 Data Type: Alphanumeric and underscore. |
| Description | Describe the activity. Character limit: 1000 Data Type: Alphanumeric and symbols. |
Configuring Transformer in Data Flows
Transformer activity is used to transform the input data model or manipulate the input data using expressions / functions as per your requirement.
Properties: Basic, Transformer, Error Handling
Dependent entities: Output data model of any preceding activity in the flow
Dependent configuration(s): NA
Basic
The basic activities in the data flows have basic details related to that activity. This is common to all the activities in the data flow.
- Click an activity in the canvas and then the Basic accordion in the Property panel to enter the basic details.
| Field | Description |
|---|---|
| Name* | Enter the name of the activity. Character limit:50 Data Type: Alphanumeric and underscore. |
| Description | Describe the activity. Character limit: 1000 Data Type: Alphanumeric and symbols. |
Transformer
-
Click Transformer accordion.
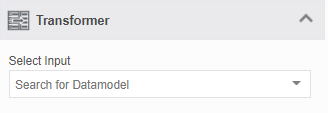
-
Select the input data model from the drop-down.
The input can be the output of any of the preceding activities that appear in the select Input data model drop-down as {activity_name}_Output.
On selection of the required data model, the attributes of that data model appear in the property panel.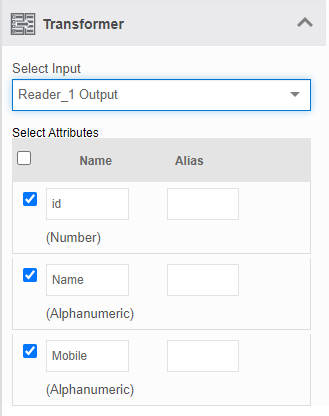
-
Corresponding to attributes under Name, enter an alias name below the Alias column if required.
-
Scroll down the properties. The Function and Expression feature appears at the end of the attribute list.
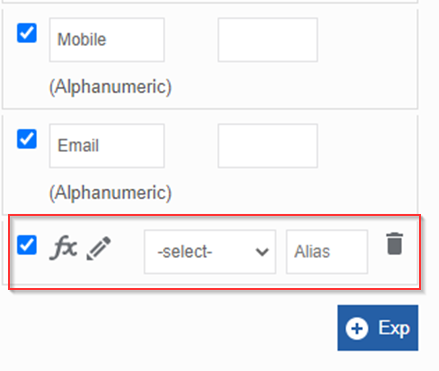
-
Click Exp to create rules or define functions using the expression editor. The Expression details appear.
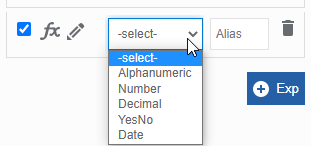
-
Select the data type and enter the Alias (if required) for the expression.
- Click fx (pencil) icon. The Expression Builder opens where you can define the rules as per your requirement. Make sure that the check box is selected in order to include the attribute in the result set.
You can add multiple expressions also. Refer to Expression Builder.
Error Handling
When an error occurs in an activity, the system either proceeds with the error or will hang up the process based on the configuration. Error handling allows you to handle the error occurred in the activity level through configurations.
To configure error handling for a particular activity:
-
Click Error Handling accordion for the activity.
-
Check the Continue If Error check box if you want to continue the workflow even if the error occurs.
Else uncheck the checkbox to break or stop the workflow execution when an error occurs. -
Select Trigger Error Workflow, if you want to trigger the process flow mapped in the dataflow configuration during an error in the dataflow.
Consider you have configured the Error Handling in the data flow level. That is, you have mapped a Error Process flow in the Data Flow Error Handling section.
You must select Error Workflow in flow level and then select Trigger Error Wrokflow in the activity level to trigger that workflow.
Currently, the same error workflow is triggered for any activity as the error workflow is in the data flow level.
Different workflow for different activities: If you want to trigger different workflow for different activities, you can capture the activity details from the error workflow Node variable and based on the captured node details, you can apply rules for the further execution of the flow.
Configuring Trigger Workflow in Data Flows
The activity, Trigger Workflow is to trigger a process flow. You need to design and deploy a process flow before configuring the trigger workflow activity.

Properties: Basic, Trigger Workflow, Error Handling
Dependent entities: Process flow
Dependent configurations: NA
Basic
The basic activities in the data flows have basic details related to that activity. This is common to all the activities in the data flow.
- Click an activity in the canvas and then the Basic accordion in the Property panel to enter the basic details.
| Field | Description |
|---|---|
| Name* | Enter the name of the activity. Character limit:50 Data Type: Alphanumeric and underscore. |
| Description | Describe the activity. Character limit: 1000 Data Type: Alphanumeric and symbols. |
Trigger Workflow
-
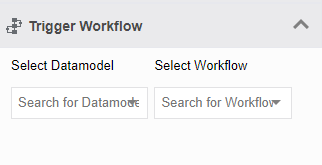
Click Trigger Workflow accordion.
-
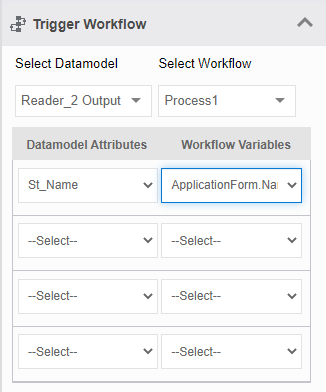
In the Select Data Model, select the Data model. The mapping of Datamodel Attributes and Workflow Variables appears.
-
In the Select Workflow, select the process flow. The Variables in this workflow are listed in the Workflow Variables section.
-
Select Data model Attributes and the corresponding Workflow Variables as how you need to map. Workflow variables list the variables that are in the selected process flow and that which is matching with the data type of the selected data model attribute.
The process flow is executed for each row entry in the data model. Hence, the number of process flow instances for this data flow will be equal to the number of rows in the data model.
Error Handling
When an error occurs in an activity, the system either proceeds with the error or will hang up the process based on the configuration. Error handling allows you to handle the error occurred in the activity level through configurations.
To configure error handling for a particular activity:
-
Click Error Handling accordion for the activity.
-
Check the Continue If Error check box if you want to continue the workflow even if the error occurs.
Else uncheck the checkbox to break or stop the workflow execution when an error occurs. -
Select Trigger Error Workflow, if you want to trigger the process flow mapped in the dataflow configuration during an error in the dataflow.
Consider you have configured the Error Handling in the data flow level. That is, you have mapped a Error Process flow in the Data Flow Error Handling section.
You must select Error Workflow in flow level and then select Trigger Error Wrokflow in the activity level to trigger that workflow.
Currently, the same error workflow is triggered for any activity as the error workflow is in the data flow level.
Different workflow for different activities: If you want to trigger different workflow for different activities, you can capture the activity details from the error workflow Node variable and based on the captured node details, you can apply rules for the further execution of the flow.
Configuring Update Attributes in Data Flows
The activity, Update attributes is used to update the values for a selected data model attribute. You can define rules (queries) for a selected data model.

Properties: Basic, Update Attributes, Error Handling
Dependent entities: Queries, Output data model of any preceding activity in the flow
Dependent configurations: Data model
Basic
The basic activities in the data flows have basic details related to that activity. This is common to all the activities in the data flow.
- Click an activity in the canvas and then the Basic accordion in the Property panel to enter the basic details.
| Field | Description |
|---|---|
| Name* | Enter the name of the activity. Character limit:50 Data Type: Alphanumeric and underscore. |
| Description | Describe the activity. Character limit: 1000 Data Type: Alphanumeric and symbols. |
Update Attributes
-
Click Update Attributes accordion.
-
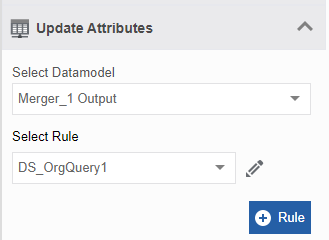
Select the Data model from the Select Data model list.
- In the Select Rule, select the Query that you have configured. You can create and define a local query or an organization-level query.
-
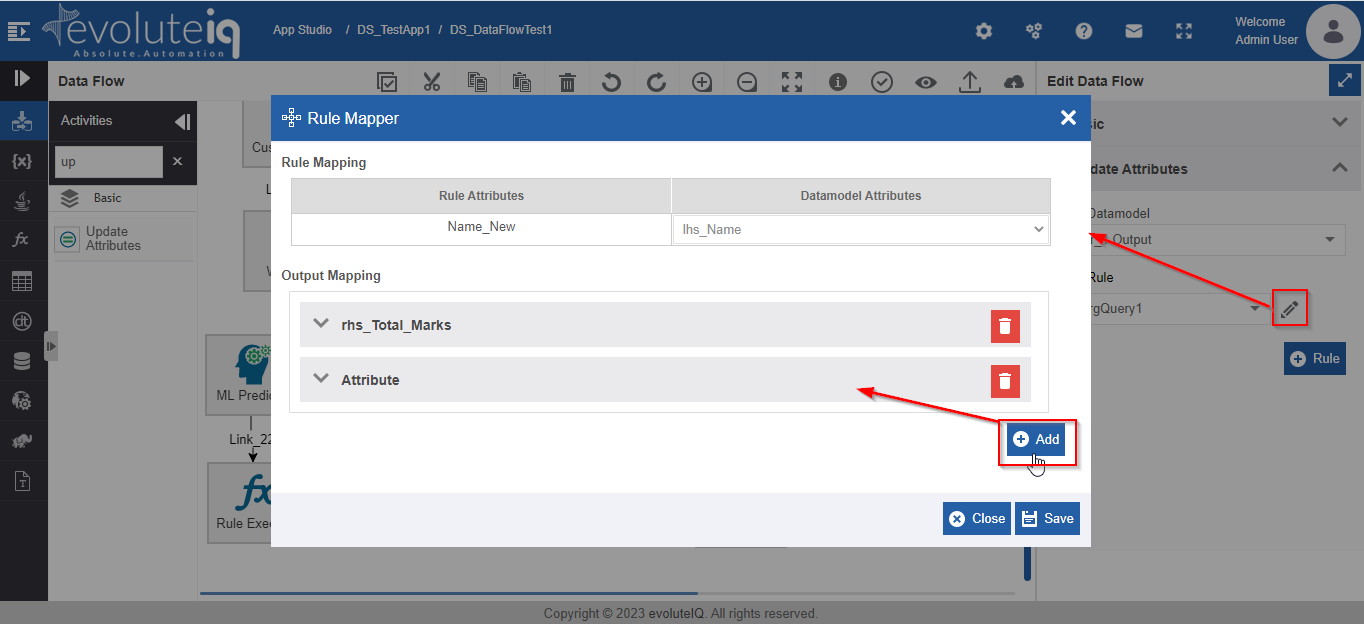
Click the pencil icon adjacent to Select Rule. The Rule Mapper pop-up appears.
-
In the Rule Mapping RHS, select the Data Model Attributes corresponding to the Rule Mapping LHS where the Rule Attributes are listed.
-
In the Output Mapping, for each key input, enter the values as explained below.

Field Description Attribute (header name) This header is automatically updated when you select an attribute. 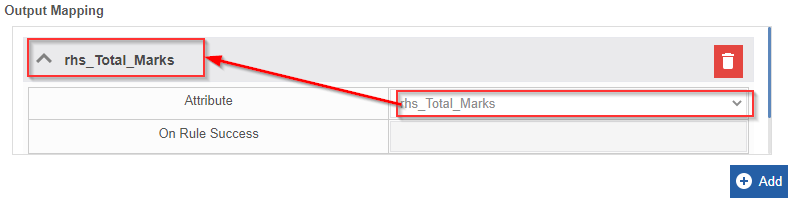
By default, the header name will be “Attribute”.Attribute (output key name) Select the attribute for which you need to update the values. On Rule Success Success message that is to be updated as the selected attribute value if the execution result is a success. You can use attribute variable and string functions in this field. On Rue Failure Failure message that is to be updated as the selected attribute value if the execution result is a failure. You can use attribute variable and string functions in this field. - Click Add to select multiple attributes in the output mapping and you can define output messages for each success/failure of a particular attribute.
-
Click Save to save the Rule Mapping configurations.
- Click Rule for configuring multiple Queries (Rules). Queries for the rules should be created before configuring.
Error Handling
When an error occurs in an activity, the system either proceeds with the error or will hang up the process based on the configuration. Error handling allows you to handle the error occurred in the activity level through configurations.
To configure error handling for a particular activity:
-
Click Error Handling accordion for the activity.
-
Check the Continue If Error check box if you want to continue the workflow even if the error occurs.
Else uncheck the checkbox to break or stop the workflow execution when an error occurs. -
Select Trigger Error Workflow, if you want to trigger the process flow mapped in the dataflow configuration during an error in the dataflow.
Consider you have configured the Error Handling in the data flow level. That is, you have mapped a Error Process flow in the Data Flow Error Handling section.
You must select Error Workflow in flow level and then select Trigger Error Wrokflow in the activity level to trigger that workflow.
Currently, the same error workflow is triggered for any activity as the error workflow is in the data flow level.
Different workflow for different activities: If you want to trigger different workflow for different activities, you can capture the activity details from the error workflow Node variable and based on the captured node details, you can apply rules for the further execution of the flow.
Configuring Webservice in Data Flows
The activity, Webservice is used to achieve web communication. Web service is an component for communication that integrates and encodes the activities in the web applications. SOAP (Simple Object Access Protocol) and REST (REpresentational State Transfer) are the two components of Web services.
The activity, WebService is used to call any API services (external APIs or internal APIs within the platform – e.g., Data Catalog APIs). You need to configure a Webservice entity for configuring the activity WebService.
Properties: Basic, Webservice, Error Handling
Dependent entities: Rule, Email, WebService
Dependent configurations: NA
Basic
The basic activities in the data flows have basic details related to that activity. This is common to all the activities in the data flow.
- Click an activity in the canvas and then the Basic accordion in the Property panel to enter the basic details.
| Field | Description |
|---|---|
| Name* | Enter the name of the activity. Character limit:50 Data Type: Alphanumeric and underscore. |
| Description | Describe the activity. Character limit: 1000 Data Type: Alphanumeric and symbols. |
Refer to Entering Basic Properties.
Webservice
-
Click Webservice accordion.
-
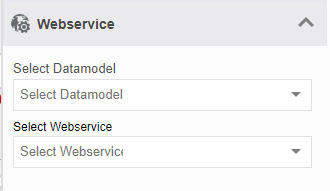
Select Data Model from the Select Datamodel drop-down. When you select a data model, the Attribute Mapper section appears.
-
Select a web service from the drop-down from the Select Webservice. Webservice entity should be configured as per your requirement so that you can map it in the web service activity.
- Refer to Entity – Webservice business entity.
-
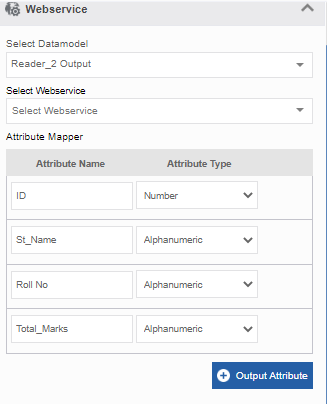
Select an appropriate Attribute Type for each Attribute Name.
- Click Output Attribute for adding more attributes.
Error Handling
When an error occurs in an activity, the system either proceeds with the error or will hang up the process based on the configuration. Error handling allows you to handle the error occurred in the activity level through configurations.
To configure error handling for a particular activity:
-
Click Error Handling accordion for the activity.
-
Check the Continue If Error check box if you want to continue the workflow even if the error occurs.
Else uncheck the checkbox to break or stop the workflow execution when an error occurs. -
Select Trigger Error Workflow, if you want to trigger the process flow mapped in the dataflow configuration during an error in the dataflow.
Consider you have configured the Error Handling in the data flow level. That is, you have mapped a Error Process flow in the Data Flow Error Handling section.
You must select Error Workflow in flow level and then select Trigger Error Wrokflow in the activity level to trigger that workflow.
Currently, the same error workflow is triggered for any activity as the error workflow is in the data flow level.
Different workflow for different activities: If you want to trigger different workflow for different activities, you can capture the activity details from the error workflow Node variable and based on the captured node details, you can apply rules for the further execution of the flow.
Configuring Writer in Data Flows
The activity Writer is used to write data or result set to a database or file (e.g., RDBMS or a File or a NoSQL).
Note
You cannot preview the Writer activity output or use/map the writer output for any other activity.
Properties: Basic, Writer, Error Handling
Dependent entities: Data model/Output data model of any preceding activity in the flow
Dependent configuration(s): Data source
Basic
The basic activities in the data flows have basic details related to that activity. This is common to all the activities in the data flow.
- Click an activity in the canvas and then the Basic accordion in the Property panel to enter the basic details.
| Field | Description |
|---|---|
| Name* | Enter the name of the activity. Character limit:50 Data Type: Alphanumeric and underscore. |
| Description | Describe the activity. Character limit: 1000 Data Type: Alphanumeric and symbols. |
Writer
-
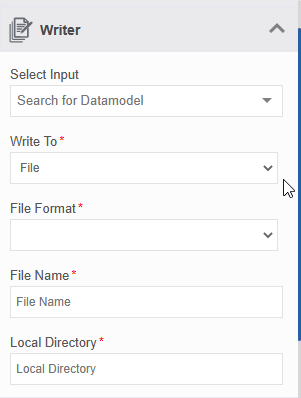
Click Writer accordion.
-
Enter the details as explained below.
Field Description Select Input Select the input data model.
The input can be the output of any of the preceding activities.Write To Select a type from Write To . 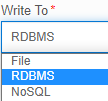
- File : Writes the output to a file (CSV, JSON, Parquet) file.
Refer to Writing into File.
- RDBMS : Writes the output to the relational database.
Refer to Writing into RDBMS or NoSQL.
- NoSQL : Writes the output to a non-relational database.
Refer to Writing into RDBMS or NoSQL.
Writing into File
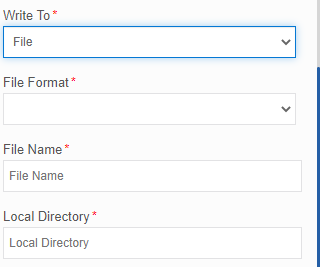
When you select the Write To as File, the below configuration details appear.
-
File Format: Select the File Format that you require to write the output. The file formats supported are CSV, JSON, and Parquet.
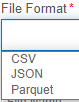
Parquet is built to handle flat columnar storage data formats. It is a column-oriented data storage format.
- File Name: Provide a filename. Output file will take this file name.
- Local Directory: Provide the local path in which the file needs to be dumped.
Writing into RDBMS or No SQL
The configuration details for the RDBMS and the NoSQL are the same except for the selection of database type. For RDBMS, you should select only a relational database and for No SQL, you should select a non-relational database.
When you select Write To as RDBMS or NoSQL, the below configuration details appear.
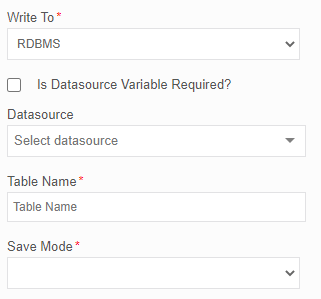
-
If you want to capture the data source name in a variable, select Is Datasource Variable Required?. Select Variable option appears.
The data source variable of type, alphanumeric should be created (in the business entity, Variables) and mapped in this section.
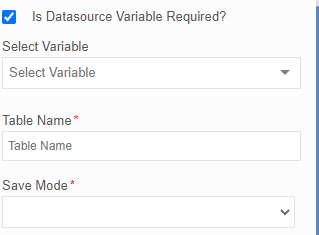
If you do not wish to provide the Data source variable then deselect the “Is Data source Variable Required?” Data source dropdown list appears.
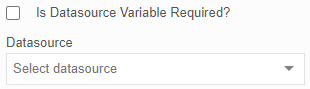
In the Data source, select the required data source.
-
Enter the Table Name. You can enter an existing table name in the selected data source or a new table name that is to be created in the selected data source.
-
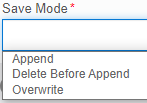
Select the Save Mode.
-
Append: To append the output data to the selected table. This will retain the already existing data.
- Delete Before Append: To delete the already existing data before adding or appending the output data.
- Overwrite: To overwrite the existing data if it matches the output that is been getting inserted.
Additional Columns
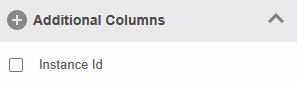
Additional Columns section allows you to add any additional column named, Instance Id in the result set. When you write the writer output to a database, this column also gets amended to the result set table.
-
Click the Additional Column accordion.
-
Select Instance Id box.
Error Handling
When an error occurs in an activity, the system either proceeds with the error or will hang up the process based on the configuration. Error handling allows you to handle the error occurred in the activity level through configurations.
To configure error handling for a particular activity:
-
Click Error Handling accordion for the activity.
-
Check the Continue If Error check box if you want to continue the workflow even if the error occurs.
Else uncheck the checkbox to break or stop the workflow execution when an error occurs. -
Select Trigger Error Workflow, if you want to trigger the process flow mapped in the dataflow configuration during an error in the dataflow.
Consider you have configured the Error Handling in the data flow level. That is, you have mapped a Error Process flow in the Data Flow Error Handling section.
You must select Error Workflow in flow level and then select Trigger Error Wrokflow in the activity level to trigger that workflow.
Currently, the same error workflow is triggered for any activity as the error workflow is in the data flow level.
Different workflow for different activities: If you want to trigger different workflow for different activities, you can capture the activity details from the error workflow Node variable and based on the captured node details, you can apply rules for the further execution of the flow.
Getting the Azure IoT Hub Connection String
To get the Azure IoT Hub Connection String, you need to have valid Azure credentials.
- Log on to the Azure Portal.
- In the jumpbar, click New, then click Internet of Things, and then click Azure IoT Hub.
- In the New IoT Hub blade, specify the desired configuration for the IoT Hub.
- Once the new IoT hub options are configured, click Create. It can take a few minutes for the IoT hub to be created. To check the status, you can monitor the progress on the Startboard. Or, you can monitor your progress from the Notifications section.
- After the IoT hub has been created successfully, open the blade of the new IoT hub, take note of the hostname URI, and click Shared access policies.
- Select the Shared access policy called iothubowner, then copy and take note of the connection string on the right blade.
- Your IoT hub is now created, and you have the connection string you need to use the Device Explorer tool. This connection string enables applications to perform management operations on the IoT hub such as adding a new device to the IoT hub.
For more details, refer to
https://thingspro-programming-guide.netlify.app/application-note/how_to_get_azure_iot_device_connection_string/