Application Management
The Application Management section allows the user to manage the applications, flows, instances, and tasks in the Platform. Manage is accessible to the intended users only. General users cannot access the Management sections.
The deployed applications are listed in the Application section. In this section, you can make changes to the application that is running. The entities or the components in the Application Management section are created in the App Studio module except for the Custom Task. The Application management section is to manage the deployed flows, instances, and tasks within the flows.
If you modify the details of the Application or flows in the App Studio module, you need to redeploy the flow, and a new version of the flow is created. However, in Application Management, you can directly incorporate modifications to the currently running version of the deployment and save it. You need not re-deploy the process for execution and reflection of the changes made to it nor a newer version of the process is created. The changes will be reflected from the next initiation of the flow.
Viewing Application Management Sections
-
Click the Berger Menu on the left of the logo on the upper-left of the Platform.
-
Click Management. The list of all management sections appears.
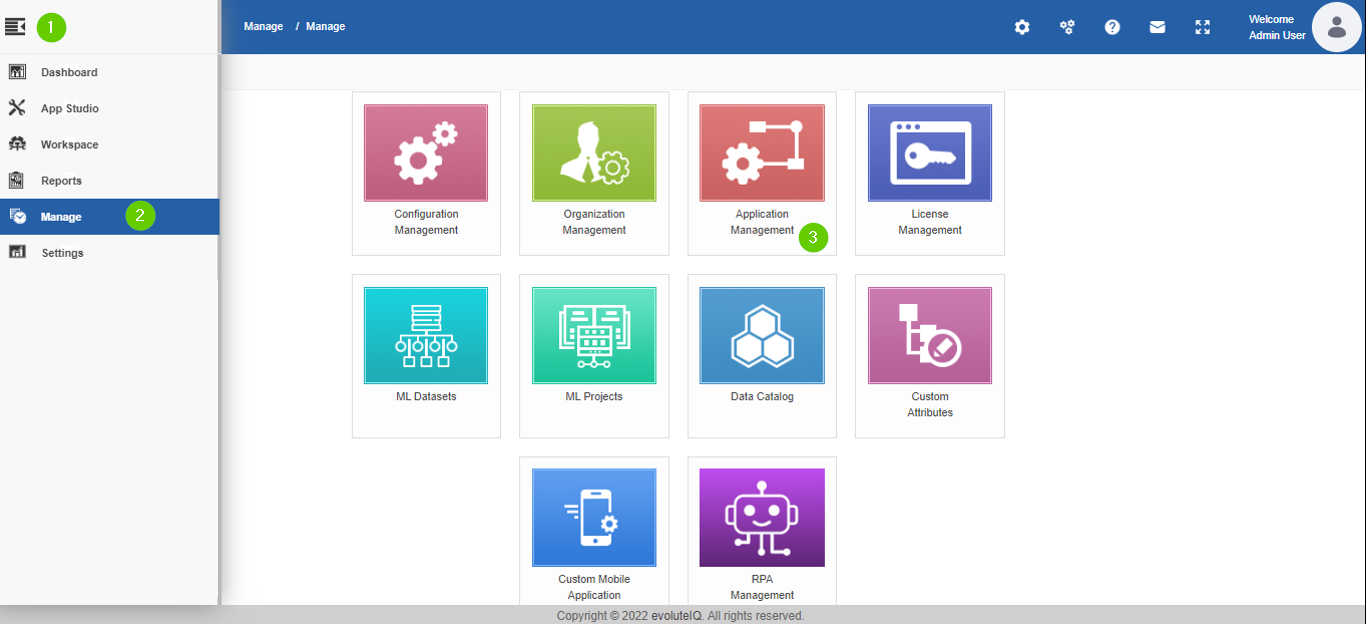
Steps for viewing Application Management section. -
Click Application Management.
The Application submodule is selected by default and the Application page appears with applications created for the organization.
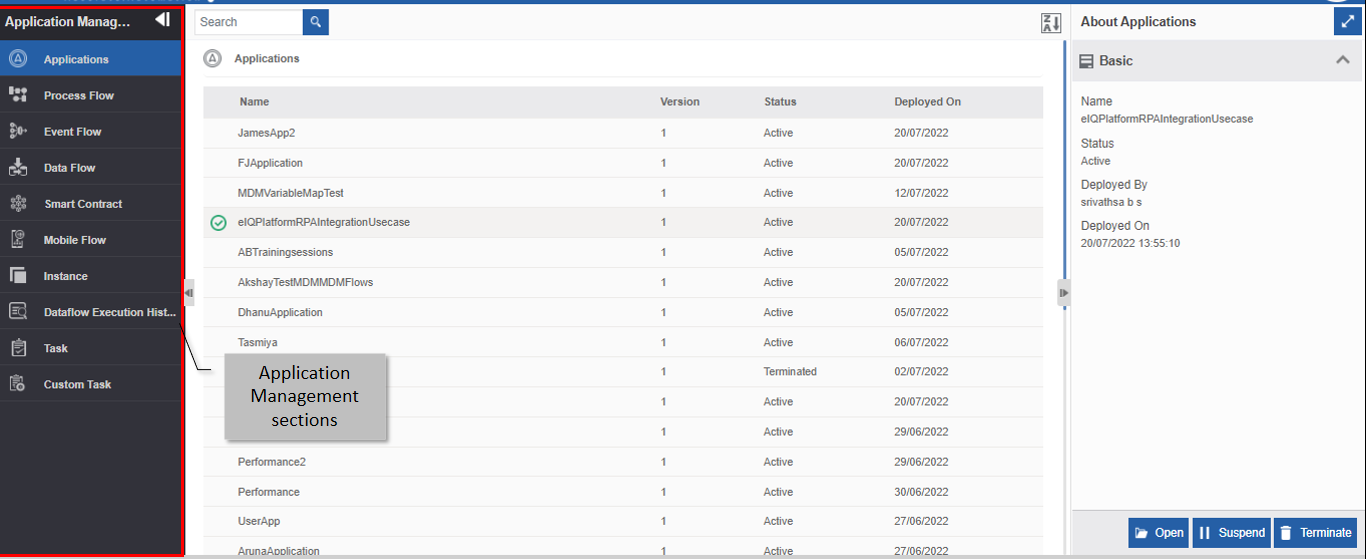
The Application Management sections in the opening page. -
Click the expand arrow in the left side panel for viewing the sections in the Application Management module.
-
Click a section and the corresponding list of items appear on the screen.
Understanding the Application Management Layout
The Application management sections are listed on the left side of the page. You can expand the left side panel for viewing the sections.
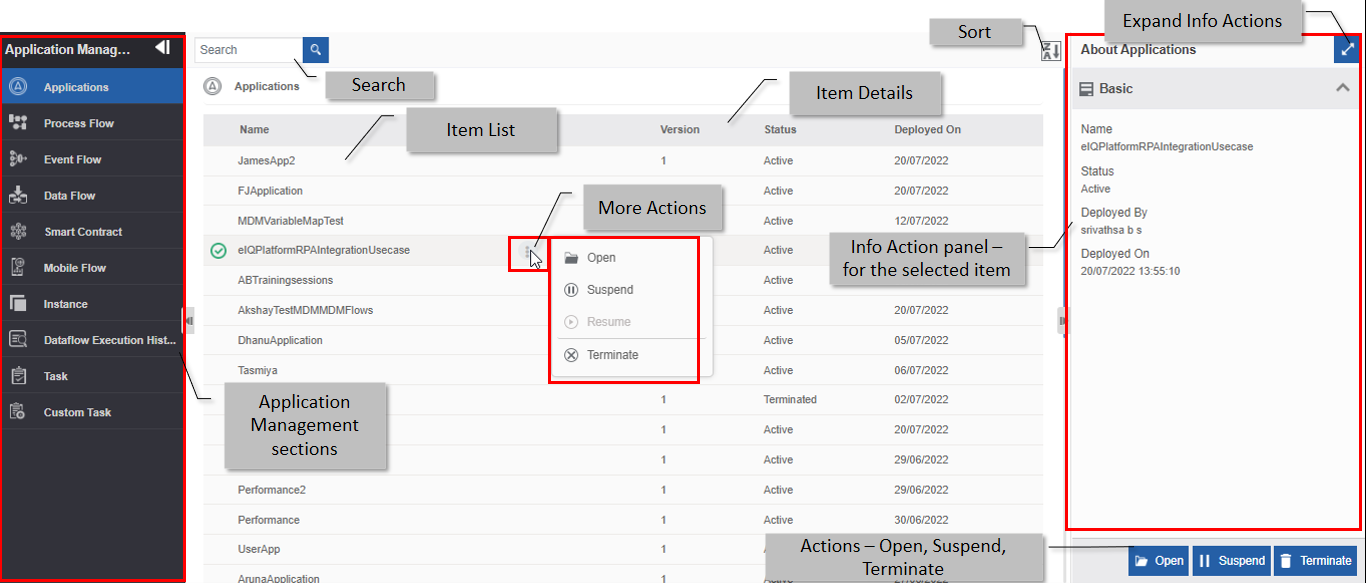
Application Management page components and features.
| UI Elements | Description |
|---|---|
| Application Management sections |
The left side panel displays the list of all application management sections. |
| Search | The search field allows you to search and filter the application management section-wise cards as per the search text. |
| Sort | Sorting the list in alphabetically ascending or descending order. |
| More Actions | Click the three dots in the cards for viewing more actions applicable to the category. |
| Item List | The list of items in the selected section appears. |
| Item Details | The list of items appears with Version, Status and Deployed On date. |
| Info Actions | Info Actions panel displays the properties of the selected item including the deployed by user name. |
| Expand Info Actions |
Click on the expand icon opens up the Info Actions in a pop-up as shown below. 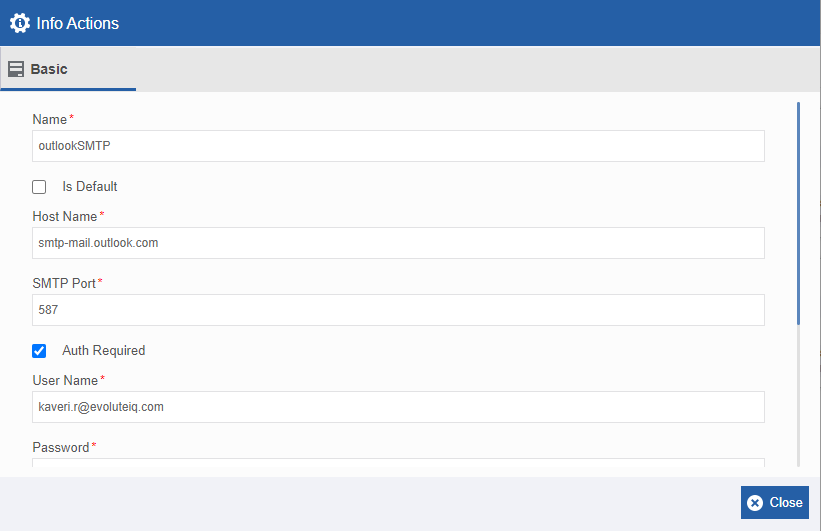 |
| Actions | The actions are applicable for the selected item in a section. |
Searching for an Item
-
Click the Burger menu, navigate to Management >Application Management > Click a section from the left side panel. The selected section page appears.
-
Type the name (or first few letters) of the configuration entity name in the search box on the upper-left of the page. The filtered results are displayed.
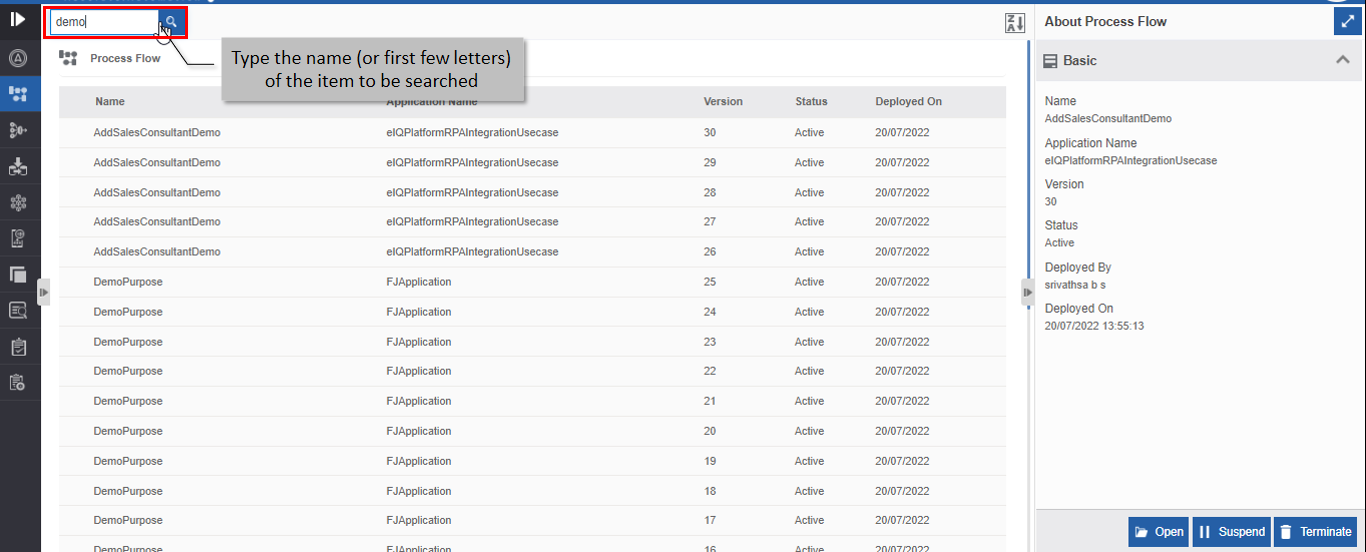
Searching for an item.
Sorting the Items
- Click the Burger menu, and navigate to Management > Configuration Management.
-
Click any Application Management section from the left side (say, Process). Process names are displayed in ascending order by default and the sort icon is descending (Z>A).
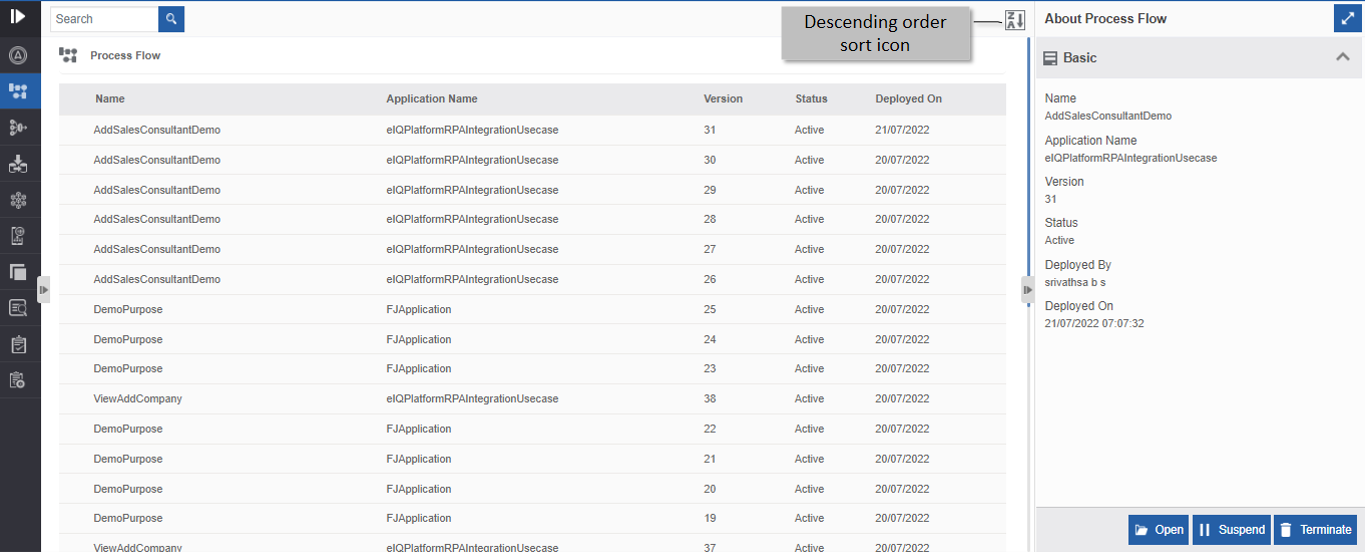
Ascending order display with descending order sort icon. -
Click the Descending order sort icon (Z>A). The names get sorted in descending order (A>Z). The Sort icon is now changed to ascending order (A>Z).
-
Click the Ascending order sort icon (A>Z) for sorting in the ascending order (A>Z). The sort icon changes to descending order (Z>A).
Applications
Viewing Application List and Details
-
Click the Burger menu and navigate to Management > Application Management.
-
Click Applications. The applications section is selected and displayed by default. A list of deployed applications is listed.
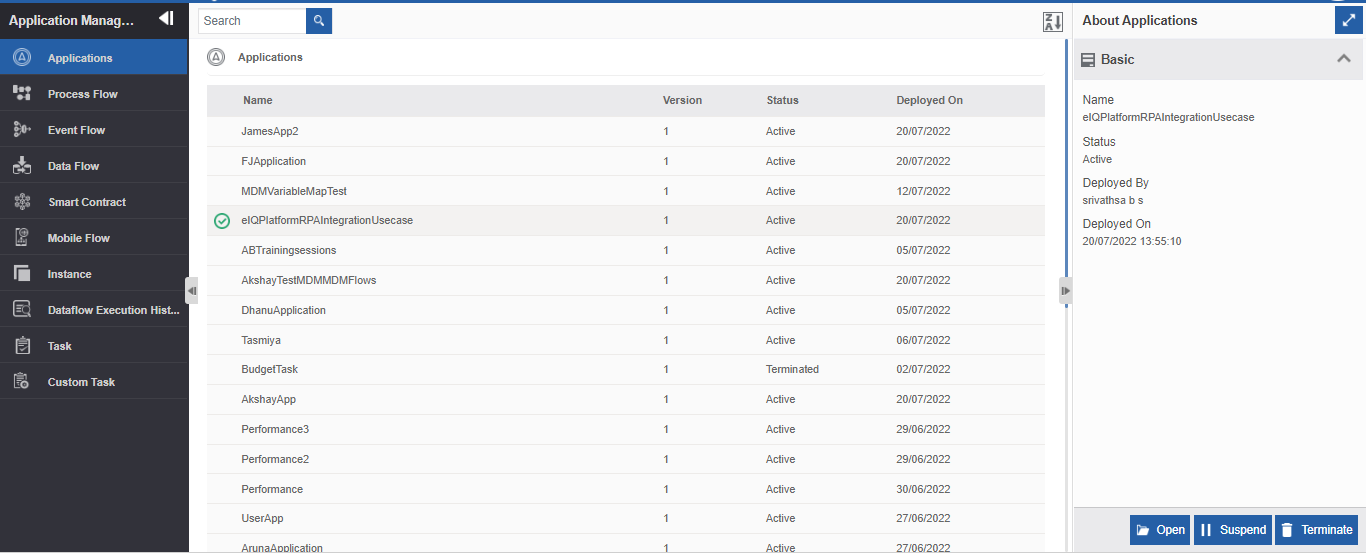
Viewing Application list and application details. -
Click an application name. The details of that application appear in the Info Action panel on the right side.
Property Description Name Name of the application. Status Status of the selected application. Deployed By Username of the user who deployed the latest flow. Deployed On Date and time on which the latest flow in the application got deployed.
Suspending an Application
When you suspend an application, the runtime application along with all the processes and the instances within that application gets suspended.
-
Click the Burger menu and navigate to Management > Application Management > Applications.
-
Click and select an application name that you want to suspend. The actions appear on the right-bottom of the page. (Alternatively, you can hover over the application name and click the three dots – More Actions- appear)
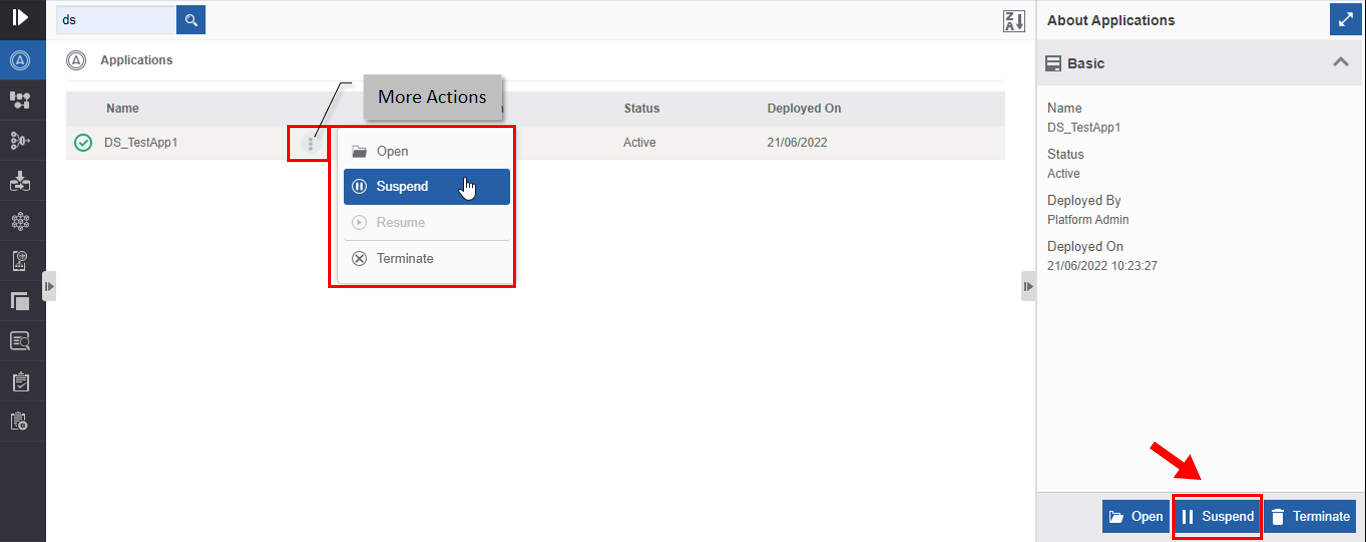
Suspending an application. -
Click Suspend. Suspend confirmation pop-up appears.
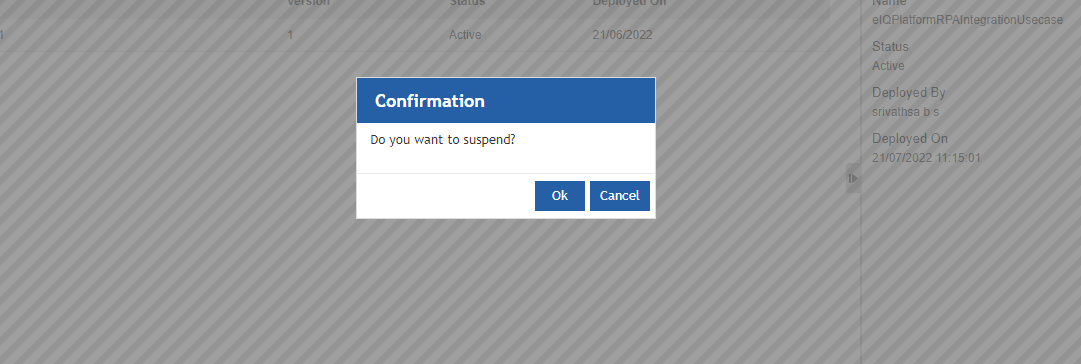
Suspend confirmation. -
Click Ok. Success pop-up appears.
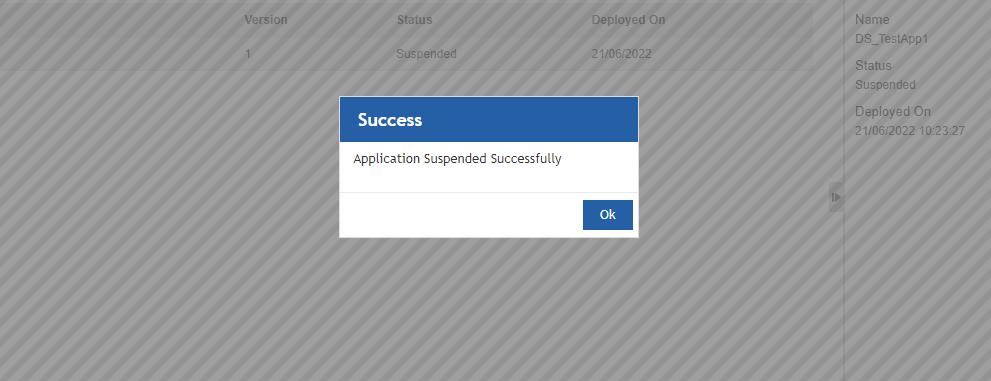
Success message. -
Click Ok. The application gets suspended. The status of the application is now “Suspended”. The Resume action appears on the screen.
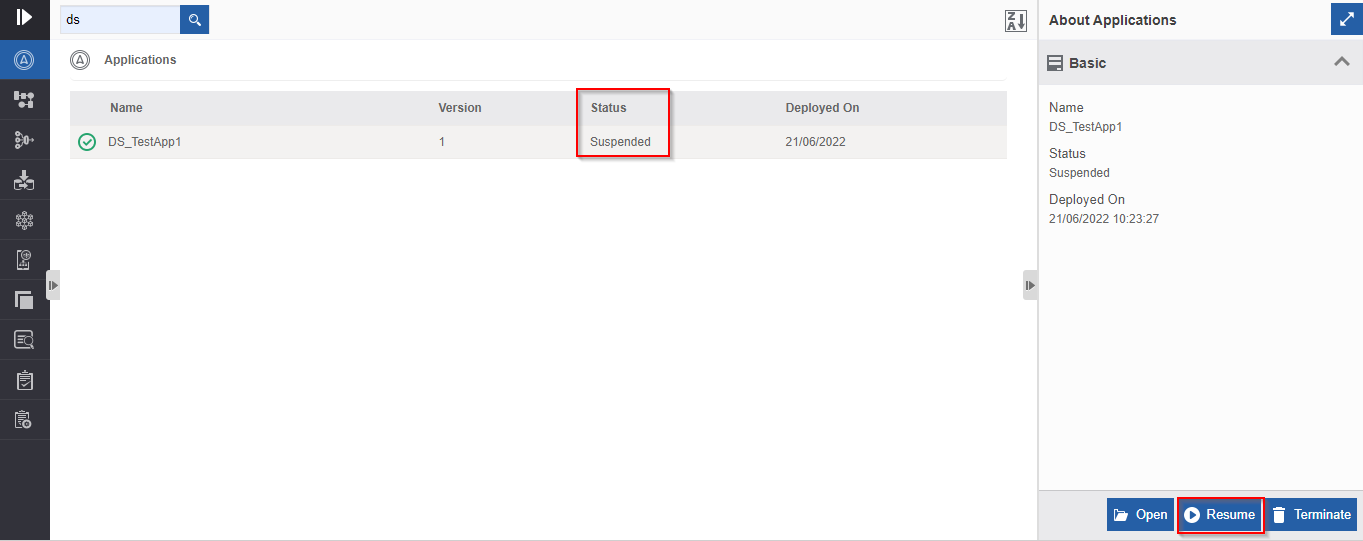
Suspended status.
Resuming an Application
When you suspend an application, the status of the application changes to “suspended” and Resume action appears on the selection of that application. When you resume a suspended application you can resume the application in the runtime. All the flows and instances within the application get resumed when you resume an application.
- Click the Burger menu and navigate to Management > Application Management > Applications.
-
Click a suspended application. Note that the status of the application now is “Suspended”. Resume action appears on the bottom right. (Alternatively, you can hover over the application name and click the three dots – More Actions- appear.)
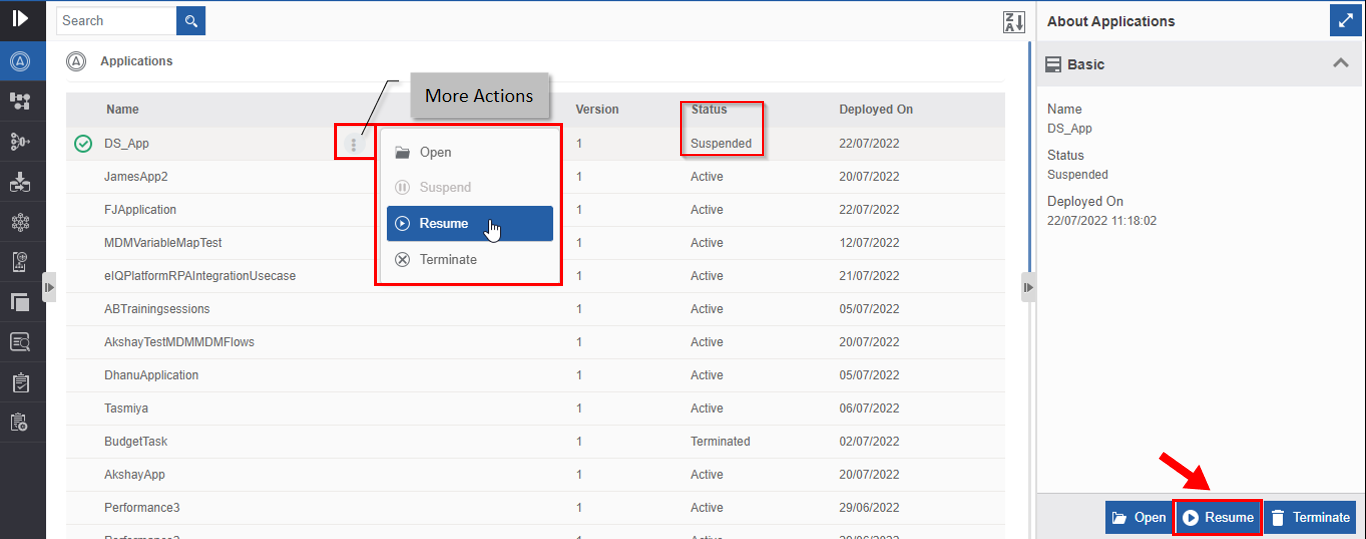
Resuming suspended Application. -
Click Resume. Resume confirmation appears.
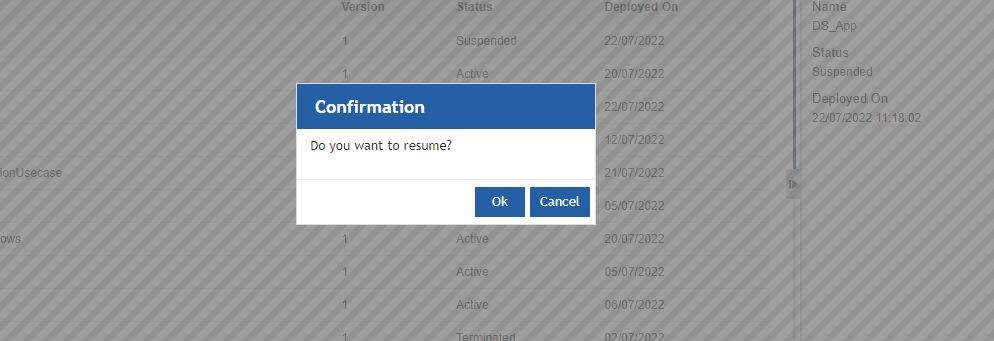
Resume Confirmation. -
Click Ok. Success pop-up appears.
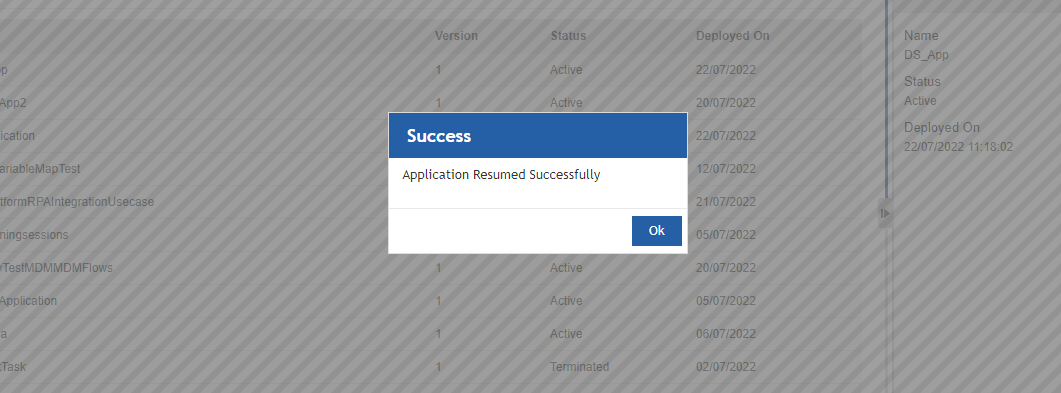
Success Message. -
Click Ok. The application is resumed and the status of the application changes to “Active”.
Terminating an Application
When you terminate an application, the application gets terminated in the runtime. The application will not be available for execution if you terminate the application. When you terminate an application, all the processes within that application and the corresponding instances also will get terminated.
- Click the Burger menu and navigate to Management > Application Management > Applications.
-
Click an active application. Note that the status of the active application is “Active”. Terminate action appears on the bottom right. (Alternatively, you can hover over the application name and click the three dots – More Actions- appear).
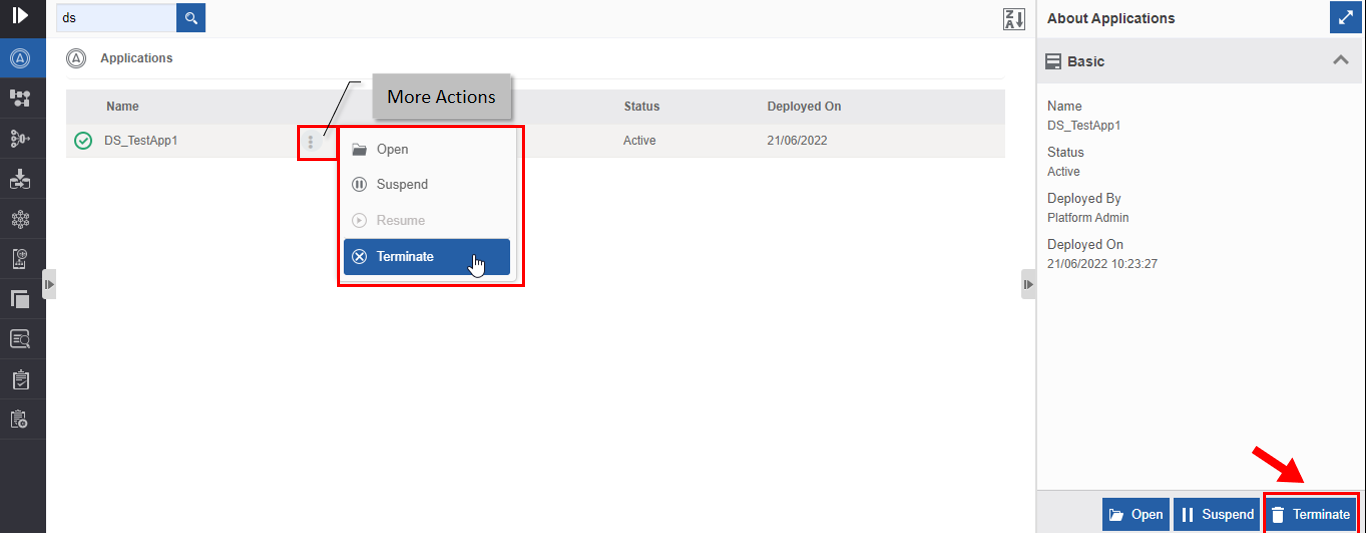
Terminating an application. -
Click Terminate. A Confirmation pop-up for Terminate appears.
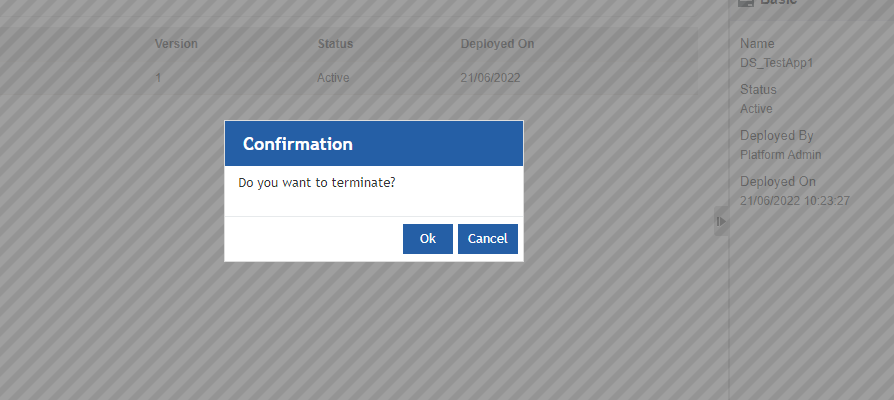
Termination confirmation. -
Click Ok for terminating the application (or click Cancel to cancel the action). A Success message appears on successful termination of the application.
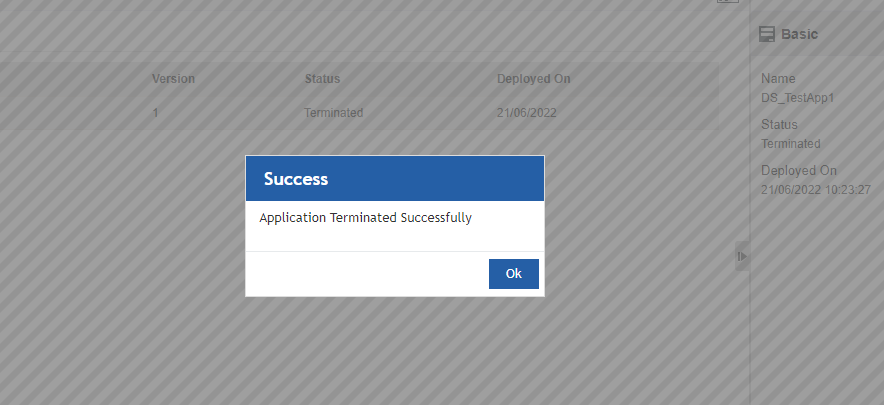
Success Message. -
Click Ok. The status of the application now changes to “Terminated”.
Process Flow
In the Process Flow section, you can view the list of all process flows with all their versions. You can modify the details of a particular version through this section. You cannot make changes to the already running process; however, you can get the changes reflected in the further process flow from the next instance onwards without actually deploying the flow.
Viewing Process Flow List and Details
- Click the Burger menu and navigate to Management > Application Management.
-
Click Process Flow. A list of deployed process flows is listed.
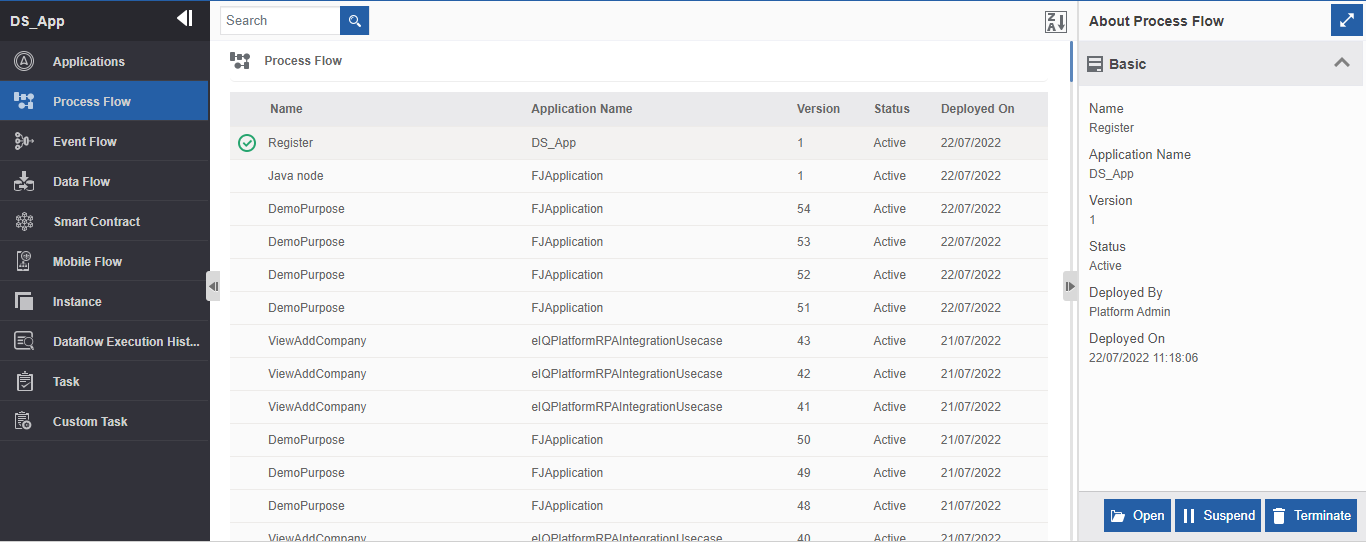
Viewing deployed Process flow list and details. -
Click a process flow name. The details of that process flow appear in the Info Action panel on the right side. All versions of the process flow have the same name. Refer to the Version column for identifying a particular process.
Property Description Name Name of the process flow. Application Name Name of the application to which the flow belongs. Version Version of the process flow. Status Status of the process flow. Deployed By Username of the user who deployed the process flow. Deployed On Date and time on which the process flow is deployed.
Viewing and Editing Process Flow and Details
-
Click the Burger menu and navigate to Management > Application Management > Process Flows.
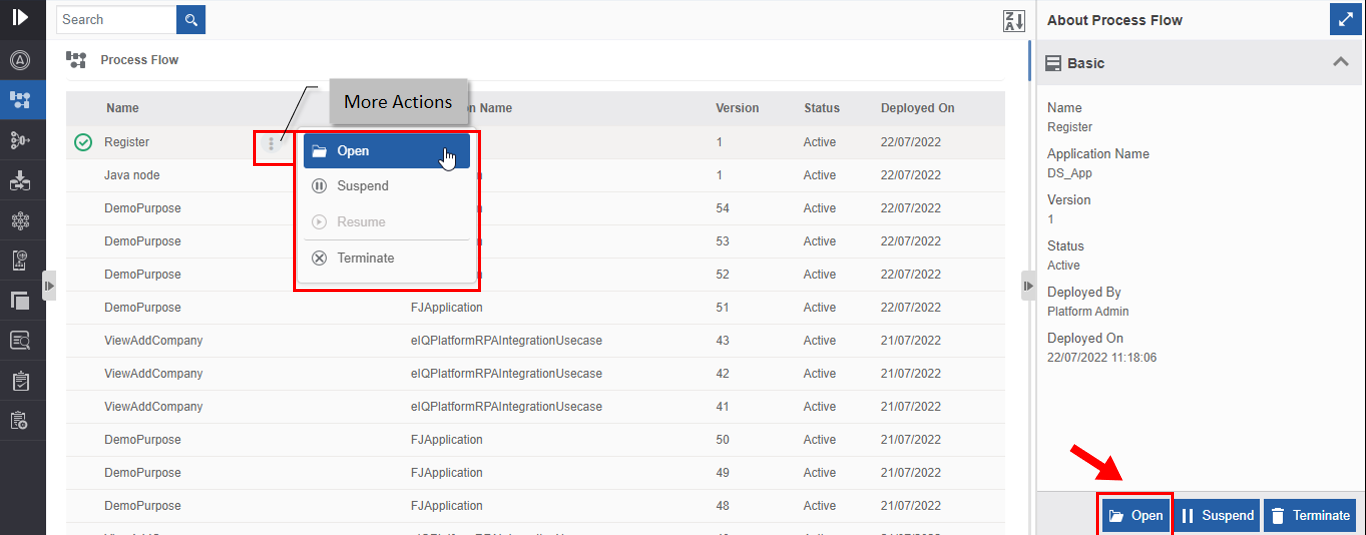
Opening Process flow details. -
Click a process flow name and click Open.
Alternatively, you can hover over the process name and click the three dots [More Actions] and then click Open or double-click the process name.
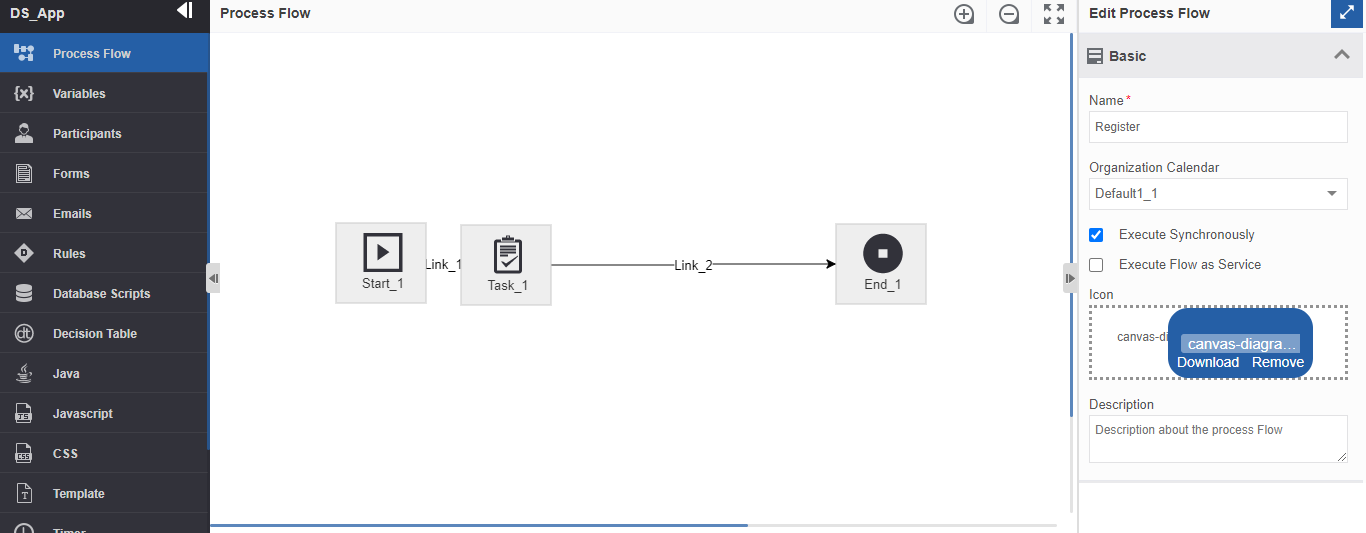
The process flow and the business entities. -
Click the entity section on the left side. The entities that are part of the selected process flow will be listed. You can edit the flow details and the process flow entities.
Refer to the Business entities and the entity-wise documentation for more details on utilizing and editing business entities.
Runtime Changes
In Application Management> Process Flow, only the deployed processes are displayed along with the process version. For a particular process version, you can modify the details of the entities that are associated with the process flow or create new entities and map them to the process flows.
Note that the modifications that are made will be reflected for the existing process flow version from the next initiation onwards (that is for the instances initiated after the modifications are done). That is, the changes do not apply to the running instances or active instances.
It is important to note that the flow modifications are done on the Application Management > Process flow are not reflected in the App Studio > Process Flow design.
If you want to make the same changes in the App Studio > Process Flow design, you need to redo the changes manually in the App Studio> Process Flow module.
If you have made any changes to the Form in the Application Management > Process Flow, you can export and then import the JSON of the form in the App Studio> Process Flow module.
If you have done modifications in any other business entity or mapping in the process flow, it needs to be done manually in the App Studio > Process Flow.
If you update any detail in the App Studio > Process Flow, then you need to deploy the process flow and use the new version of the process flow for reflecting the changes in the next instance of the process flow.
Suspending a Process Flow
When you suspend a process flow, the runtime process flow gets suspended. When you suspend a process, all the corresponding instances also will get suspended. This does not apply to already completed instances.
- Click the Burger menu and navigate to Management > Application Management > Process Flows.
-
Click and select a process flow name that you want to suspend. The actions appear on the right-bottom of the page. (Alternatively, you can hover over the process flow name and click the three dots – More Actions- appear.)
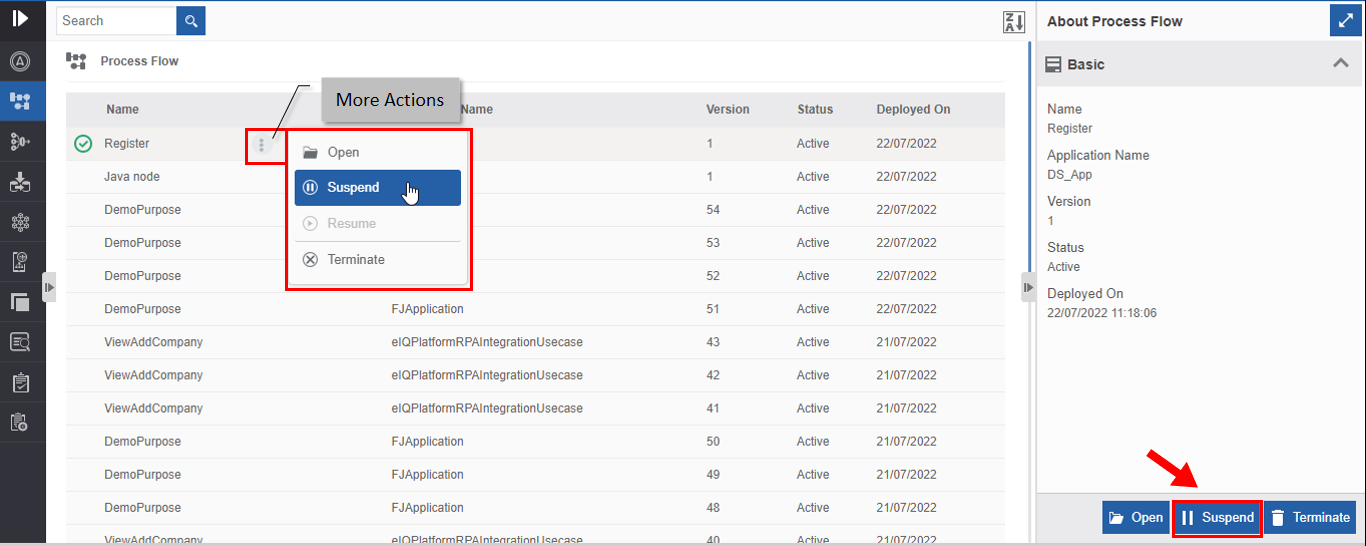
Suspending a process flow. -
Click Suspend. Suspend confirmation pop-up appears.
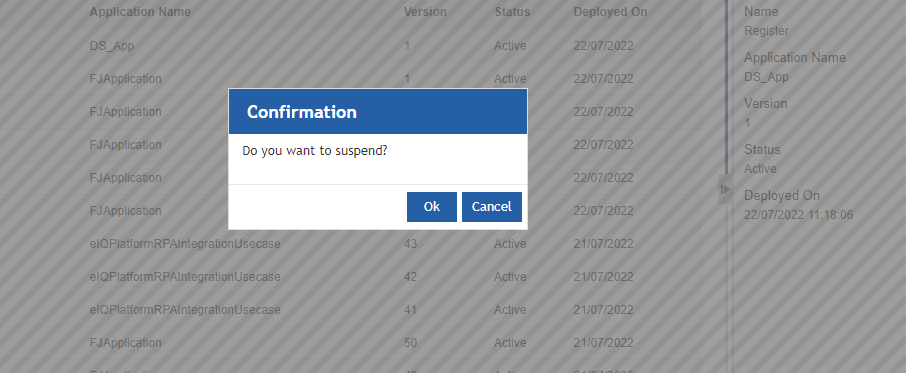
Suspend confirmation. -
Click Ok. Success pop-up appears.
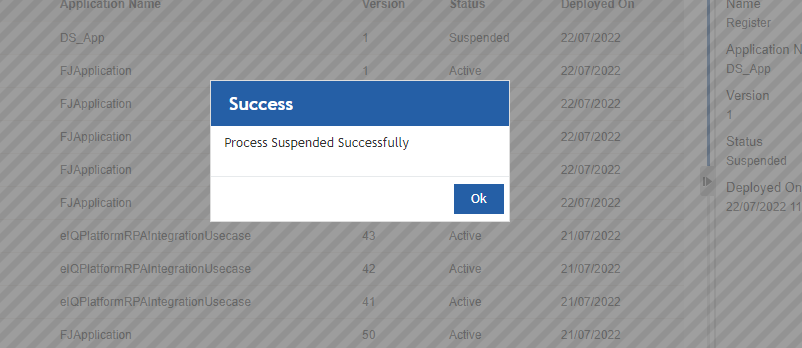
Success message. -
Click Ok. The process flow gets suspended. The status of the process flow is now “Suspended”.
Resuming a Process Flow
When you suspend a process flow, the status of the process flow changes to “Suspended” and Resume action appears on the selection of that process flow. When you resume a process flow all the corresponding instances of the process flow get resumed.
- Click the Burger menu and navigate to Management > Application Management > Process Flows.
-
Click a suspended process flow name. Note that the status of the process flow is “Suspended”. Resume action appears on the bottom right. (Alternatively, you can hover over the process flow name and click the three dots – More Actions- appear.)
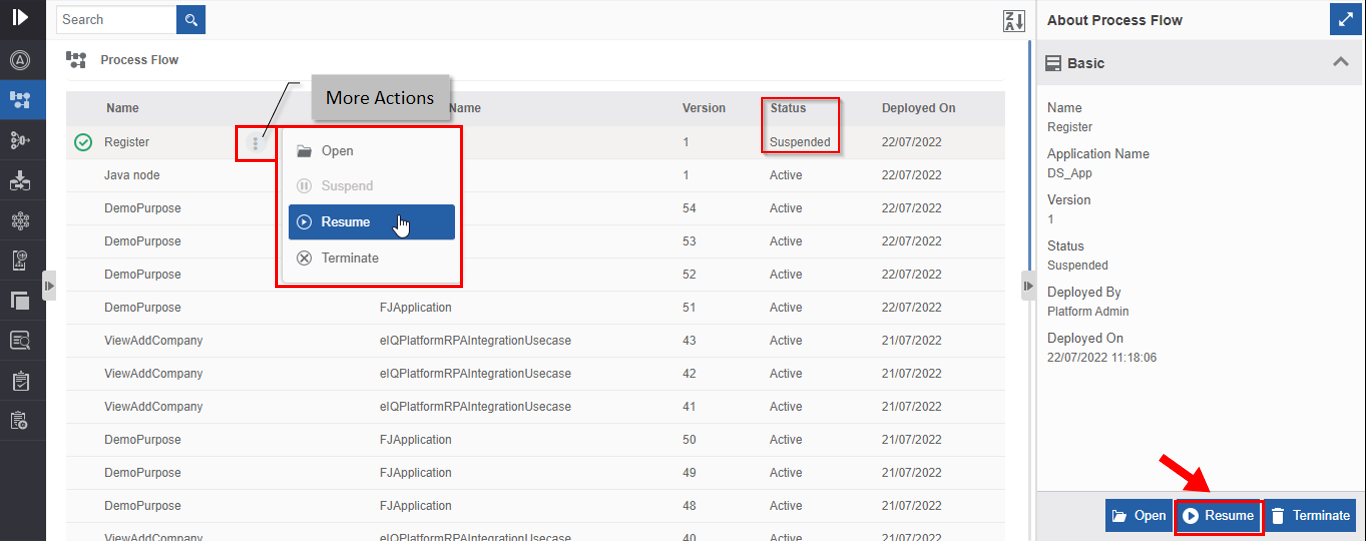
Resuming Suspended Process flow. -
Click Resume. Resume confirmation appears.
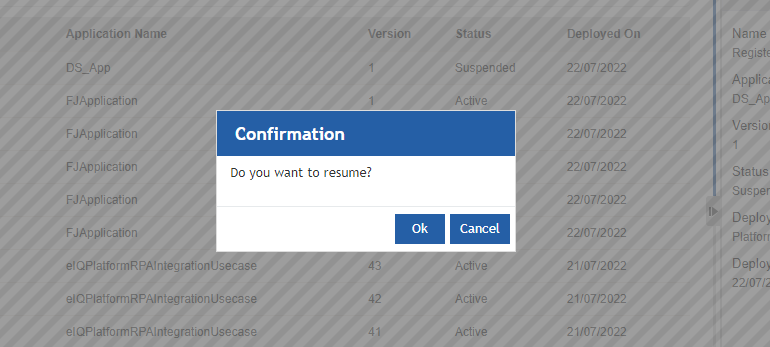
Resume Confirmation. -
Click Ok. Success pop-up appears.
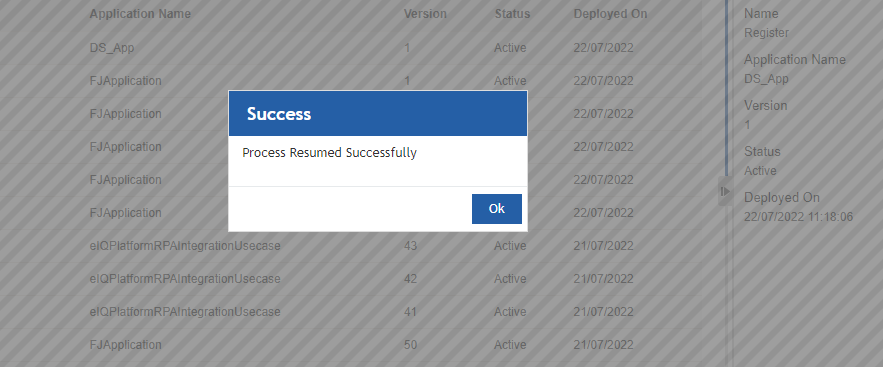
Success Message. -
Click Ok. The process flow is resumed and the status of the process flow changes to “Active”. All the suspended instances of the process flow get resumed.
Terminating a Process Flow
When you terminate a process flow, the process flow gets terminated in the runtime. You will not be able to execute the terminated process flow. When you terminate a process, all the corresponding instances also will get terminated.
-
Click the Burger menu and navigate to Management > Application Management > Process Flow.
-
Click an active process flow. Note that the status of the active process flow is “Active”. Terminate action appears on the bottom right. (Alternatively, you can hover over the process flow name and click the three dots – More Actions- appear).
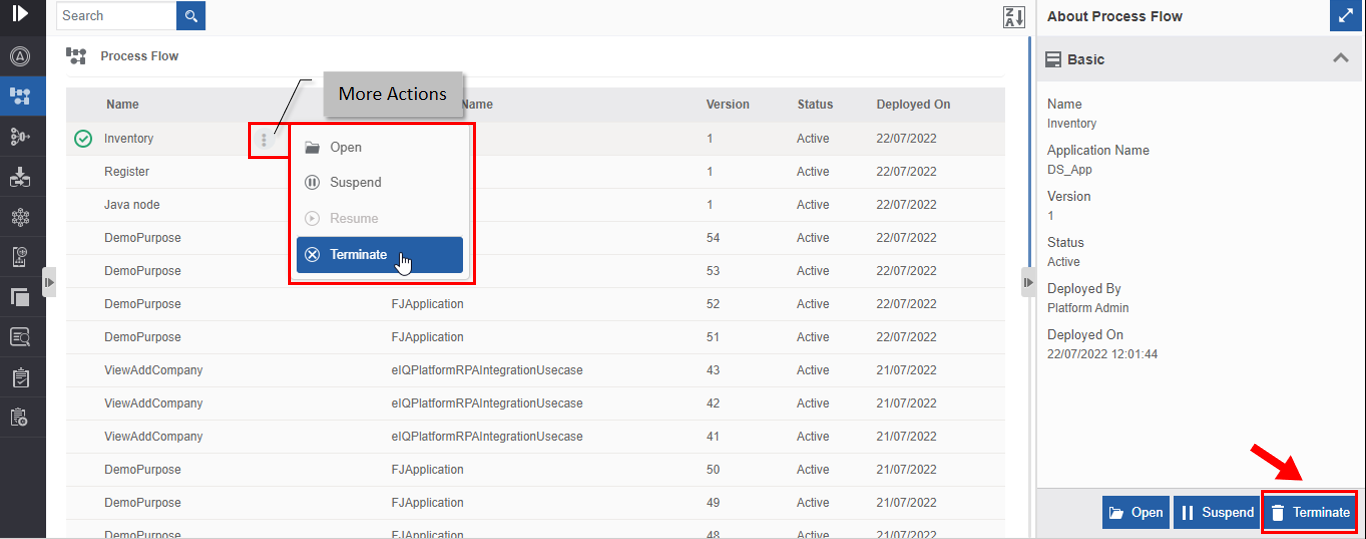
Terminating a process flow. -
Click Terminate. A Confirmation pop-up for Terminate appears.
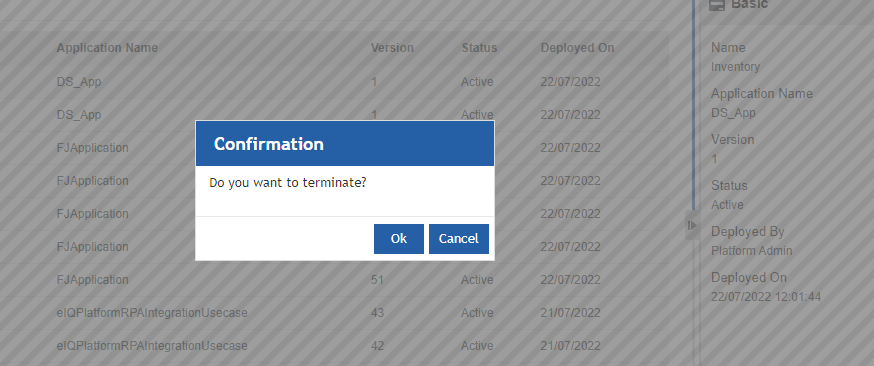
Termination confirmation. -
Click Ok for terminating the process flow (or click Cancel to cancel the action). A Success message appears on successful termination of the process flow.
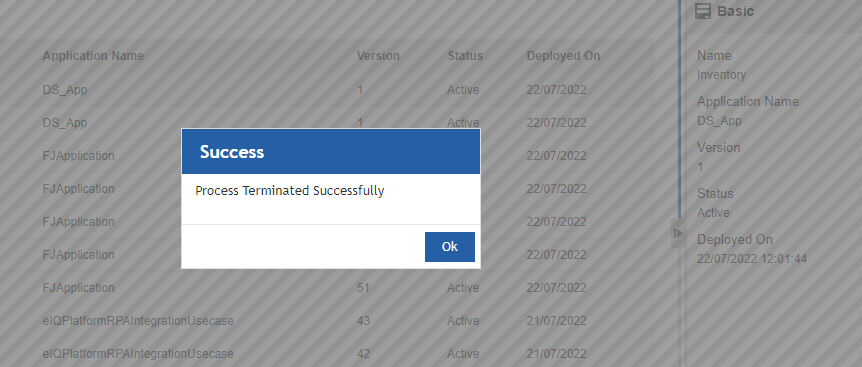
Success Message. -
Click Ok. The status of the process flow now changes to “Terminated”.
Event Flow Management👑
Introduction to Event Flow Management
In the Event Flow section, you can view the list of all the deployed event flows and their status. All the versions of the event flows are available in this section. You cannot modify the details of an event flow version through this section, however, you can open and view the event flow (even if it is deleted in the App Studio module).
Viewing Event Flow List and Details
- Click the Burger menu and navigate to Management > Application Management.
-
Click Event Flow. A list of deployed event flows is listed in the table format.
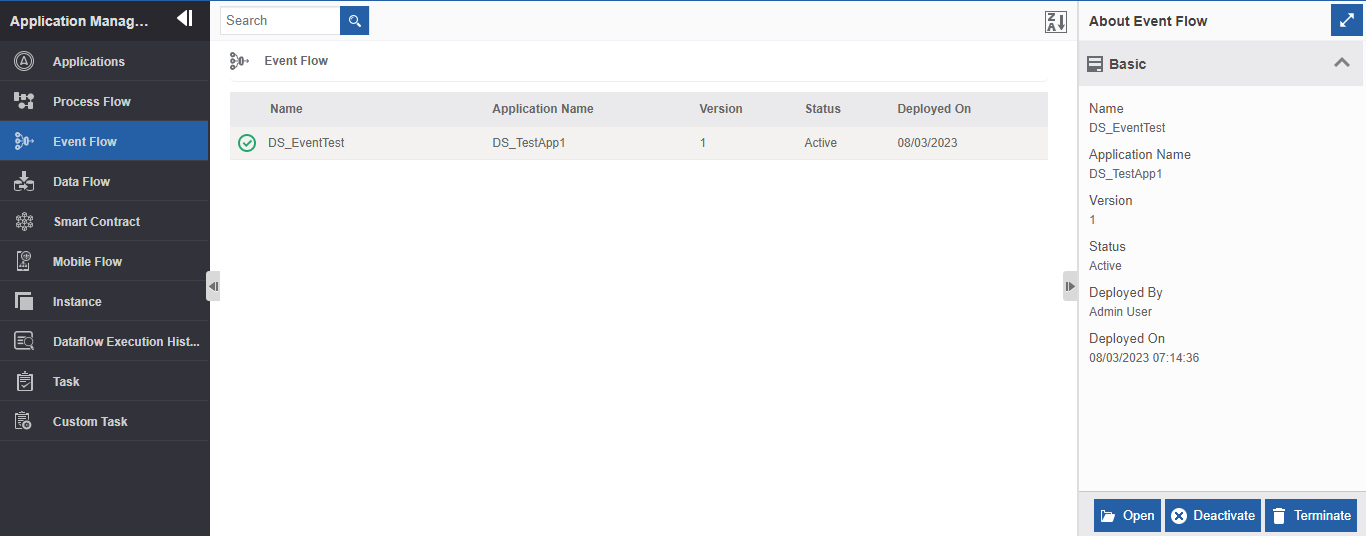
Viewing event flow list and details. -
Click an event flow name. The details of that event flow appear in the Info Action panel on the right side. All versions of the event flow have the same name.
Refer to the Version column for identifying a particular flow.Property Description Name Name of the data flow. Application Name Name of the application to which the flow belongs. Version The version of the event flow. Status Status of the event flow. Deployed By Username of the user who deployed the event flow. Deployed On Date and time on which the event flow is deployed
(detail is on the data flow list table).
Viewing Event Flow Details
You can open the data flow and view the flow design and details.
- Click the Burger menu and navigate to Management > Application Management.
-
Click Event Flow. The list of all deployed event flows is listed in the table format.
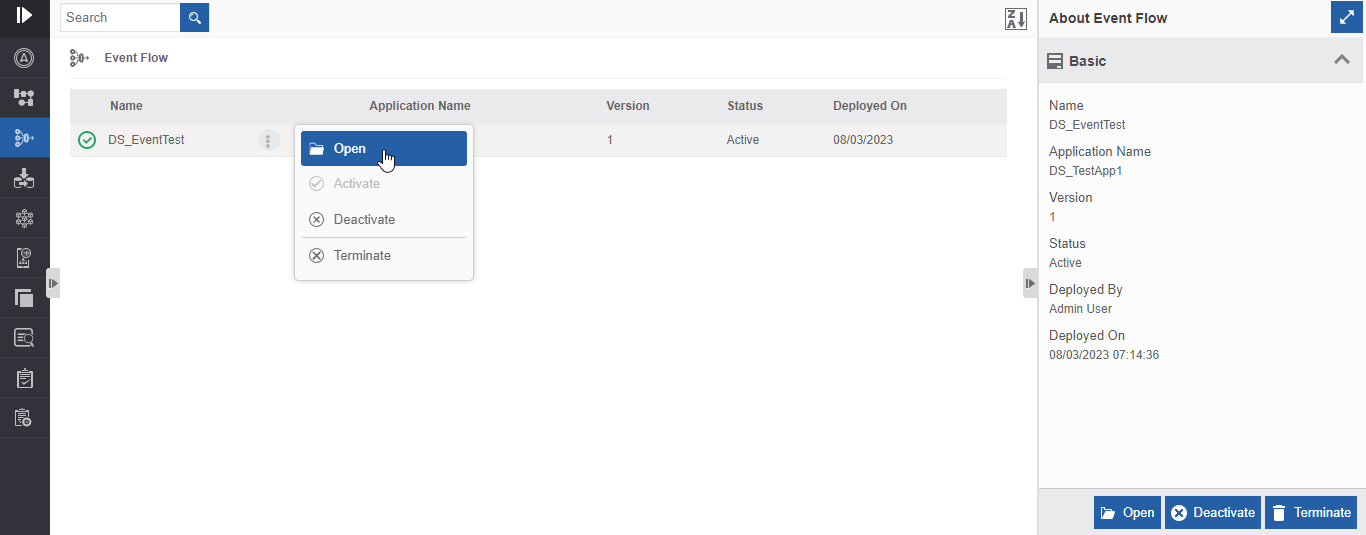
Opening an event flow. -
Click Open at the bottom right of the event flow page
Or hover over the data flow name and more actions (three dots) appear and then click More Actions > Open. Event Flow design and details appear. You cannot edit the event flow design or details.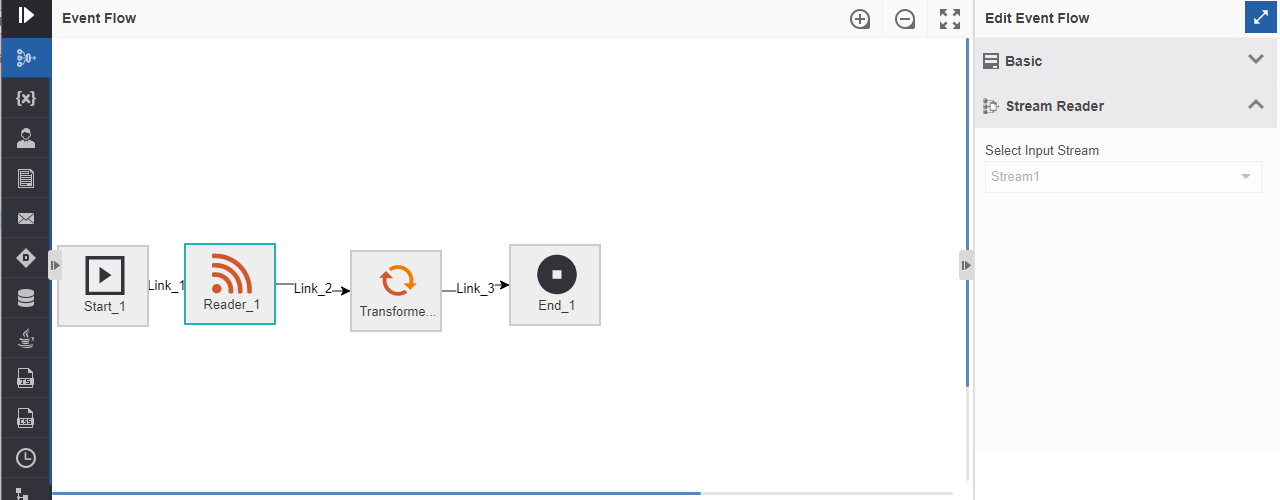
Viewing the event flow design details.
Deactivating the Event Flow Version
When you deploy an event flow for the first time, the status of that flow will be active and if your deploy the same flow for the second time, the older version of the flow will get deactivated and the latest deployed version becomes the active version. You can deactivate the current version using the deactivate feature as applicable. The deactivated version can also be activated again.
- Click the Burger menu and navigate to Management > Application Management.
-
Click Event Flow. The list of all deployed event flows is listed in the table format.
-
Click an event flow that is to be deactivated.
If a flow is active, it will display Deactivate at the bottom right of the page.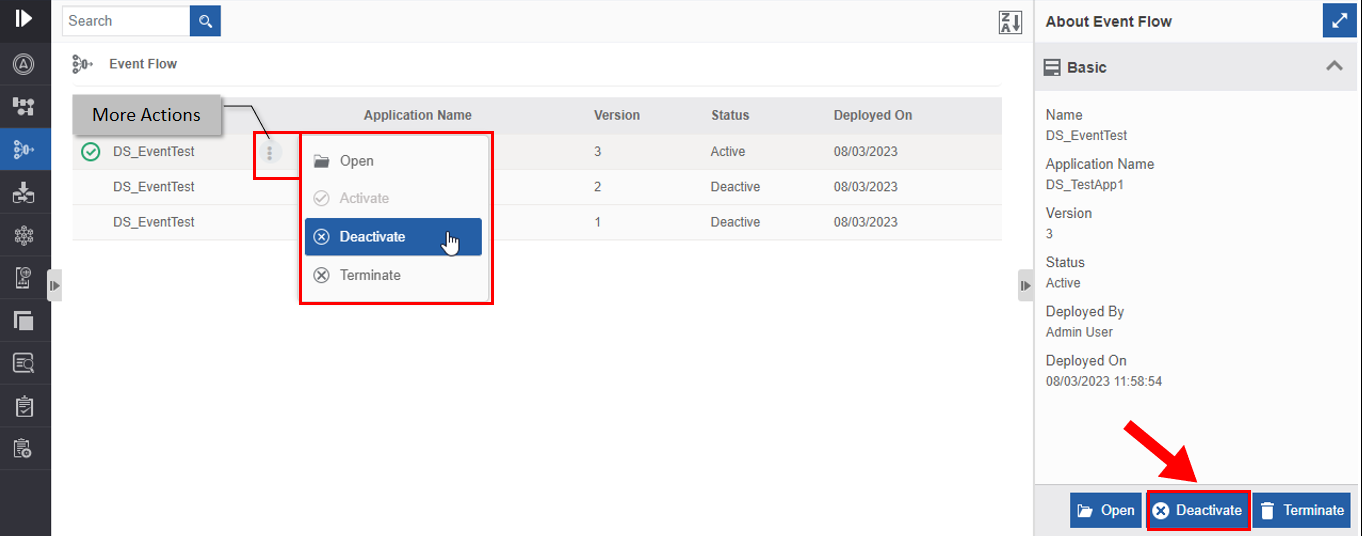
Deactivating an event flow version. -
At the bottom right, click Deactivate.
Or hover over the flow name > click More Actions and then click Deactivate.
Deactivate Confirmation message appears.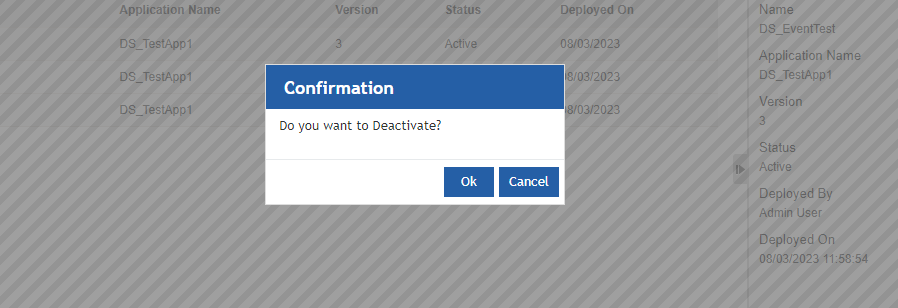
Deactivate confirmation. -
Click Ok. The selected version of the workflow will get deactivated and the status changes to “Deactive”.
Activating an Event Flow Version
You can activate any deactivated version of the event flow. When you activate a version, the previously active version becomes deactivated (a validation message will be displayed for deactivating a latest version).
- Click the Burger menu and navigate to Management > Application Management.
-
Click Event Flow. The list of all deployed event flows is listed in the table format.
-
Click an event flow that is to be activated.
If a flow is active, it will display Activate at the bottom right of the page.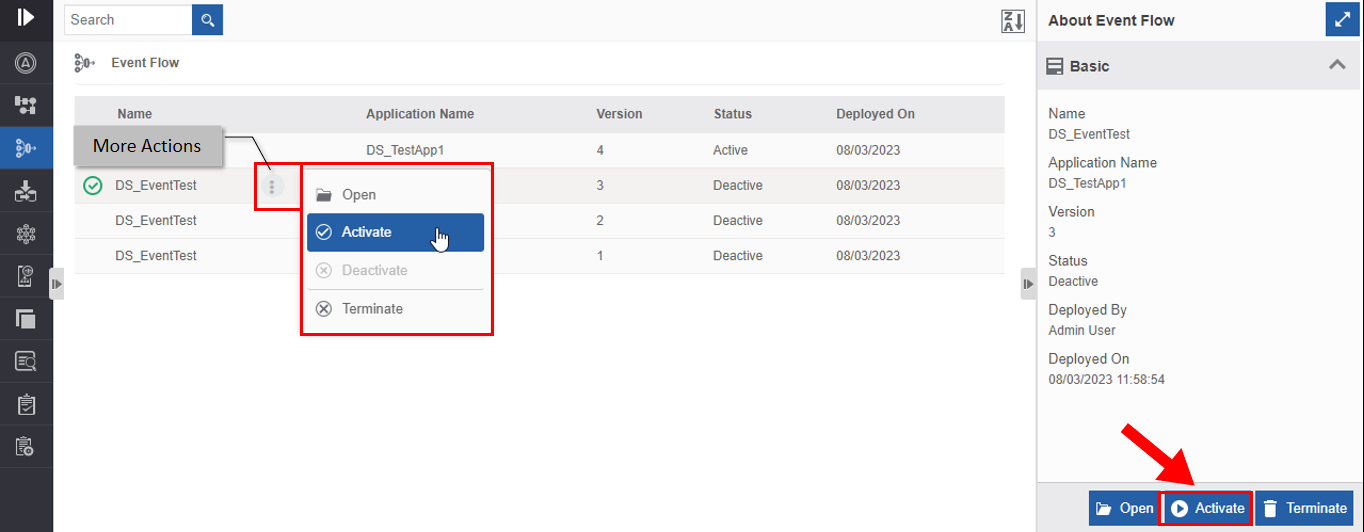 .
. -
At the bottom right, click Activate.
Or hover over the flow name > click More Actions and then click Activate.
Activate Confirmation message appears.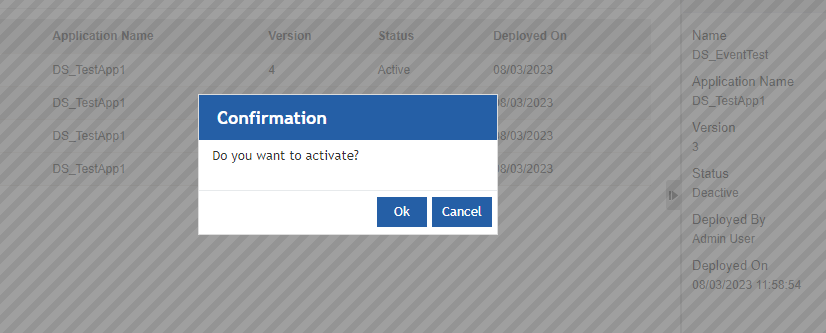 .
. -
Click Ok. The selected version of the workflow will get activated and the status changes to “Active”.
Terminating an Event Flow Version
If you terminate a version of the event flow, you cannot activate that version.
- Click the Burger menu and navigate to Management > Application Management.
-
Click Event Flow. The list of all deployed event flows is listed in the table format.
-
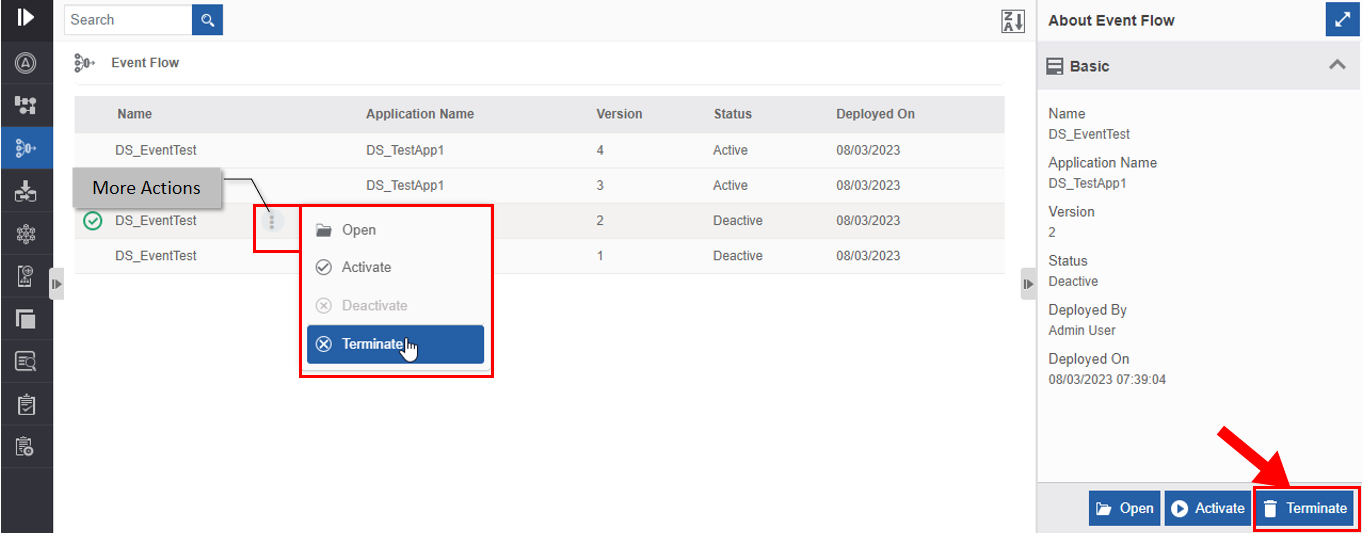
Click an event flow that is to be terminated. The Terminate button appears at the bottom right of the page.
 .
. -
At the bottom-right, click Terminate.
Or hover over the flow name > click More Actions and then click Terminate.
Terminate Confirmation message appears.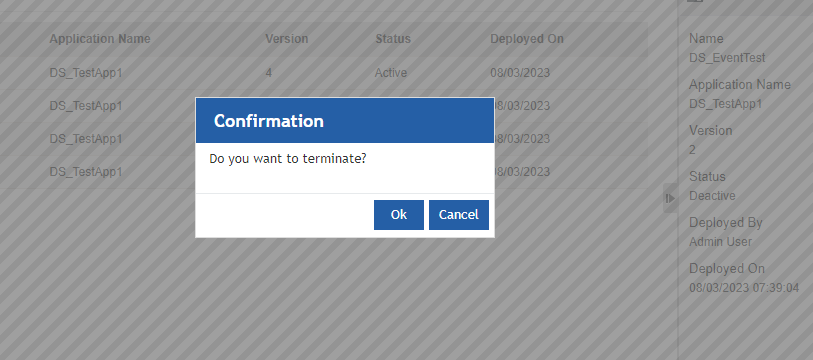 .
. -
Click Ok. The selected version of the workflow will get terminated and the status changes to “Terminated”.
Dataflow Management👑
Introduction to Data Flow Management
In the Data Flow section, you can view the list of all data flows that are deployed through App Studio module. All the versions of the data flows are available in Data Flow section. You cannot modify the details of a particular flow version through this section, however, you can execute the data flows through this module (even if it is deleted in the App Studio module).
Viewing Data Flow List and Details
- Click the Burger menu and navigate to Management > Application Management.
-
Click Data Flow. A list of deployed data flows is listed in the table format.
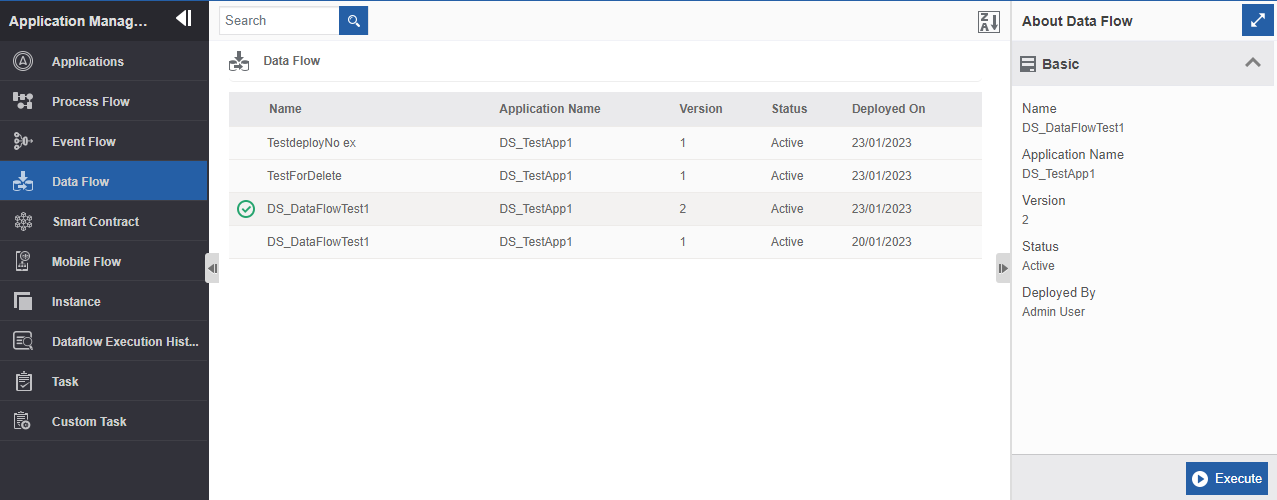
Viewing deployed data flow list and details. -
Click a data flow name. The details of that data flow appear in the Info Action panel on the right side. All versions of the data flow have the same name. Refer to the Version column for identifying a particular flow.
Property Description Name Name of the data flow. Application Name Name of the application to which the flow belongs. Version Version of the data flow. Status Status of the data flow. Deployed By Username of the user who deployed the data flow. Deployed On Date and time on which the data flow is deployed
(detail is on the data flow list table).
Viewing Data Flow Details
You can open the data flow and view the flow design and entities details.
- Click the Burger menu and navigate to Manage > Application Management.
-
Click Data Flow. The list of all deployed data flows is listed in the table format.
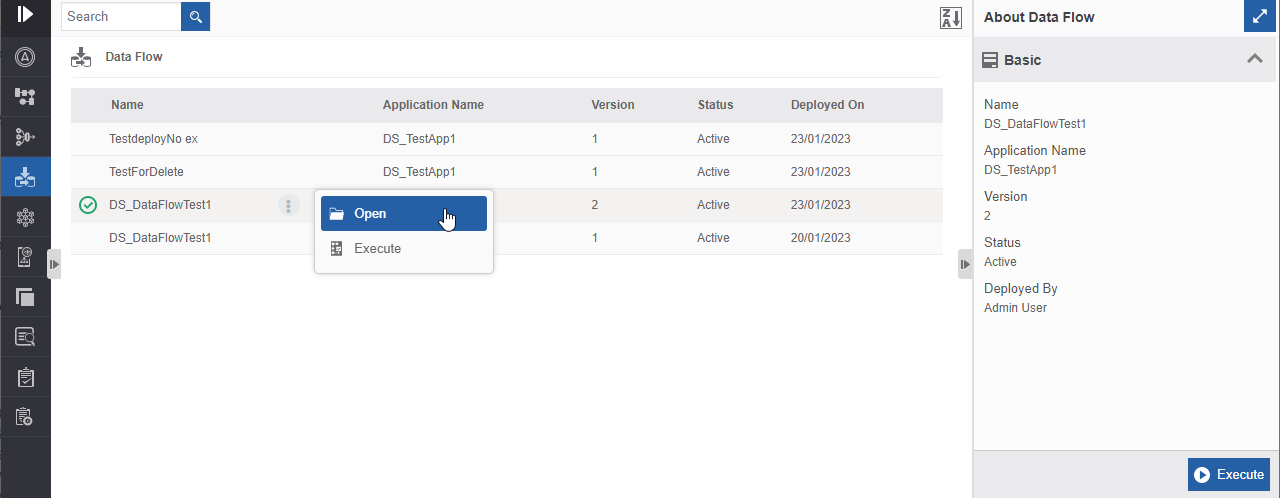
Opening the data flow. -
Hover over the data flow name and more actions (three dots) appear.
-
Click More Actions and then click Open. Data Flow design and details appear. You cannot edit the data flow design or details.
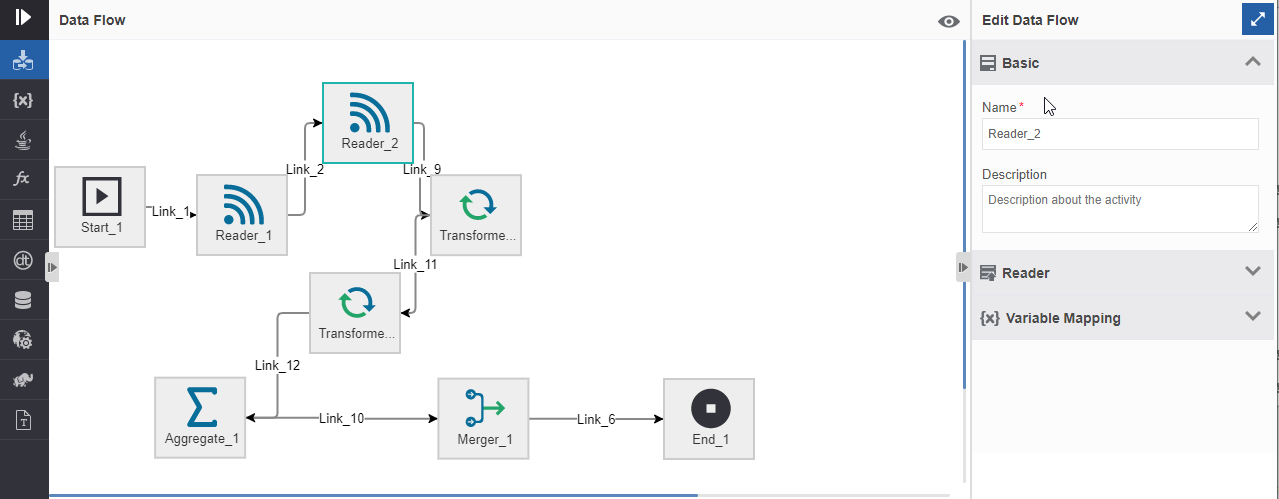
Viewing flow details.
Executing a Data Flow
The data flow section allows you to execute the data flows. You can execute and check all the versions (latest and older ones) of the data flow in this section. All the executed data flow instances get logged in Management > Application Management > Data Flow Execution History.
- Click the Burger menu and navigate to Management > Application Management.
-
Click Data Flow. A list of deployed data flows are listed in the table format.
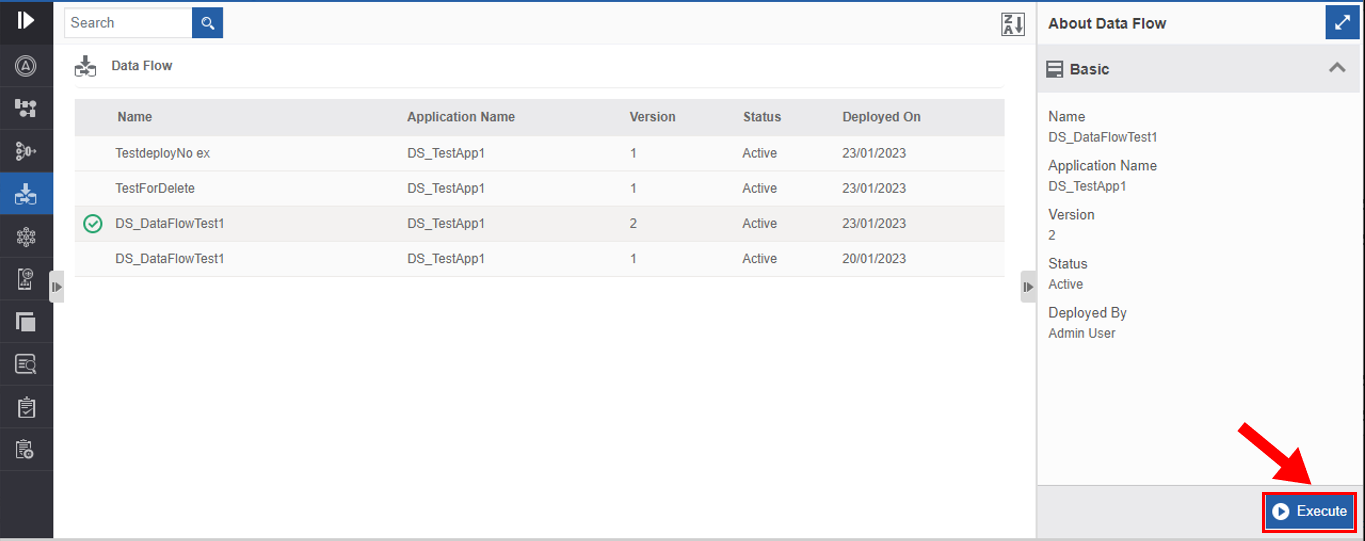
Executing data flow. -
Click and select a Data flow from the table.
-
Click Execute.
Instance
The Instance section allows you to view all instances of the process flows by their status. All the instances have unique instance numbers. You cannot alter a particular instance that is running. However, you can view the instance status and details in this section. You can also view the instance variable details.
The instance actions are not valid for completed instances.
Viewing Instance List
- Click the Burger menu and navigate to Management > Application Management.
-
Click Instance. A list of instances is listed.
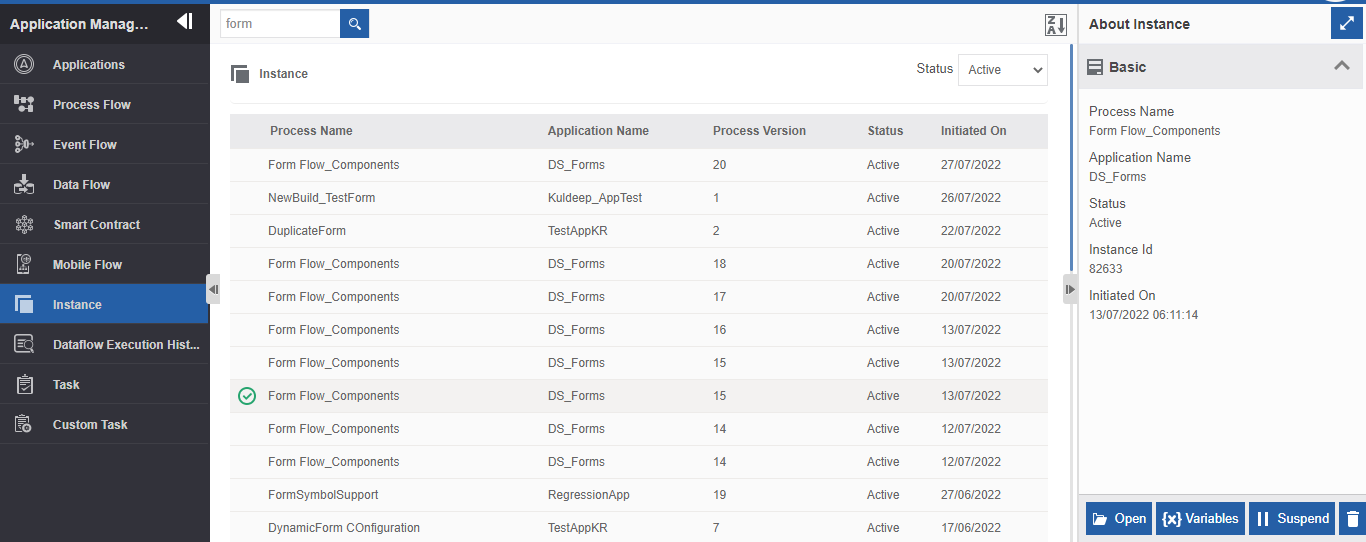
Viewing instance list and details. -
Click a process name (of the instance needed). The details of that instance appear in the Info Action panel (About Instance) on the right side.
All the instances of a process are listed with the same process name. The instance is differentiated using the instance id that can be viewed in the About Instance panel.
Viewing the Instance Details
-
Click the Burger menu and navigate to Management > Application Management > Instance.
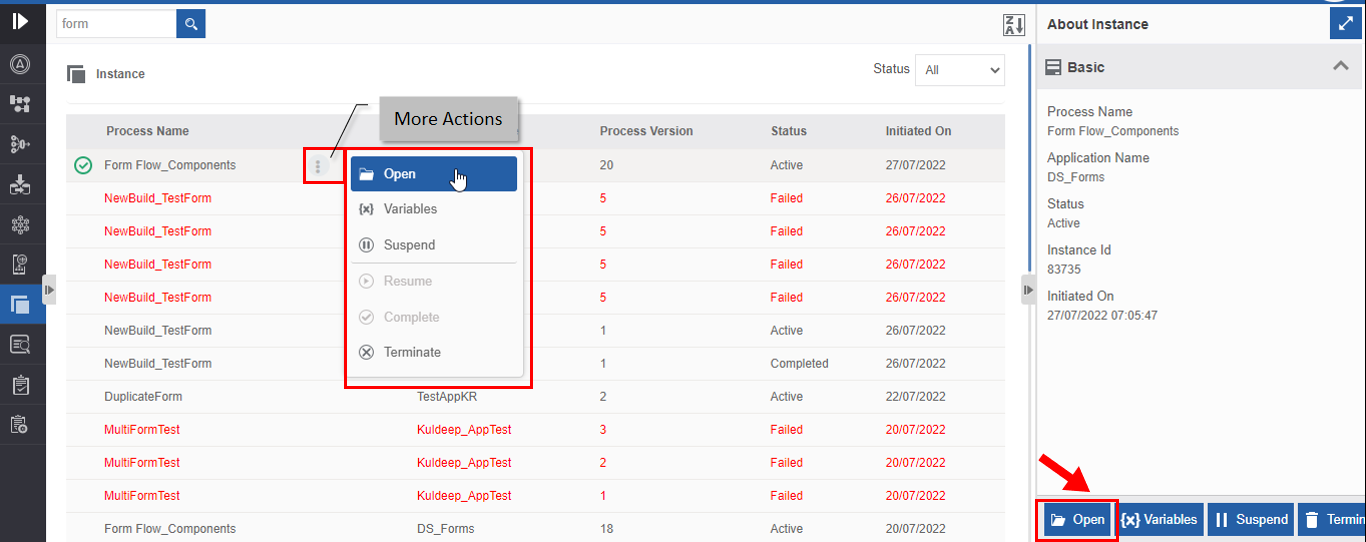
Opening and viewing instance details. -
Click the process name of the instance and click Open.
Alternatively, you can hover over the process name and click the three dots [More Actions] and then click Open or double-click the process instance name. Instance details appear in a pop-up with Info details on the right-side panel.
When you click an instance, the About Instance panel on the right side displays the details of the selected instance with the Instance Id.
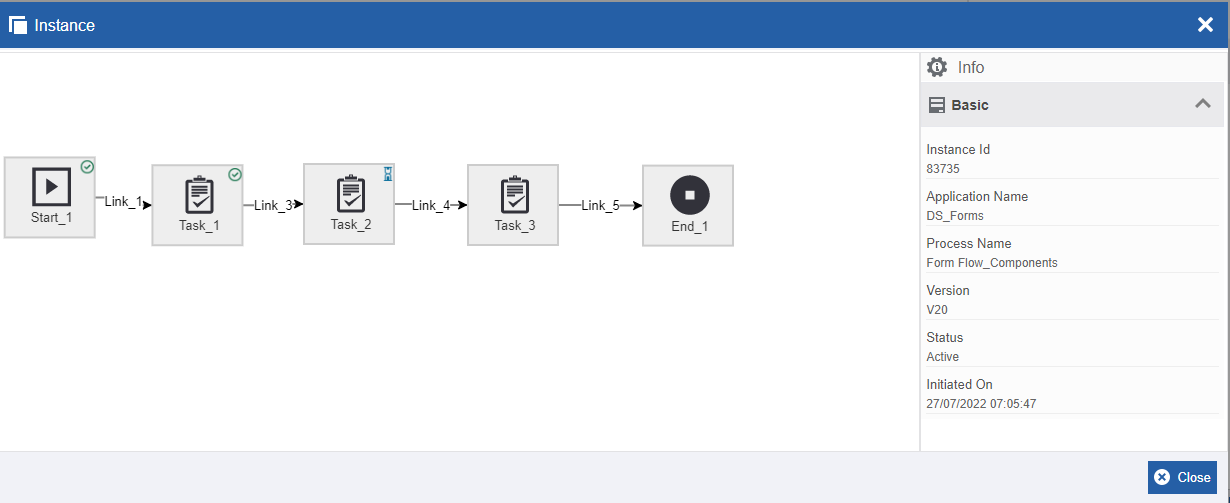
The instance flow and details.Property Description Instance Id Instance Id of the selected instance. Application Name Application name of the process instance. Process Name The process name of the flow. Version Version of the flow. Status Status of the instance. Initiated on Instance initiated date and time. The About instance panel displays the below properties as well.
-
Parent Instance Id: The parent instance id of the instance if applicable.
-
Parent node name: The parent activity name of the instance if applicable.
-
-
Click an activity in the flow to view the status and details of that activity in the Info section.
-
The indication mark on the top-right of the activity represents the various status of that activity.
-
 : Completed activity.
  : Failed activity.
 : Active activity.
- If there is no mark on the activity, it indicates that the activity is not yet executed.
- If you click outside the activity, the general details of that instance appear.
-
-
Click Close to close the Instance pop-up.
Viewing Instances by Status
You can filter the instances by the status of the instance.
-
Click the Burger menu and navigate to Management > Application Management > Instance. The flow instances are listed. By default, all the instances are listed.
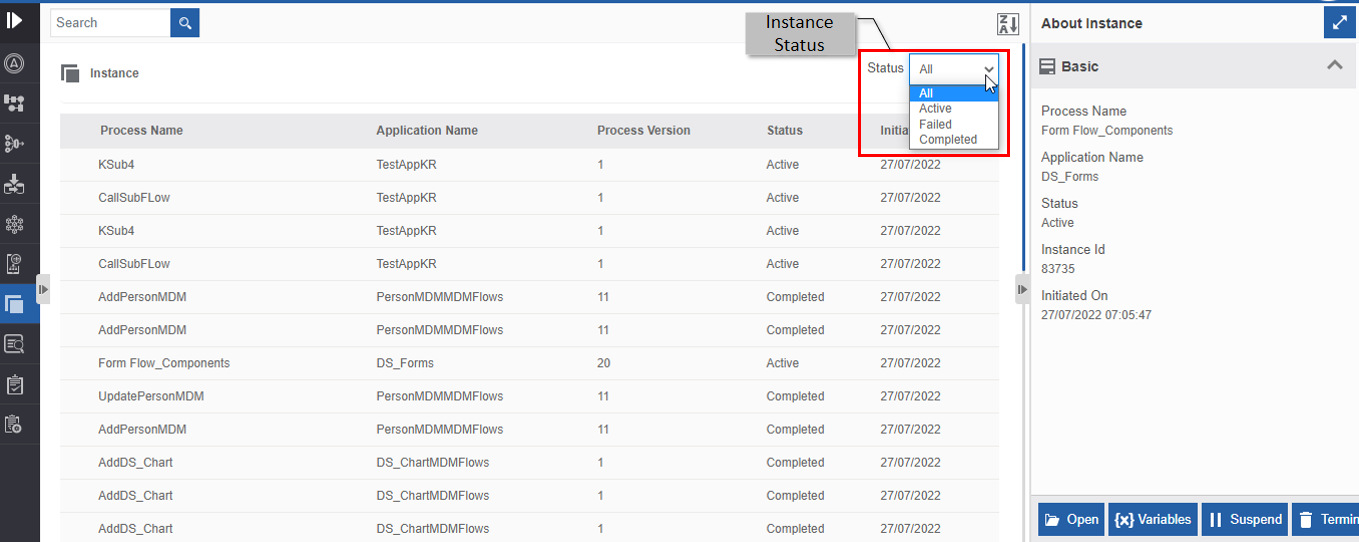
Status-wise instance listing. -
In the Status drop-down on the top right, select the status by which the flows are to be listed.
- All: Lists all the instances.
- Active: Displays all the active instances or the flows that are running.
- Failed: Displays all the failed instances. Failed instances appear in red.
- Completed: Displays all the completed instances.
Viewing Instance Variable Details
Instance Variable Details lists all the variables associated with the instance and the corresponding details.
-
Click the Burger menu and navigate to Management > Application Management > Instance.
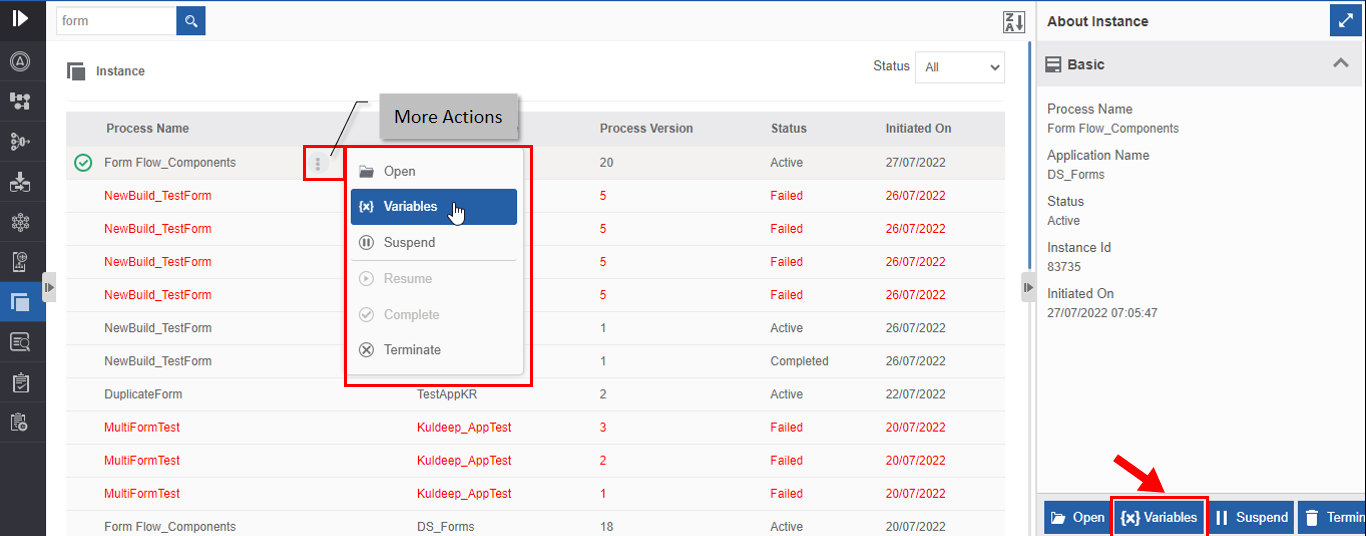
Opening and viewing instance details. -
Click a process name and click Variables. (Alternatively, you can hover over the process name and click the three dots [More Actions] and then click Variables). Instance Variable details appear in a pop-up.
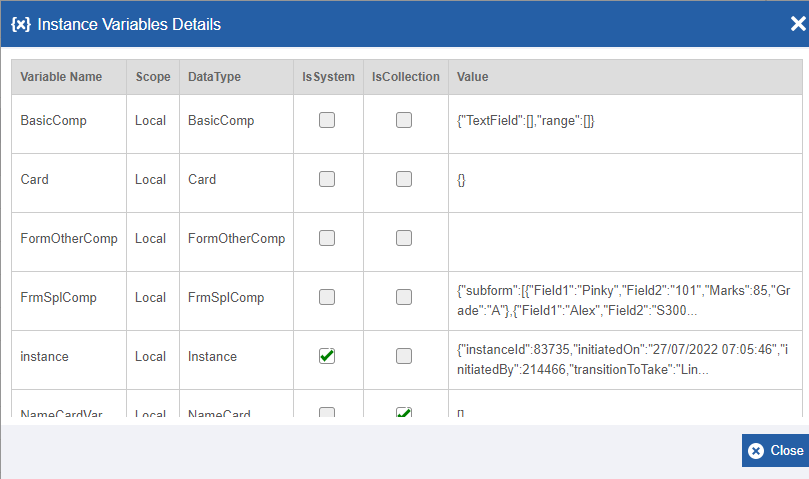
The details in the Instance Variable Details include the variable name, scope, data type of the variable, type of the variable (Is System = True or False), collection type (Is Correction = True or False), and the value of the variable for the selected instance.
-
Click Close to close the Instance Variable Details pop-up.
Suspending an Instance
You can suspend an instance whose status is “Active”. When you suspend an instance, users cannot access that instance, and the status of that instance becomes “Suspended”.
- Click the Burger menu and navigate to Management > Application Management > Instance.
-
Click and select a process flow instance that you want to suspend. The actions appear on the right-bottom of the page. (Alternatively, you can hover over the process flow instance and click the three dots – More Actions- appear). (Click the process name of the instance for viewing the instance details in the About Instance on the right side.)
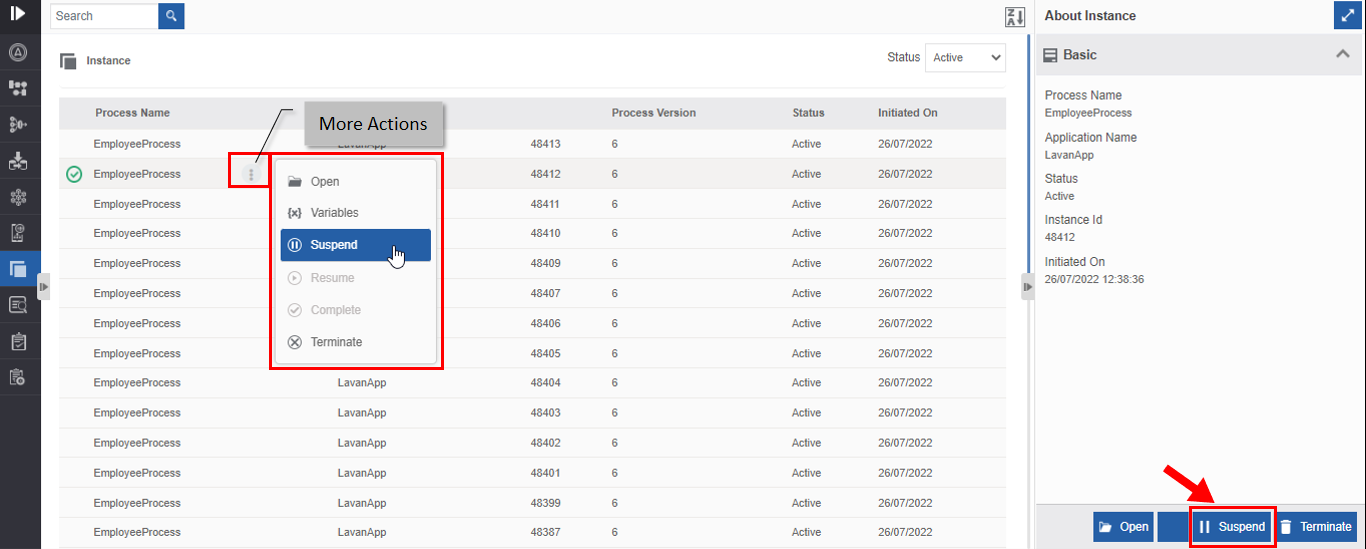
Suspending an instance. -
Click Suspend. Suspend confirmation pop-up appears.
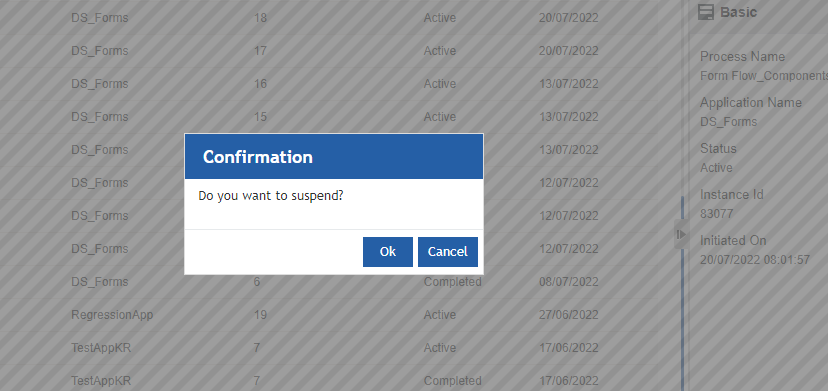
Suspend confirmation. -
Click Ok. Success pop-up appears.
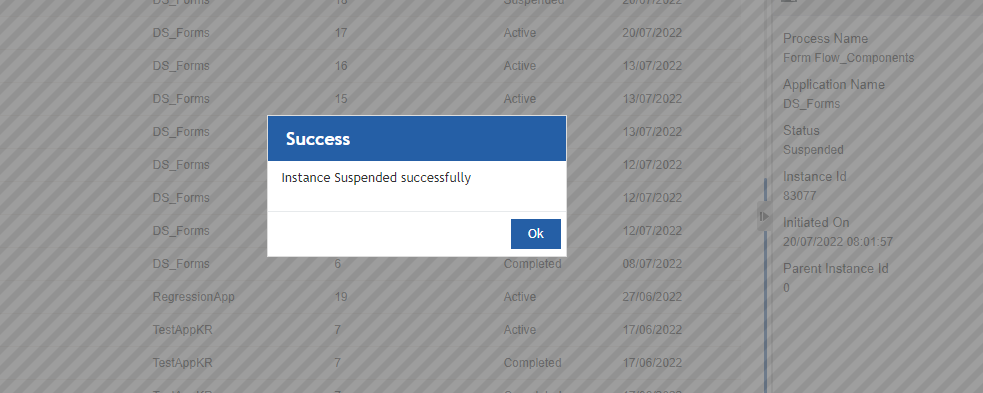
Success message. -
Click Ok. The process flow gets suspended. The status of the process instance is now “suspended”. The Resume action appears on the screen.
Resuming an Instance
You can resume a suspended instance. When you suspend an instance, the status of the instance changes to “Suspended” and Resume action appears on the selection of that instance. When you resume a suspended instance you are resuming the instance in the runtime and hence users will be able to resume the flow from where it goes suspended.
- Click the Burger menu and navigate to Management > Application Management > Instance.
-
Click a suspended process flow name. Note that the status of the process flow is “Suspended”. Resume action appears on the bottom right. (Alternatively, you can hover over the process flow instance name and click the three dots – More Actions- appear.)
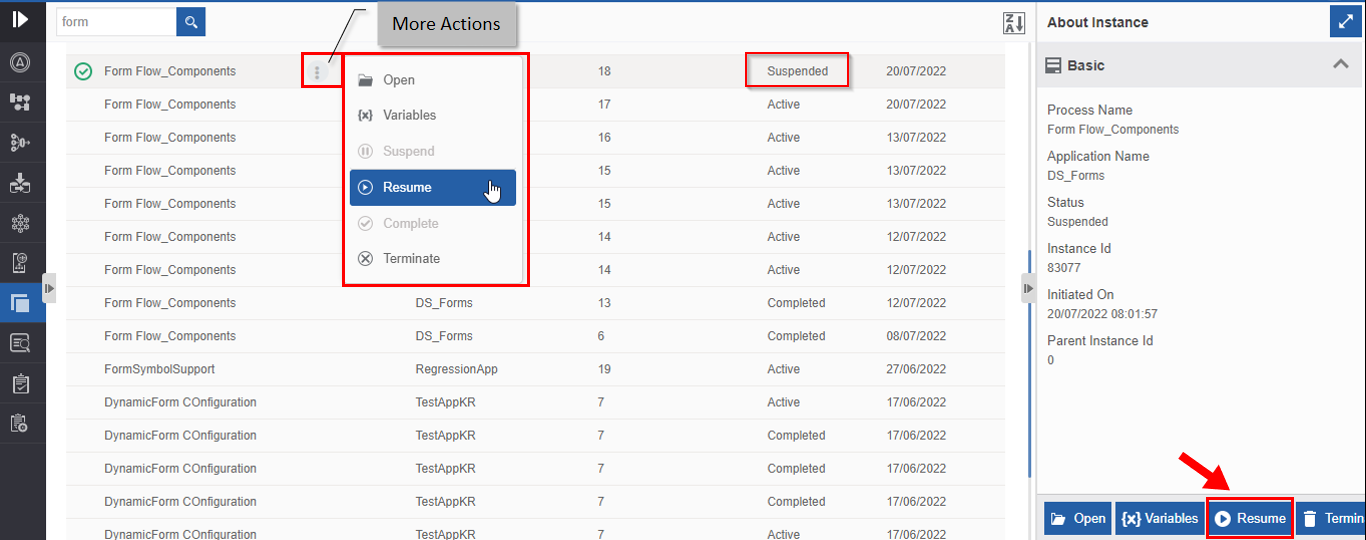
Resuming Suspended Process flow. -
Click Resume. Resume confirmation appears.
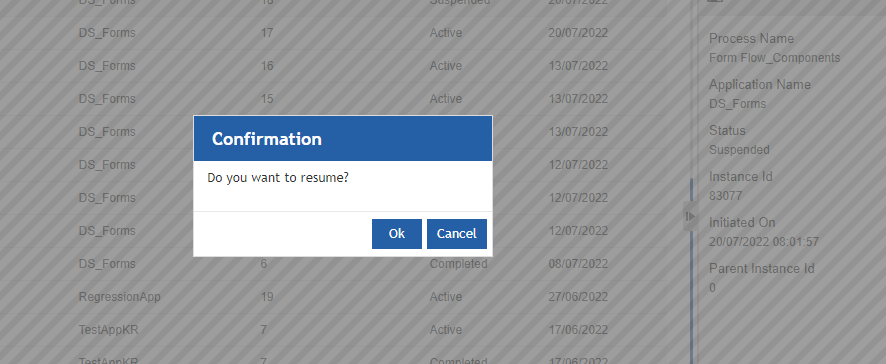
Resume Confirmation. -
Click Ok. Success pop-up appears.
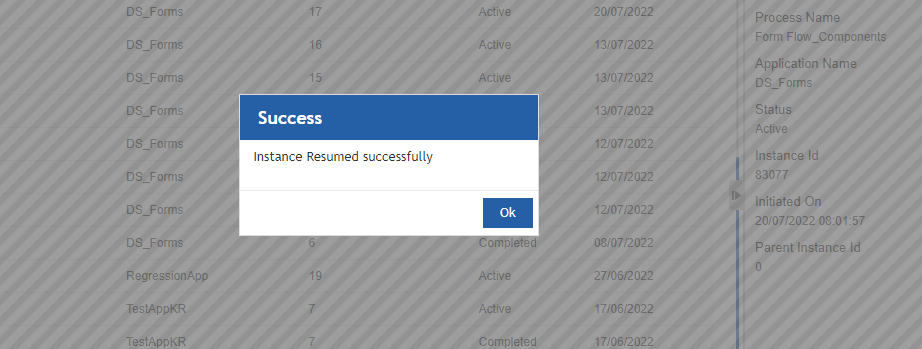
Success Message. -
Click Ok. The process flow is resumed and the status of the process flow changes to “Active”.
Viewing Error Details in Failed Instance
- Click the Burger menu and navigate to Management > Application Management > Instance.
-
Click a Failed instance. Note that the status of the failed instance is “Failed”. The About Instance panel on the right side displays the details of the failed instance.
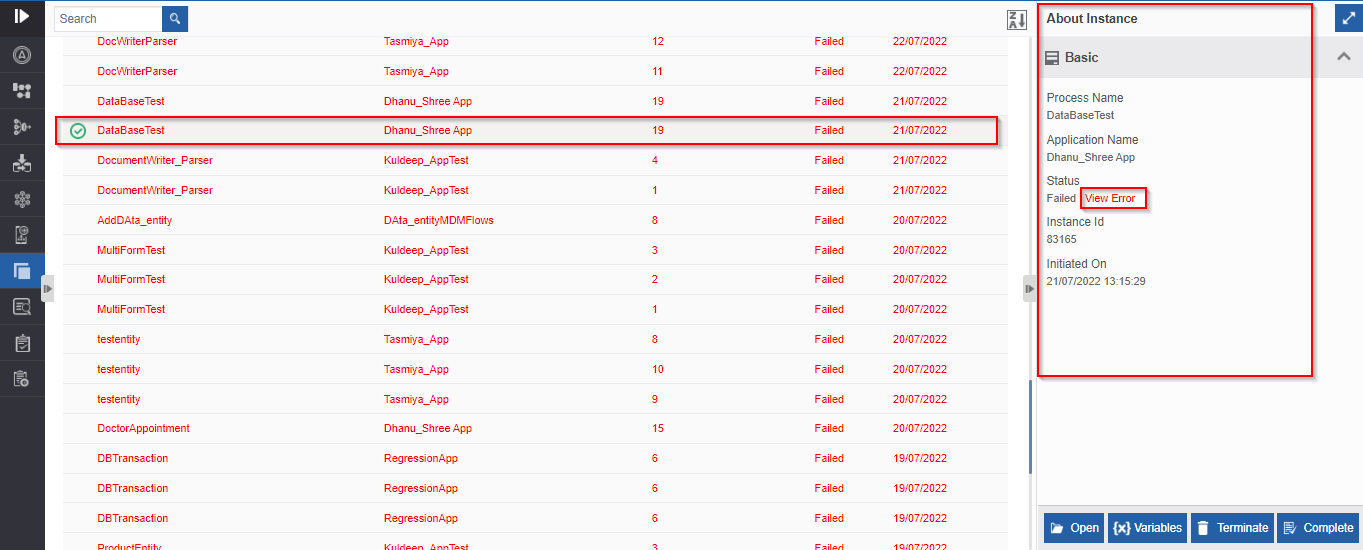
Details of a failed instance. -
Click View Error link in the Status. Error details pop-up appears.
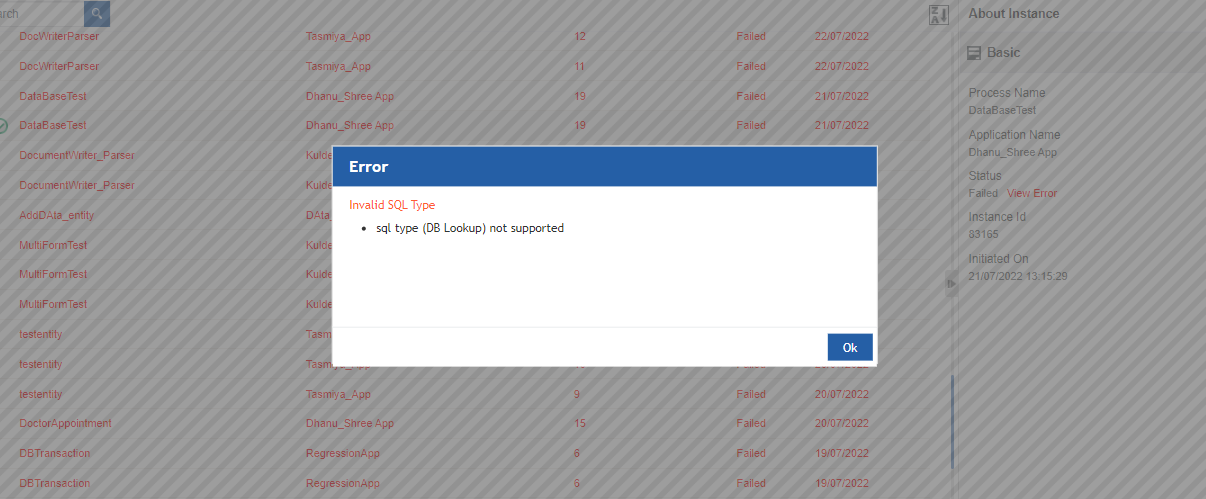
The Instance Error details. -
Click Ok in the pop-up to close the pop-up.
Force Completing the Error Activity in the Instance
The Force Complete feature is applicable for the failed activity of an instance. When an instance fails, it means that there is an error in a particular activity by which the instance has failed and further process is stopped. If you force complete an activity for which an error has been encountered, you can surpass that error and jump to the next transition for continuing the instance.
- Click the Burger menu and navigate to Management > Application Management > Instance.
-
Click a Failed instance. Note that the status of the failed instance is “Failed”.
-
Open the Failed instance of the process for which you need to view details and the Instance detail pop-up appears.
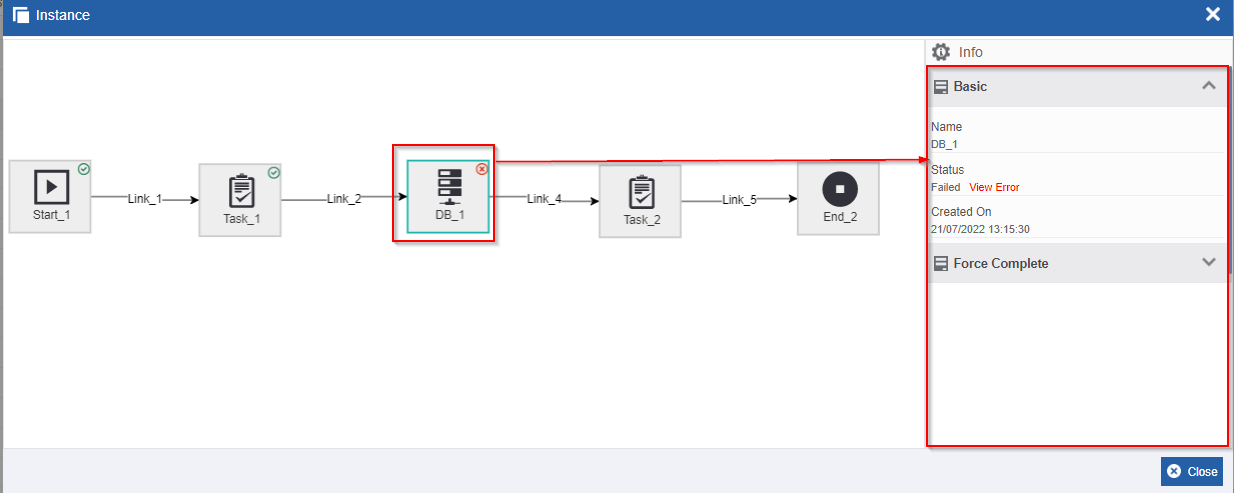
Error activity details. -
Click the error activity in the flow. Details of that activity appear in the Info Actions panel.
-
In the Info Actions, click Force Complete accordion. Force Complete section appears only for the activities that failed.
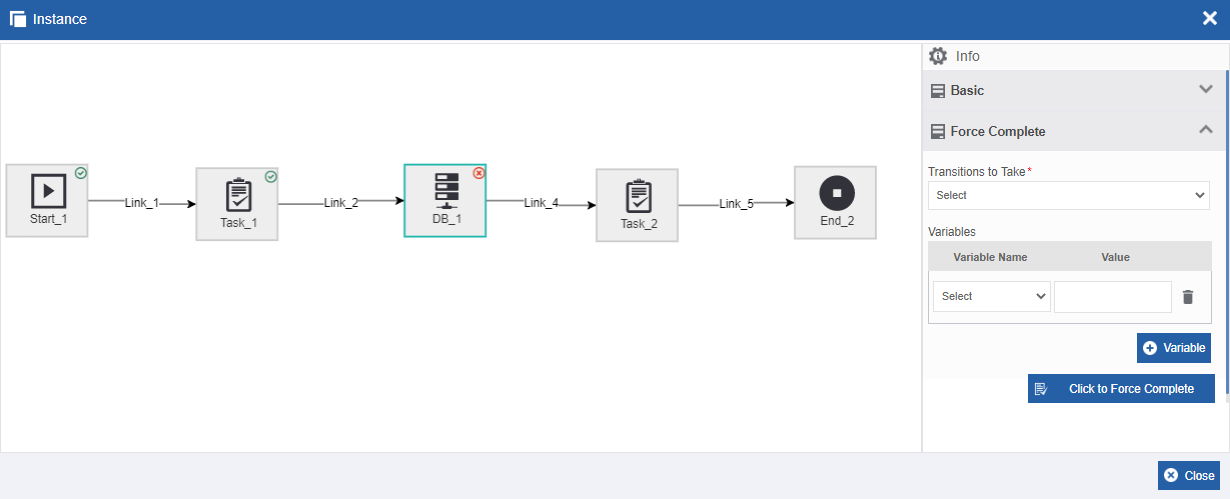
Force Complete section for the selected activity. -
In the Transition to Take, select the transition that you need after the current activity. If there are multiple transitions, you need to choose a particular transition. If only one transition is available, select that transition.
-
In the Variables section, select the Variable name and provide the Value for the activity as per your requirement in the failed activity. This is dependent on the activity that has failed. Click +Variable for adding multiple variables and values.
-
Click “Click to Force Complete” to complete the selected error activity. Now you can continue with the instance flow.
When you surpass the error activity and resume the instance, the status of the instance will become “Active”. However, the instance record will be in red indicating that there is at least one activity in the instance that has failed.
Completing an Instance
[Deprecated!]
Terminating an Instance
You can terminate an instance that is active or failed. When you terminate a flow instance, the instance gets terminated in the runtime. You will not be able to retrieve the terminated instance.
- Click the Burger menu and navigate to Management > Application Management > Process Flow.
-
Click a Failed/Active instance.
Note that the Terminate action is applicable only for the Failed or Active instances. Terminate action appears on the bottom right. (Alternatively, you can hover over the process flow name and click the three dots – More Actions- appear).
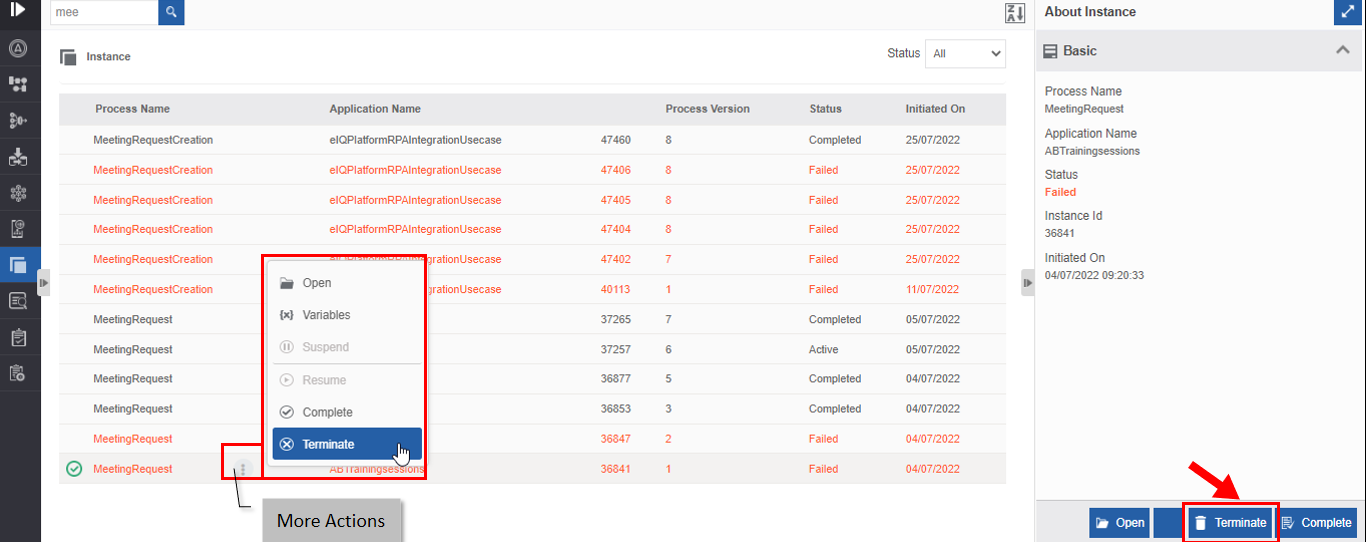
Terminating an instance. -
Click Terminate. A Confirmation pop-up for Terminate appears.
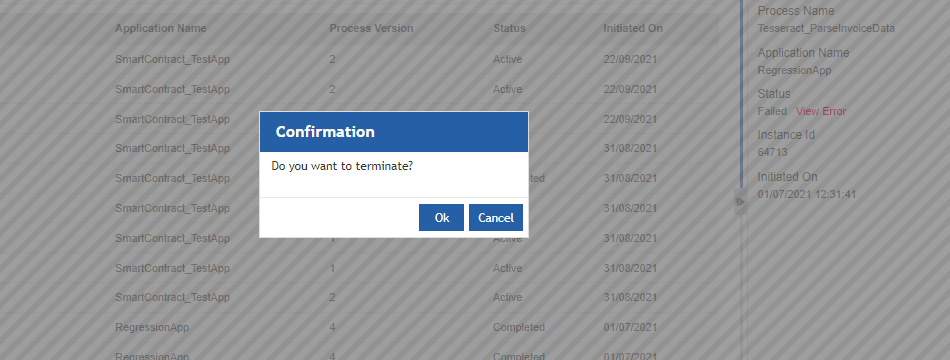
Termination confirmation. -
Click Ok for terminating the process flow (or click Cancel to cancel the action). A Success message appears on successful termination of the process flow.
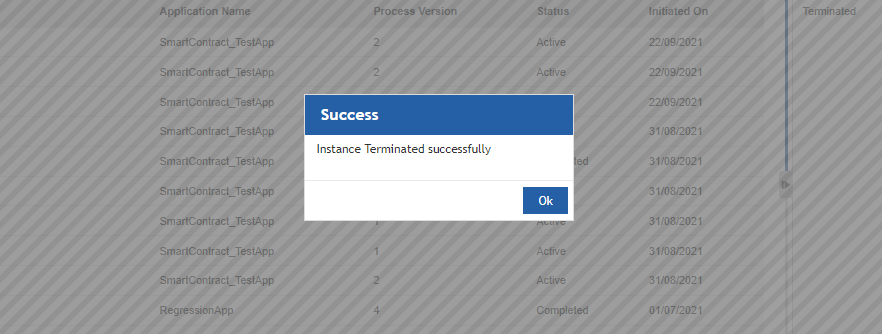
Success Message. -
Click Ok. The status of the process flow now changes to “Terminated”.
Dataflow Execution History👑
Introduction to Data Flow Execution History
The data flow execution history section displays the list of all data flow execution instances.
Viewing Dataflow Execution History
- Click the Burger menu and navigate to Management > Application Management > Dataflow Execution History.
-
Click any Data flow name. The About Dataflow Execution History panel (Info Actions) displays the details of that data flow execution.
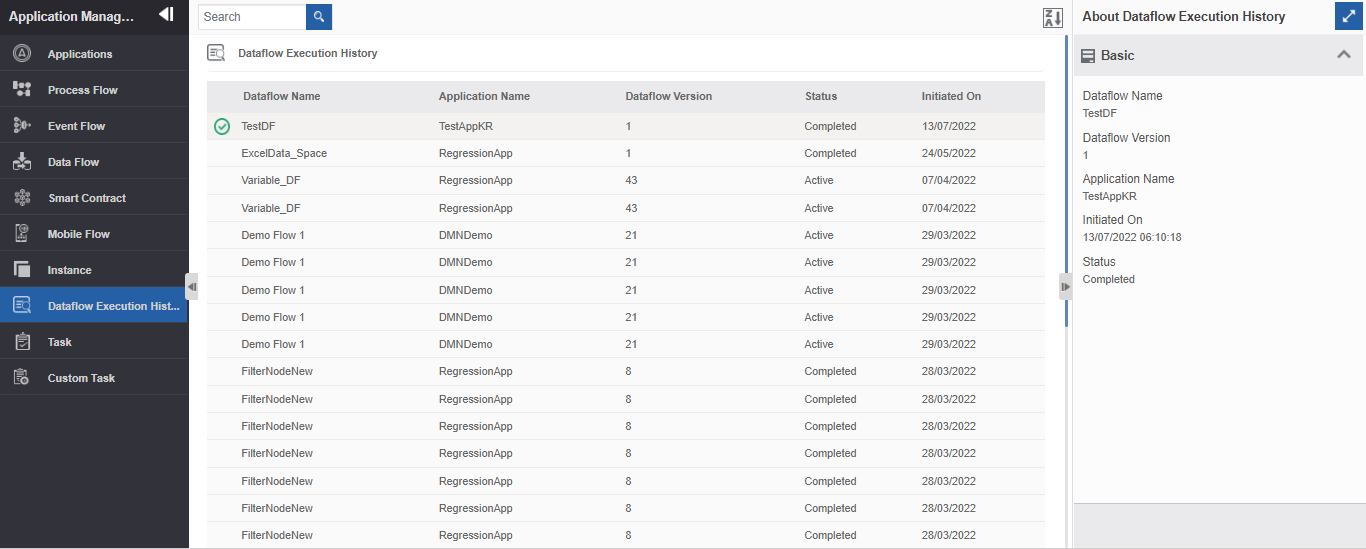
Data Flow Execution History.Property Description Dataflow Name Name of the dataflow. Dataflow Version Version of the selected dataflow. Application Name Application name to which the dataflow belongs. Initiated On Dataflow initiated date and time. Status Current status of the dataflow instance.
Task
The activities Task and Approve Reject in the process flows are always associated with a Form that needs an end user to act on it (submitting the form by the user) for the further execution of the flow.
These activities are managed in the Application Management > Tasks.
The purpose of the task listing is to view the list of task instances and their current status. Also, you can reassign a task instance from the Application Management > Tasks to another user. This participant reassignment will be temporary only for that instance.
Viewing Task List and Task Details
- Click the Burger menu and navigate to Management > Application Management.
-
Click Task. A list of tasks is listed.
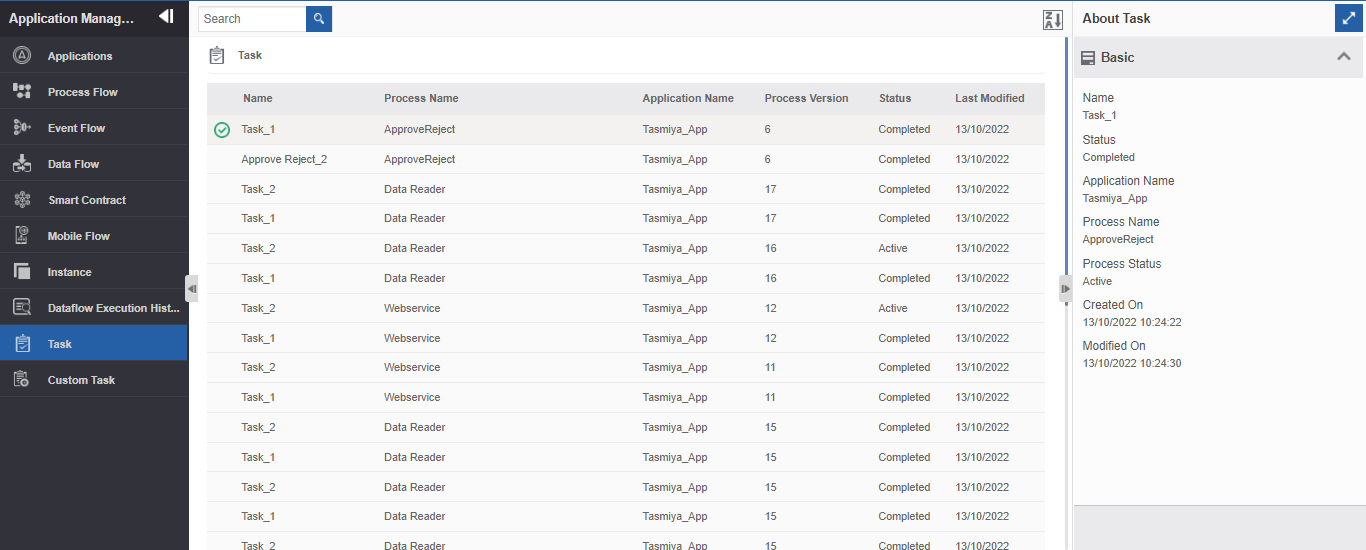
Viewing task list and details. -
Click a task name. The details of that task appear in the Info Action panel (About Task) on the right side.
Reassigning Tasks
The tasks can be reassigned to another user.
- Click the Burger menu and navigate to Management > Application Management.
-
Click Task. A list of tasks is listed.
-
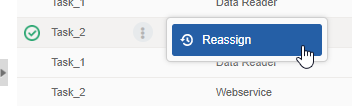
Click an active task. Reassign appears on the About Task on the right side.
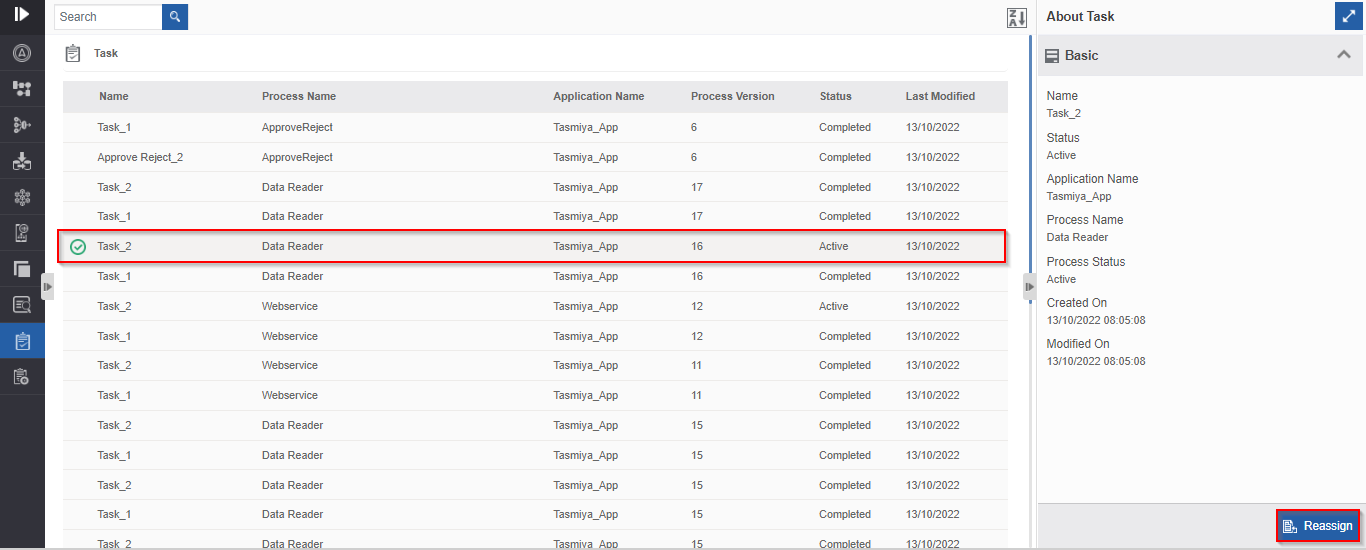
Reassigning Task.Or hover over the task name > click three dots (More Actions) > Click Reassign
 .
. -
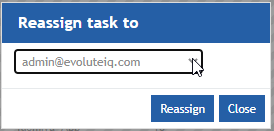
Click Reassign. Reassign task to pop-up appears.
 .
. -
From the drop-down, select the user email id to whom you want to reassign the selected task. The reassignment is applicable if you had mapped a participant or a variable for the participant (dynamic participant mapping).
-
Click Reassign (or click Close to cancel the reassign action). The task gets reassigned to the selected user.
Custom Task
Custom Task section allows you to create a custom task list through the manage section. A custom task allows the participants of the custom task to view the allocated tasks in a grid format. Custom task list appears for the associated participants and it displays the task list after the initiation of the process.
Creating New Custom Task
Follow the below steps for creating a new Custom Task.
-
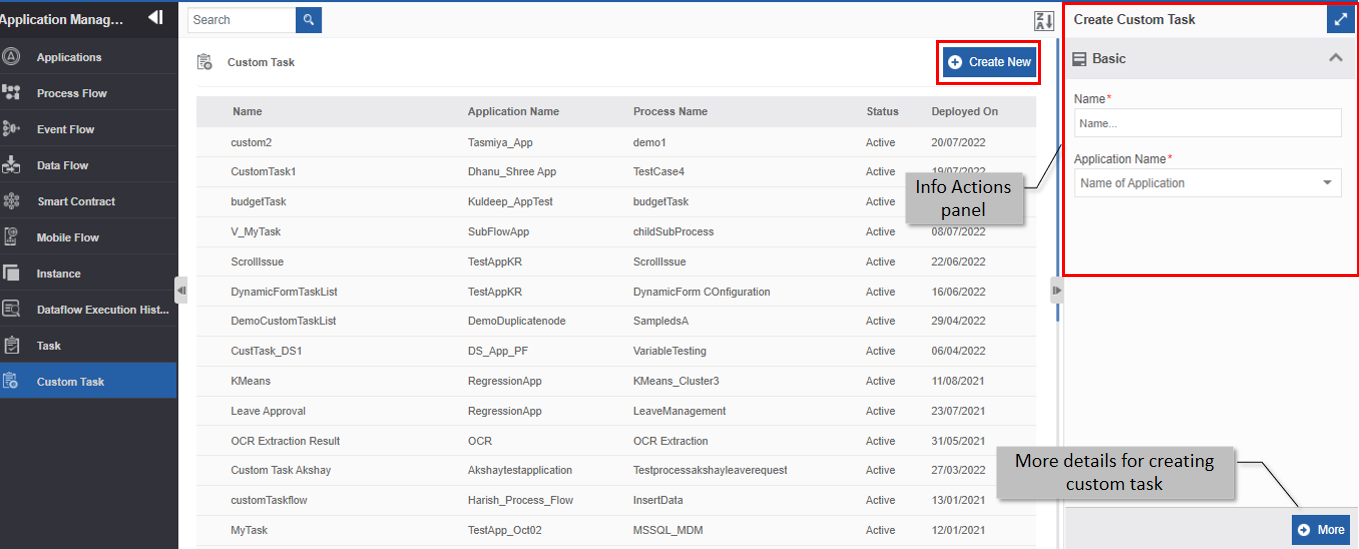
Click the Burger menu and navigate to Management > Application Management > Custom Task.
Creating a new Custom Task. -
Click + Create New.
-
Enter the Basic details in the Create Custom Task panel as explained below.
Field Description Name Enter the name of the custom task.
Character limit: 50.
Data type: Alphanumeric and underscore.
Application Name Select the Application name for the custom task.
When you select an application name, the process name field appears.Process Name* All the deployed process flows in that application are listed
in the process name drop-down.Select the process name for which you need to create
custom task list.- * Mandatory (required) fields.
-
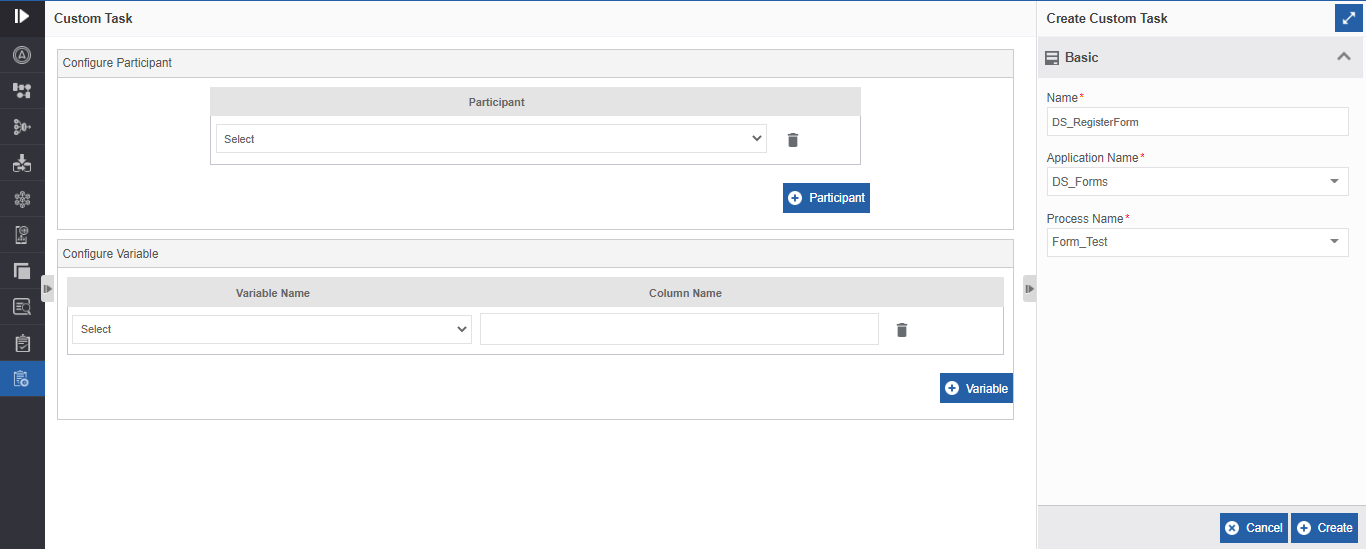
Click More. More configuration details for the custom task appear.
Custom Task - More Details. -
Below Configure Participant, select the participant name for the custom task. The list of participants associated with the process flow is only displayed in the drop-down.
-
Click + Participant for adding more participants.
-
Click the delete icon adjacent to the participant's name to delete that participant.
- The participants who are mapped in the custom task can only view the custom task list.
-
-
Below the Configure Variable, select the variable required from the Variable drop-down and enter the Column name in the Column Name box.
-
Click + Variable for adding more variables.
-
Click delete adjacent to that variable for deleting that variable.
- The variables added are displayed in the custom task list grid as columns.
-
-
Click Create on the bottom right of the page and the custom task gets created with the details entered.
Viewing and Editing Custom Task
- Click the Burger menu and navigate to Management > Configuration Management > Custom Task. Custom Task list gets displayed.
-
Click the custom task name for viewing the actions.
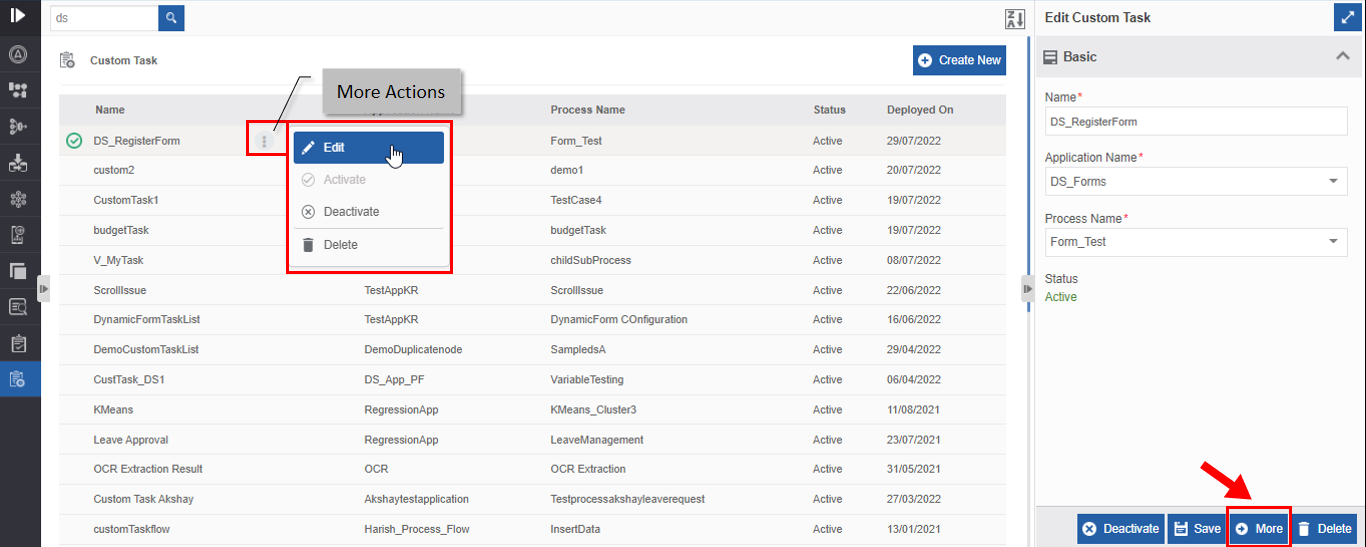
Editing custom task details. -
Click More.
Alternatively, you can hover over the custom task and click the three dots (More Actions) and then click Edit or double-click the custom task name. Details of the custom task appear.
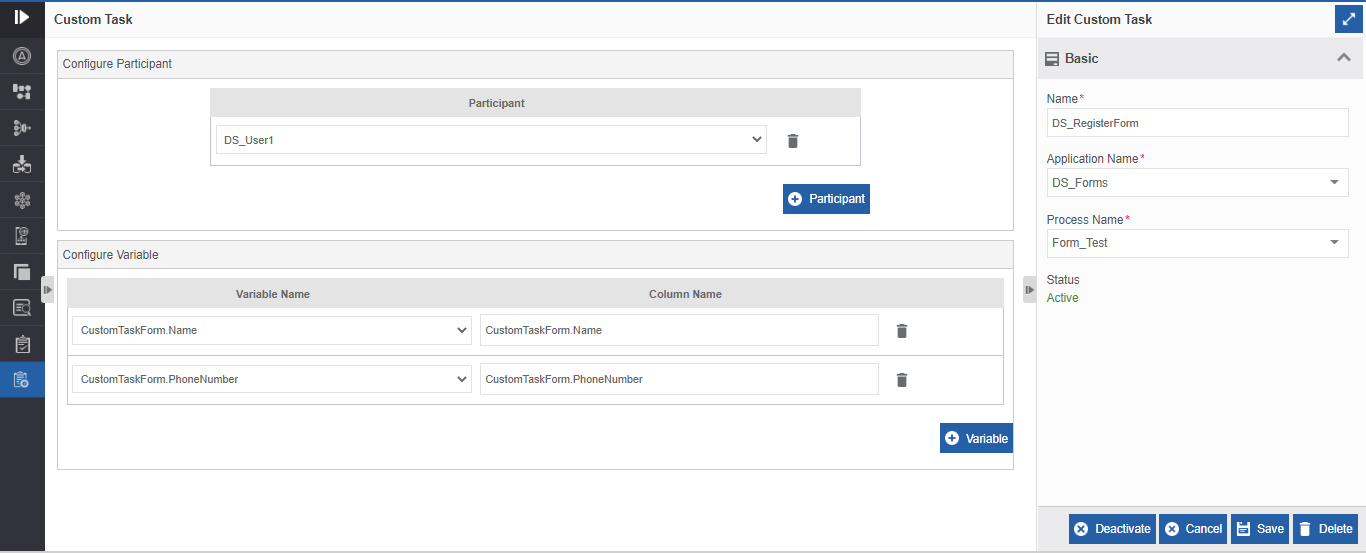
Configuration details of custom task. -
Edit the details of the custom task as needed.
- Click Save to save the modified details.
Deactivating Custom Task
You can deactivate a custom task list. Deactivate action appears only for the active custom task.
- Click the Burger menu and navigate to Management > Configuration Management > Custom Task.
-
Click the custom task name that you want to deactivate. Action buttons appear on the bottom right of the page.
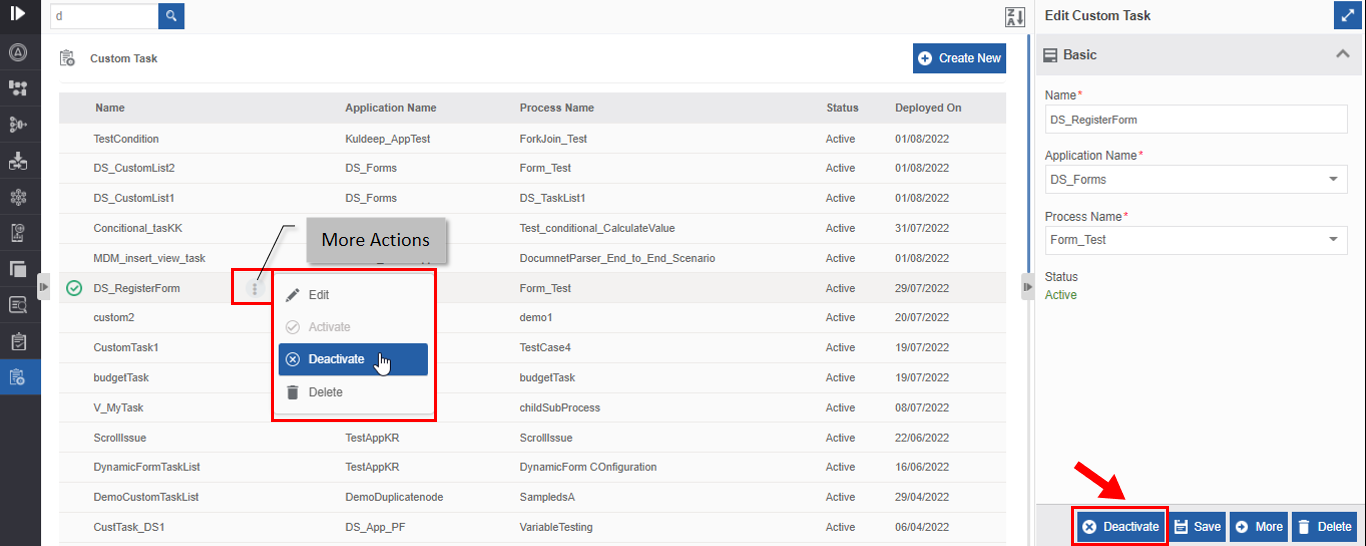
Deactivating Custom Task. -
Click Deactivate. Alternatively, you can hover over the custom task and click the three dots [More Actions] and then click Deactivate. Deactivate Confirmation appears.
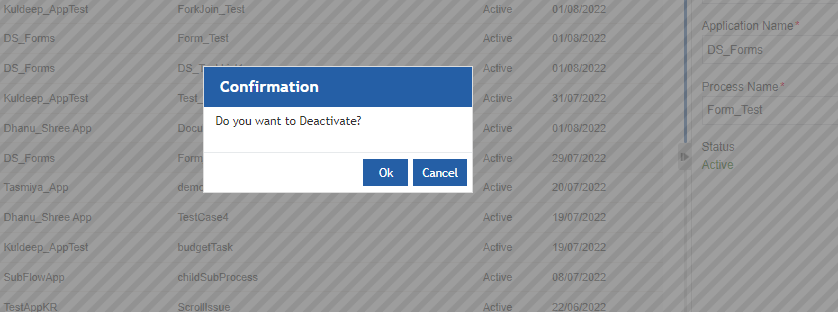
Deactivate confirmation. -
Click Ok for deactivating the custom task (or you can click Cancel to cancel the action). A Success message appears on successful deactivation.
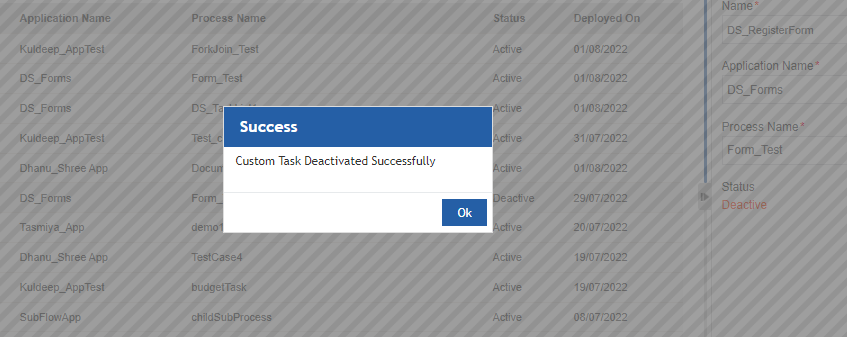
Deactivate success message. -
Click Ok. The status of the custom task is changed to “Deactive”.
Activating Custom Task
You can activate a custom task list that is already deactivated.
-
Click the Burger menu and navigate to Management > Configuration Management > Custom Task.
-
Click the custom task name that you want to deactivate. Action buttons appear on the bottom right of the page.
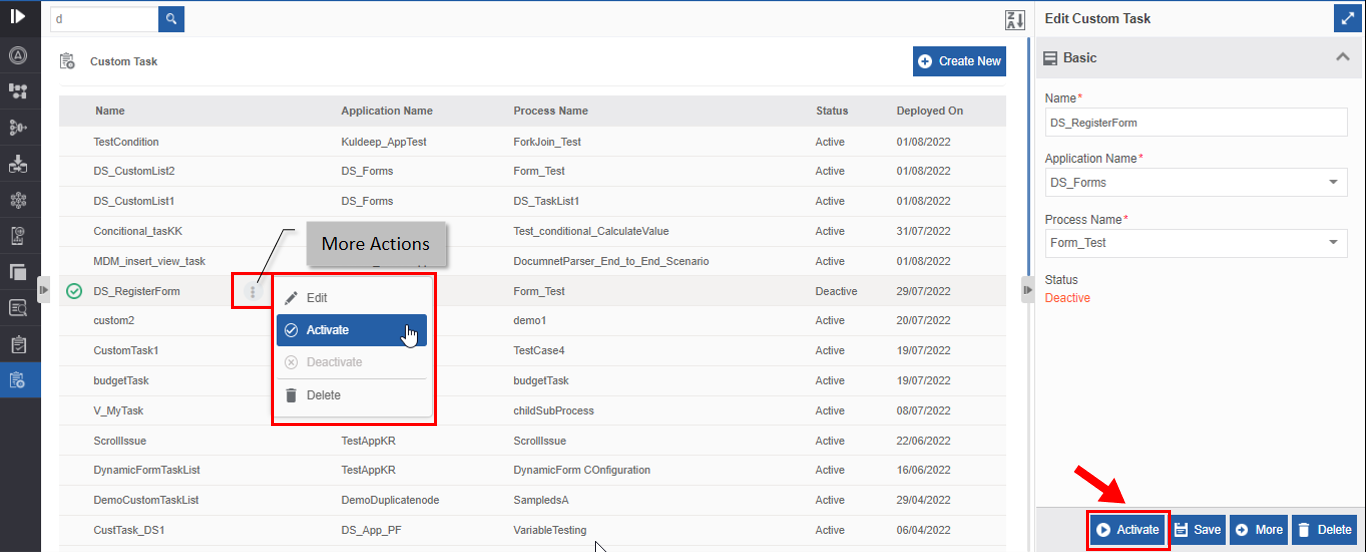
Activating Custom task. -
Click Activate. Alternatively, you can hover over the custom task and click the three dots [More Actions] and then click Activate. Activate confirmation appears.
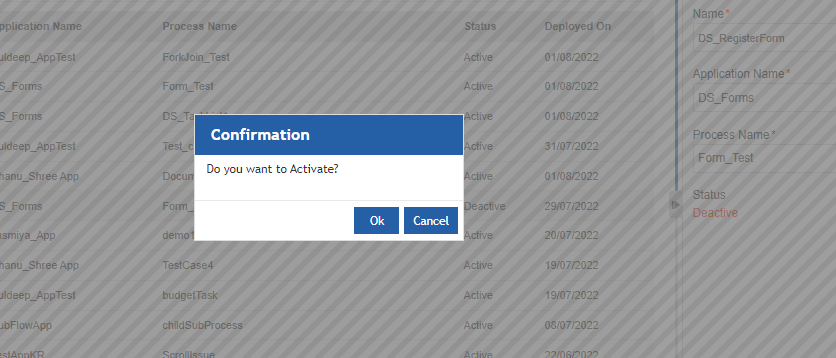
Activate Confirmation. -
Click Ok for activating the custom task (or you can click Cancel to cancel the action). A Success message appears on successful activation.
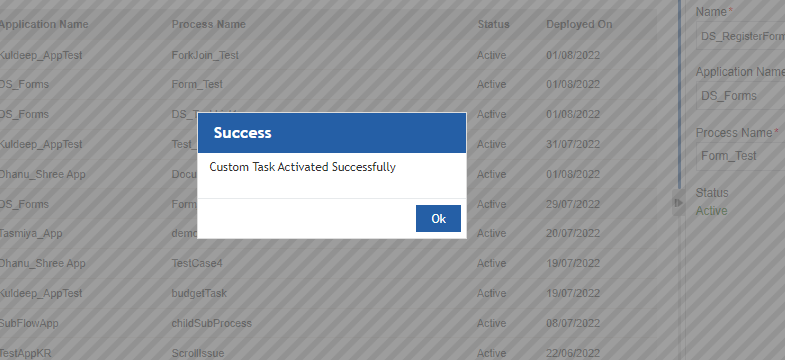
Activate success message. -
Click Ok. The custom task is activated and the status is changed to “Active”.
Deleting Custom Task
You can delete a custom task. You cannot get back a deleted custom task.
- Click the Burger menu and navigate to Management > Configuration Management > Custom Task.
-
Click the custom task that is to be deleted. The lower-right of the page displays the Delete button.
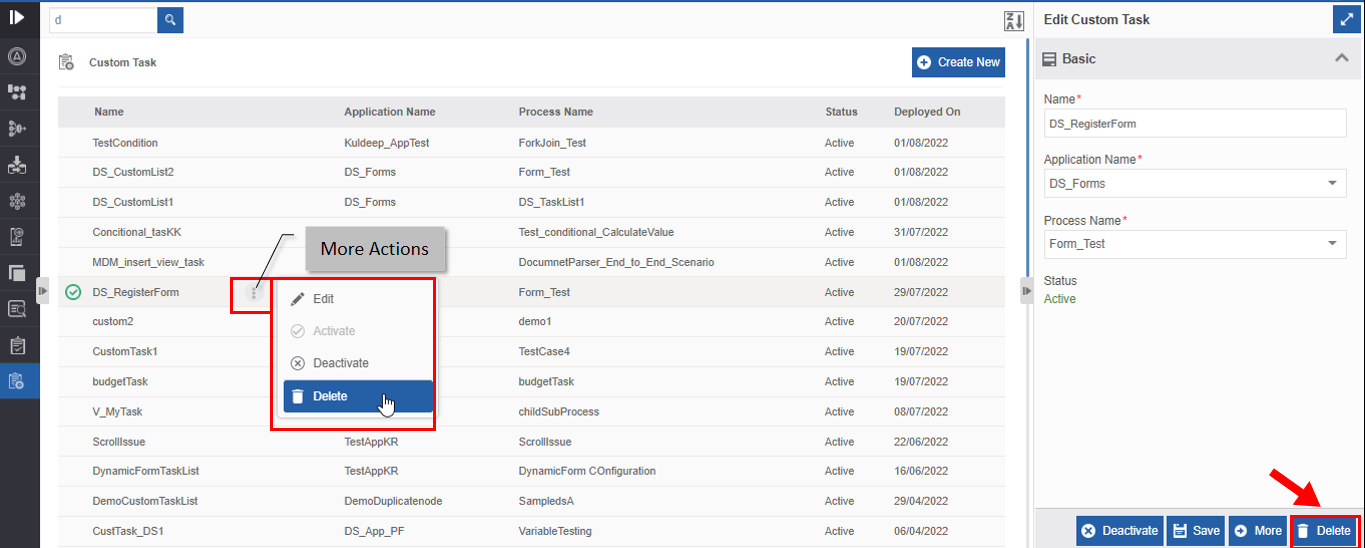
Deleting Custom task. -
Click Delete. Alternatively, you can hover over the custom task and click the three dots [More Actions] and then click Delete. Delete confirmation appears.
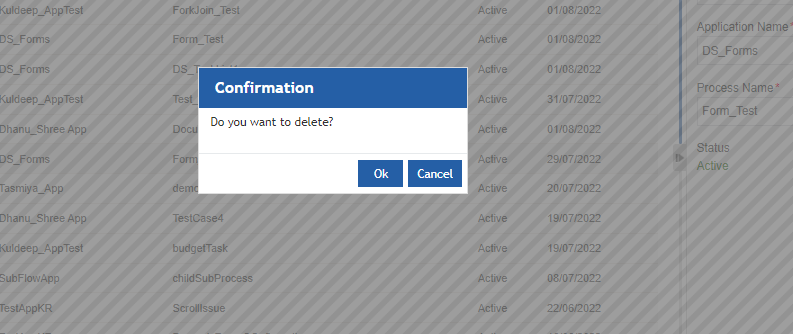
Delete confirmation. -
Click Ok. The custom task gets deleted.
Custom Task List at Runtime
The custom task list can be viewed in the Workspace or you can configure a widget page in the Platform for viewing the custom task list. Custom task lists can be viewed only for those participants who are mapped to the custom task list in the Management > Application Management > Custom Task section.
Viewing Custom Task List in Workspace
The custom task created in the Manage section can be viewed in the Workspace for the participants (assigned users) associated with the task. The participant can view all the instances of the active custom task.
- Go to Main Menu > App Studio and create an application and a process flow within that. For example, create a flow with two tasks and map appropriate forms and participants for the tasks.
-
Deploy the process flow.
-
Go to Main Menu > Management > Application Management > Custom Task and create a Custom task and map the participants for whom you want to provide the custom task list. Refer to Creating New Custom Task.
-
In the Workspace > My Process, initiate the process. Now the form associated with the first task gets completed as you initiated the process through Workspace > My Process section. The second task becomes active and hence you can view the Form associated with the second task in the Workspace > My Task section.
-
Navigate to Workspace > Custom Task. For the participants associated with the second task (participants who are mapped in the custom task), the Custom Task page section displays the corresponding custom task in the left side panel.
-
Click the custom task name. The custom task grid appears.
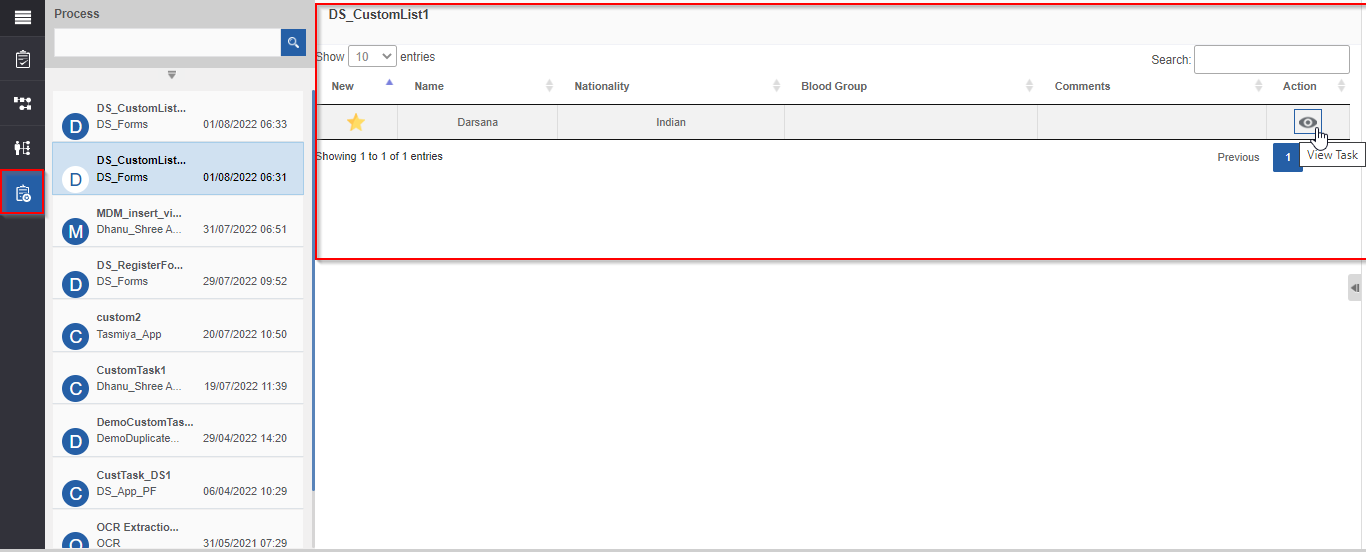
Custom Task page with custom task grid.
Adding Custom Task List Widget
You can view the custom task list on a page on the Platform by configuring the custom task list widget (or custom portlet).
-
Go to Main Menu > Management > Application Management > Custom Task and create a custom task as per your requirement.
-
Create a page on the Platform.
(On the title bar, click Administration icon, and then in the left side menu click Public Pages > “+” (Add Page) > Widget Page (Basic Templates) > Enter name of the page in Add Page > Add).
Refer to the Page Configurations for more details.
-
Navigate to the created page in the Platform (click the page name that appears in the Main Menu).
-
On the title bar, click the Administration icon (
 )
and then click the “+” icon. Add Widgets and Contents section
appears on the right side.
)
and then click the “+” icon. Add Widgets and Contents section
appears on the right side. -
In the Add Widgets and Contents panel, click the Widgets tab and then navigate to PLATFORM > Custom Task List.
-
Click the “+” icon on the right side of the Custom Task List. The custom task list gets added to the page. The custom task list widget will get added to the page with a Click Here button. Now you can configure the custom task of your choice to this.
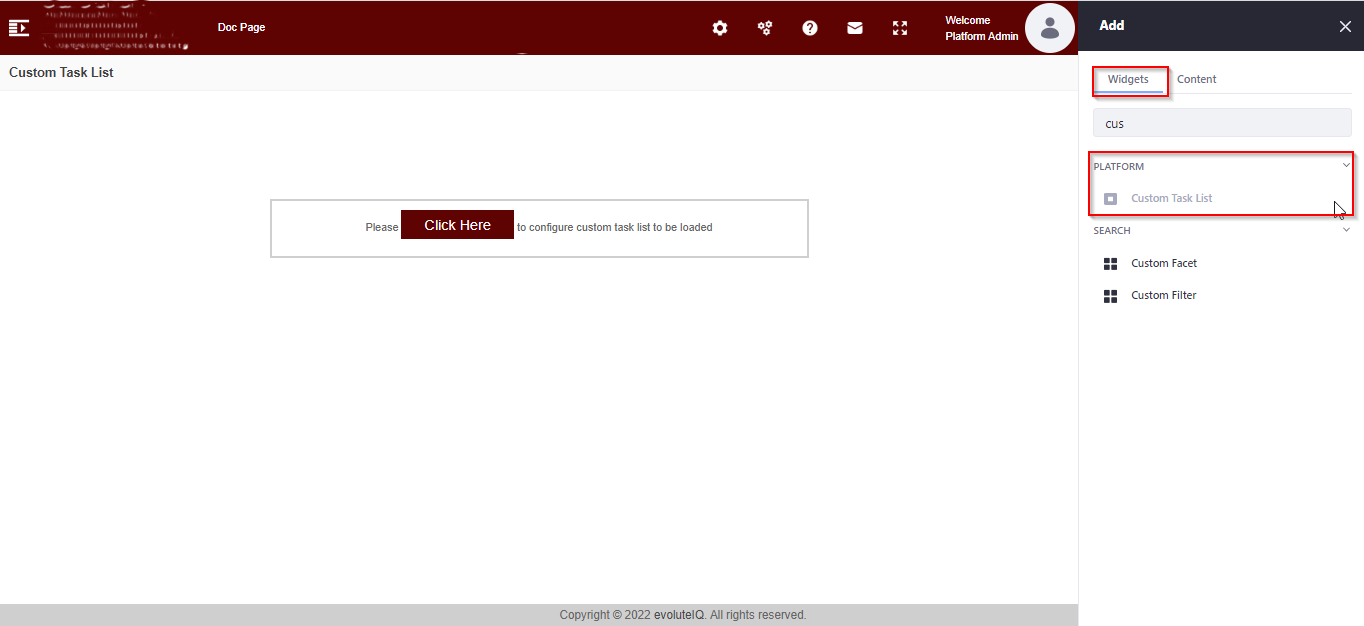
Custom Task list widget added to the portlet page. -
Click “Click Here”. Custom Task List Configuration pop-up appears.
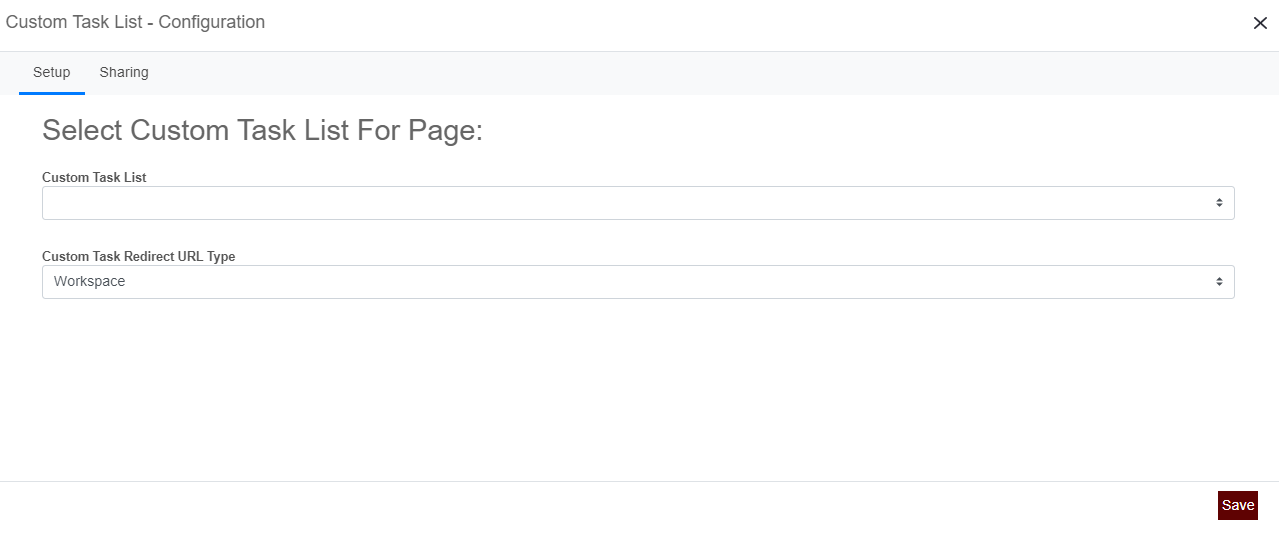
Custom Task List Configuration. -
Click Setup tab. Setup tab will be active by default.
- Click Custom Task List drop-down and select the custom task created in the Application Management section.
-
Click the Custom Task Redirect URL Type drop-down and select where to redirect when the user tries to view the task in detail.
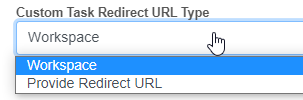 .
.- Workspace: If Workspace is selected, on click of the view icon (eye icon) in the custom task list, you will be redirected to the task on the Workspace page.
- Provide Redirect URL: If you select “Provide Redirect URL”, the Task URL box appears.
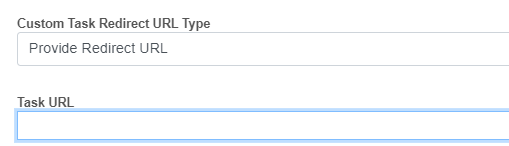 .
.- Enter the Task URL in the box.
For getting the Task URL, it is mandatory to create a Platform page and add a Runtime Form widget or portlet to that page. After creating the page and adding the runtime form widget, add that page name in the above Task URL box.
Refer to Managing Forms2.0 documentation, section “Creating Page and Adding Runtime Form Widget”.
-
Click Save. Success message appears on successful configuration.
After configuring the Task URL, if you click the view icon (eye icon) in the custom task list, you will be redirected to the form associated with that task (which is now loaded in the page where the runtime form widget is added).
Viewing and Editing the Custom Task List Widget Configuration
You can view and edit the custom task list configuration details.
- Navigate to the page in the Platform in which the custom task list widget is added. The custom task list appears as applicable.
-
In the title bar, click the Control Panel icon and then hover over the widget on the page. Three dots appear on the right side of the page with configuration options.
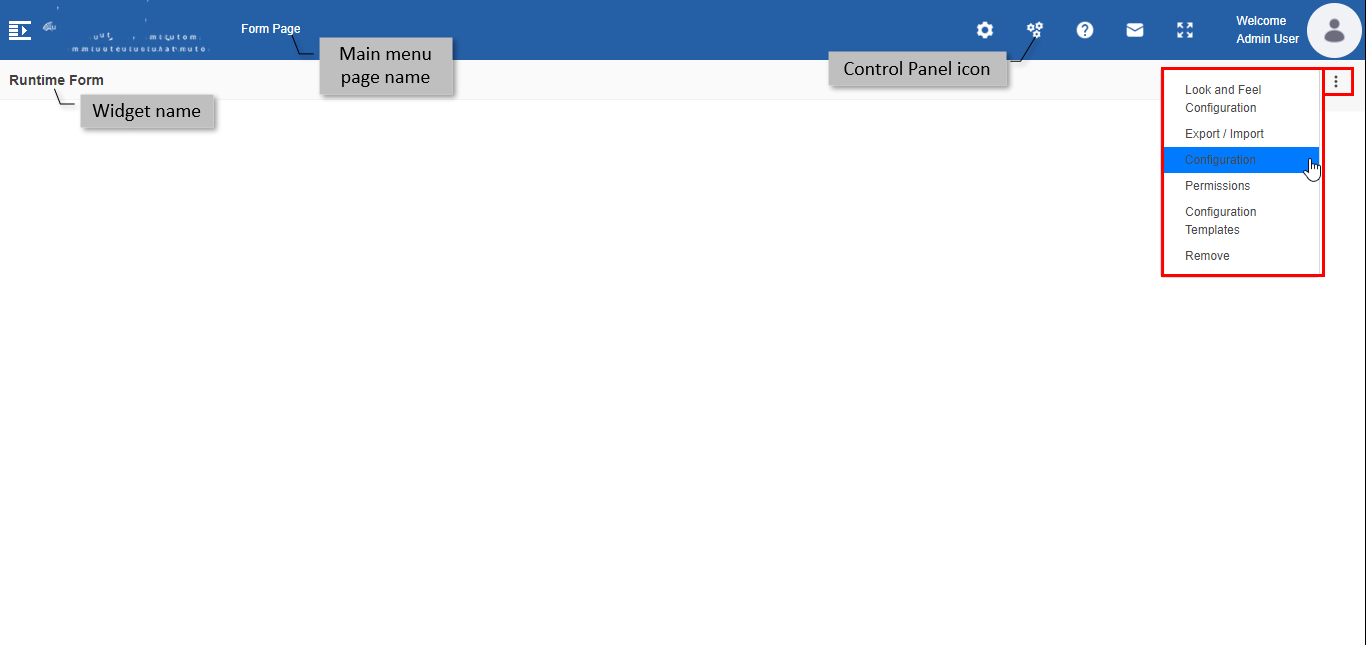 .
. -
Click the three dots and then click Configuration. Custom Task List
Configuration pop-up appears. - Edit the configuration details as per your need.
- Click Save.
Custom Task List - Runtime Scenarios
Before initiation of a process, the Custom Task name can be viewed in the Workspace > Custom Task or the Runtime Form Custom Task List, however, the page will be blank until the process gets initiated.
Different scenarios of custom task list during the runtime are discussed below.
Case 1: Consider that the process has only one task and the process initiates through the execution of the first task.
The participant associated with the first task will get the process for initiation in Workspace > My Process. The process initiation in this case is achieved by submitting the form associated with the task. The participant initiates the process and the first task is executed and completed (form submitted) as part of the initiation. In this case, the custom task list associated with the process cannot be viewed as the process gets over after the initiation.
Case 2: Consider that the process has only one task and the process initiates externally.
The process can be configured to initiate externally - it can be through an email trigger or Start activity SLA trigger or using an API or Subprocess activity. When the initiation is through an external trigger (not through the Form UI), the first task becomes active for the participants associated with that task. This task form can be viewed in Workspace > My Tasks for the associated participants. Now in the Workspace > Custom Task, the custom task list will appear for the participants associated with that custom task. Participants of the custom task can view all the tasks associated with that process in the custom task list grid.
Case 3: Consider that the process has multiple tasks.
If the process is initiated externally, the participant can view all the task forms in the custom task list. Each task appears after the execution of the current task as per the assignment. If there are parallel tasks assigned to the same participant, then both tasks will get listed in the custom task list grid.
If the process is initiated through the first task form UI, the participant can view all the tasks one after another during the flow execution except the first task (Case 1).
Case 4: Multiple instances for same deployed process version.
If multiple instances are running, all the task instances will get displayed in the custom task list for the participants associated with those tasks. You need to configure the variable details properly to identify the instance-wise details while creating the custom task.